
You have seen them in offices, classrooms, and basements. Drab, gray metal file cabinets that blend into the background and make any room feel dull. But what if you could turn that eyesore into a statement piece? Decorating file cabinets is one of the easiest and most rewarding DIY projects for transforming unused or outdated furniture. Whether it is an old metal filing cabinet from the 1980s or a basic modern unit, a little creativity can breathe new life into it.
From bold paint jobs to functional makeovers like chalkboard surfaces or mini plant stands, there are endless ways to personalize your cabinet. This guide covers everything you need to know. You will learn prep work, paint choices, unique design ideas, and room-specific applications. By the end, you will be ready to turn your file cabinet into a stylish, useful centerpiece.
Prep the Surface Properly
Before any brush touches the cabinet, proper preparation ensures your design lasts. Skipping this step leads to peeling paint and uneven finishes. Take the time to do it right.
Remove Drawers and Clean Thoroughly
Start by taking out all drawers and emptying the contents. Wipe down every surface with a damp cloth to remove dust and grime. For metal cabinets, use a degreaser to cut through built-up oils and fingerprints. This step is critical for paint adhesion. Let the cabinet dry completely before moving forward.
Sand for Better Adhesion
Use medium-grit sandpaper around 120 to 150 grit to lightly scuff the surface. This creates texture so paint or sealant can grip better. Focus on glossy areas, especially on older cabinets. After sanding, wipe away dust with a tack cloth or dry rag. If rust is present on metal units, remove it with steel wool or a wire brush before priming.
Choose the Right Paint Type

Not all paints work the same on file cabinets. The material matters, and using the wrong kind leads to chipping and poor coverage. Match your paint to your cabinet.
Use Chalk Paint for Matte Elegance
Chalk paint is ideal for wooden or laminated cabinets. It adheres well without heavy sanding and dries to a velvety matte finish. Available in a wide range of colors, it is perfect for farmhouse or vintage styles. Apply two thin coats, letting each dry fully. Lightly sand between coats for a smooth result.
Opt for Metal-Specific Paint
For metal cabinets, choose spray paint or acrylic formulated for metal. Brands like Rust-Oleum or Krylon offer durable, rust-resistant options. Spray paint delivers even coverage with minimal brush marks. Apply in thin, even layers outdoors or in a ventilated area. Allow proper drying time, usually 15 to 30 minutes between coats.
Apply a Protective Finish
Even the best paint job fails without protection. Sealing extends durability and guards against scratches and moisture. Do not skip this essential step.
Seal with Clear Wax or Top Coat
For chalk-painted cabinets, apply clear wax with a soft cloth. Work in small sections, then buff after 10 to 15 minutes for a smooth finish. This adds subtle sheen and protects high-touch areas like drawer fronts.
For metal or decoupage projects, use a clear sealant in matte or glossy. Apply 2 to 3 thin coats with a foam brush, letting each dry completely. A glossy top coat adds shine and makes cleaning easier.
Paint with a Bold Color
A single vibrant hue can transform a dull cabinet into a focal point. Bold colors make a statement and energize any room.
Pick Eye-Catching Shades
Choose colors that energize the space. Cobalt blue, mustard yellow, or forest green make strong visual impacts. Black or deep navy adds sophistication, while white or pastels brighten small rooms. Match the color to your room’s theme. Gold hardware with black paint creates glam, while sage green with wood accents gives a boho feel.
Paint the Entire Cabinet or Just Accents
For a dramatic change, paint the whole unit. For subtle style, paint only drawer fronts or edges. Use painter’s tape to create clean lines. Try ombré effects by blending two shades vertically, or two-tone designs with contrasting top and bottom sections.
Add Stenciled or Retro Designs
Patterns bring personality and vintage flair to plain surfaces. They turn a generic cabinet into a conversation piece.
Use Stencils for Precision
Buy pre-cut stencils with geometric, floral, or 1950s motifs. Secure them with tape to prevent shifting. Use a stencil brush or small sponge to dab paint. Do not brush, or paint will bleed under the edges. Lift the stencil carefully and let dry before repositioning.
Create a Vintage Look
Pair retro patterns with antique brass or ceramic knobs. Add aged touches with light distressing. Sand edges after painting to reveal the base layer. Use sepia-toned paper cutouts or old sheet music in decoupage for nostalgic charm.
Apply Decoupage for Personal Flair
Turn your cabinet into a storytelling piece with paper, fabric, or photos. This technique adds texture and personal meaning.
Use Napkins or Book Pages
Cut designs from decorative napkins, using only the top layer. Or tear pages from old books. Apply decoupage glue to the cabinet surface, place the material, then seal with more glue on top. Smooth out air bubbles with a credit card.
Layer for Texture
Combine elements like fabric scraps, maps, or postcards for depth. Let each layer dry before adding the next. Finish with 2 to 3 coats of clear sealant. This technique works well on drawer fronts for a custom look.
Install Chalkboard or Magnetic Paint
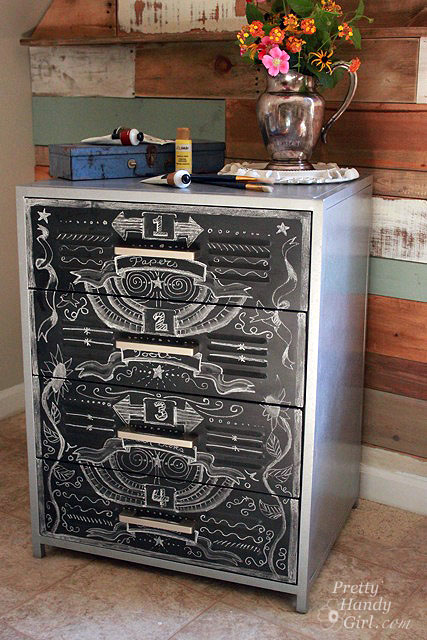
Turn your cabinet into a functional workspace. These paints add utility while looking great.
Paint Front or Sides for Notes
Apply chalkboard paint in 2 to 3 coats to the cabinet front or drawer panels. Let cure for 24 to 48 hours, then season by rubbing a chalk side across the surface. Ideal for kitchens for grocery lists, kids’ rooms for doodling, or home offices for to-do lists.
Use Magnetic Paint for Display
Magnetic paint contains iron particles and works under regular paint. Apply 2 to 3 coats, let dry, then top with your chosen color. Once dry, magnets will stick. Perfect for holding notes, photos, or tools. Great for craft rooms or command centers.
Build a Mini Gallery Wall
Display memories right on your furniture. This turns storage into a personal showcase.
Attach Frames or Clips
Glue small picture frames to drawer fronts or sides. Use adhesive-backed hooks for lightweight frames. Alternatively, install magnetic strips or decorative clips to hold photos, postcards, or artwork. Swap them out seasonally for fresh looks.
Curate a Themed Display
Create a travel theme with maps and postcards, or a family gallery with black-and-white photos. Keep spacing consistent for a clean appearance. Use washi tape or mini clothespins for a removable, damage-free option.
Convert to a Plant Stand

Bring nature indoors with a green twist. This transformation adds life and color to any room.
Style Drawers with Potted Plants
Paint the cabinet in soft pastels or earthy tones like terracotta or sage. Place small potted succulents, cacti, or herbs in the drawers. Use drawer organizers to keep pots from sliding. Add pebbles or moss for a natural touch.
Waterproof for Longevity
Line drawers with plastic trays or adhesive vinyl to prevent water damage. Use self-watering pots or place saucers under plants. Avoid overwatering and check soil weekly.
Transform Into a Bar Cabinet

Add glam to your living room or dining area. This functional makeover impresses guests.
Paint in Luxe Colors
Choose black, deep red, or gold for a cocktail lounge vibe. Use high-gloss paint or add mirrored panels to drawer fronts for sparkle. Attach decorative trim or molding for an upscale look.
Stock with Bar Essentials
Store wine bottles, glasses, cocktail shakers, and coasters inside. Use dividers to separate categories. Add LED strip lighting inside for ambiance. Label drawers for glassware, mixers, and tools.
Add Textured Fabrics or Felt
Tactile elements elevate visual interest. They add warmth and dimension to flat surfaces.
Line Fronts with Burlap or Lace
Cut fabric to fit drawer fronts. Use fabric glue or spray adhesive to attach. Overlap edges neatly and trim excess. Combine with stenciling. Paint first, then add lace for a layered effect.
Use Felt for a Soft Touch
Felt adds cushion and sound dampening. Great for kids’ rooms or craft cabinets. Choose bold colors or patterns for fun. Secure with strong adhesive and seal edges with clear glue to prevent fraying.
Design a Theme-Based Cabinet
Match your decor with a cohesive concept. Themed designs tie the whole room together.
Go Boho or Farmhouse
For boho, use warm earth tones, macramé accents, and mixed patterns. Add tassels to drawer pulls. For farmhouse, opt for distressed white paint, rustic knobs, and stenciled labels like Files or Bills.
Try Art Deco or Tropical
For Art Deco, use black and gold with geometric stencils. Add mirrored details. For tropical, paint in coral or turquoise. Decorate with seashells, palm prints, or rope handles.
Upgrade Hardware for Instant Impact
New knobs or handles change the entire look. This is fast and cheap.
Swap Out Old Pulls
Remove existing hardware with a screwdriver. Fill old holes with wood filler if switching styles. Choose vintage brass, ceramic, or leather pulls for character. For a modern look, try sleek black or chrome bars.
DIY Custom Handles
Wrap existing pulls with twine, ribbon, or washi tape. Glue on beads, buttons, or small charms. Use adhesive hooks for a no-drill option.
Enhance Functionality with Add-Ons
Make your cabinet more than just pretty. Add features that improve daily use.
Add Shelves or Dividers
Install small wooden shelves inside deep drawers to stack files or supplies. Use adjustable dividers for makeup, craft tools, or office gear. Cut to size with a handsaw or buy pre-made organizers.
Attach Baskets or Trays
Glue or screw a small wicker basket to the front for keys or mail. Use a magnetic tray for paper clips or scissors. Great for entryways or home offices.
Style by Room and Use
Tailor your design to where the cabinet lives. Each room has unique needs and aesthetics.
Home Office: Stay Organized
Use chalkboard paint for to-do lists. Add magnetic sides for holding documents. Label drawers clearly. Choose calm colors like gray or navy for focus.
Craft Room: Inspire Creativity
Go bold with bright paint or decoupage using scrapbook paper. Add small shelves for supplies. Use colorful knobs for fun.
Kitchen: Mix Beauty and Utility
Turn into a herb station with potted plants. Use magnetic paint to hold recipes. Paint in warm tones like mustard or olive green.
Kid’s Room: Make It Fun
Use chalkboard fronts for drawing. Choose washable paint. Add themed stickers or decals featuring dinosaurs, unicorns, or space.
Entryway: Create a Command Center
Combine magnetic paint, a basket for mail, and a photo gallery. Use durable finishes for high traffic.
Maintain and Protect Your Design
Keep your cabinet looking fresh with simple care. Regular maintenance extends the life of your work.
Clean Without Damaging
Dust regularly with a microfiber cloth. For spills, wipe gently with a damp cloth, not wet. Avoid harsh chemicals that can strip sealant.
Touch Up as Needed
Keep leftover paint for quick fixes. Sand and repaint chipped areas. Reapply sealant every 6 to 12 months in high-use areas.
Frequently Asked Questions About Decorating File Cabinets
What kind of paint should I use on a metal file cabinet?
Use spray paint or high-quality acrylic paint specifically designed for metal surfaces. These provide better adhesion and rust resistance. Sand lightly before painting and seal with a clear top coat for durability.
Do I need to sand my file cabinet before painting?
Yes, sanding is essential. It creates texture so paint can grip the surface. Use medium-grit sandpaper around 120 to 150 grit. For metal cabinets, also clean with a degreaser and remove any rust first.
How long does a file cabinet makeover take?
A simple paint job takes 2 to 3 days including drying time. Quick projects like chalkboard paint or handle replacement take about 1 day. Complex projects like full decoupage or theme redesigns may take a week or more.
Can I use chalk paint on a metal file cabinet?
Chalk paint works best on wooden or laminated surfaces. For metal, use spray paint or acrylic formulated for metal. These adhere better and resist chipping on slick metal surfaces.
How do I protect my decorated file cabinet from scratches?
Apply a clear sealant or top coat after painting. For chalk paint, use clear wax and buff for a smooth finish. For metal, use a clear matte or glossy top coat. Reapply sealant every 6 to 12 months in high-use areas.
What are the easiest ways to decorate a file cabinet?
The easiest options are painting, adding new hardware, or applying chalkboard paint. These require minimal supplies and time. Stenciling and decoupage are moderate difficulty. All transform the look significantly.
Key Takeaways for Decorating File Cabinets
Decorating file cabinets is a low-cost, high-impact way to upgrade any space. With proper prep, the right materials, and a dash of creativity, you can turn a boring office relic into a personalized, functional masterpiece. The key is preparation. Clean, sand, and prime properly for lasting results.
Choose techniques that match your skill level and needs. Start with simple painting or hardware swaps. Work up to decoupage or theme designs as you gain confidence. Remember to seal everything for durability. Your cabinet will look great and withstand daily use.
Whether you paint it, stencil it, or turn it into a plant stand, the only limit is your imagination. Start small by swapping the knobs or trying a single drawer. Build from there. Your dream cabinet is just a few steps away.
