
Your current kitchen likely suffers from flimsy particleboard boxes that sag or fail to fit your unique space perfectly. Learning how to build custom kitchen cabinets solves these issues by letting you create durable, perfectly fitted storage using solid hardwood frames and premium plywood.
This guide details every step from digital planning and precise cutting to final installation and finishing. You will discover how to select the right materials, utilize specific jigs for accuracy, and assemble professional-grade units that save thousands compared to store-bought options.
Choose Between Face Frame and Frameless Designs
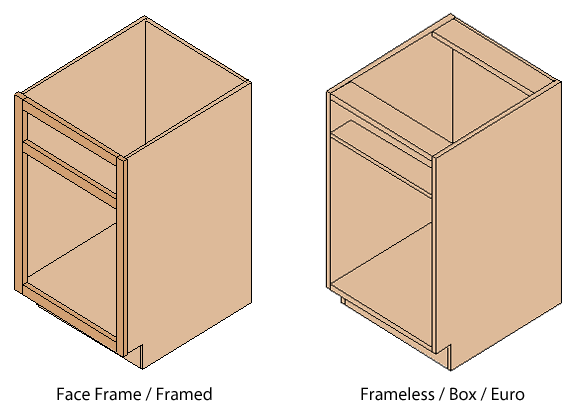
Your first major decision involves selecting a construction style that dictates your material list and joinery methods. This choice impacts the final look and the complexity of your build process.
Why Select Frameless Euro-Style Construction?
Frameless cabinets rely on thick plywood boxes without a front frame for structural integrity. They offer full interior access and suit modern aesthetics while speeding up the build time significantly. Strength comes from rigid box construction and precise joinery rather than an external frame.
When to Use Traditional Face Frames?
Face frame cabinets feature a hardwood frame attached to the front of the box. This traditional style adds durability and visual warmth while hiding edge banding. It also provides extra screw grip for mounting doors and hinges securely.
Can You Combine Both Styles?
You can build frameless boxes and add face frames later for a hybrid look. This approach allows flexibility if you want the speed of Euro construction with the traditional appearance of a framed unit.
Determine Precise Cabinet Dimensions and Layout
Accurate measurements ensure your cabinets fit your space and work ergonomically with your appliances. Standardizing sizes helps with material optimization and future repairs.
What Are Standard Base Cabinet Sizes?
Base cabinets typically stand 34.5 inches high without the countertop. Adding a standard 1.5-inch countertop achieves the industry-standard 36-inch working height. The depth is usually 24 inches including the toe kick area.
How High Should Upper Cabinets Be?
Upper cabinet depth is standard at 12 inches but can extend to 18 inches for deep storage. Height varies by ceiling: 30 inches for low ceilings, 36 inches for standard 8-foot ceilings, and 42 inches for high ceilings.
How Do You Handle Wall Irregularities?
Use 2-inch filler strips on end cabinets to scribe and seal gaps against uneven walls. Avoid complex 45-degree corner cabinets unless using CNC-cut parts, as square boxes with fillers are faster and more accurate.
Select Materials and Optimize Cutting Plans
Material choice directly affects durability, appearance, and resistance to kitchen moisture. Smart cutting strategies reduce waste and lower your overall project cost.
Which Plywood Grades Work Best?
Use ¾-inch hardwood or Baltic birch plywood for carcass panels like sides and shelves. Note that actual thickness is often 0.710 inches rather than 0.75 inches, so adjust dado depths accordingly. Use ¼-inch plywood for back panels to allow slight movement with humidity changes.
How Do You Protect Against Moisture?
Seal cabinet bottoms under sinks and near dishwashers with polyurethane to prevent water damage. Use moisture-resistant plywood in high-humidity zones and ensure range hoods vent outdoors to reduce long-term steam exposure.
What Strategies Minimize Material Waste?
Undersize initial cuts to 23.75 inches deep for base cabinets to allow trimming factory edges. Rip factory edges off using a table saw to remove damaged sections before cutting final dimensions. Use offcuts for stretchers and toe kicks to save up to 50 percent of a sheet.
Gather Essential Tools and Precision Jigs
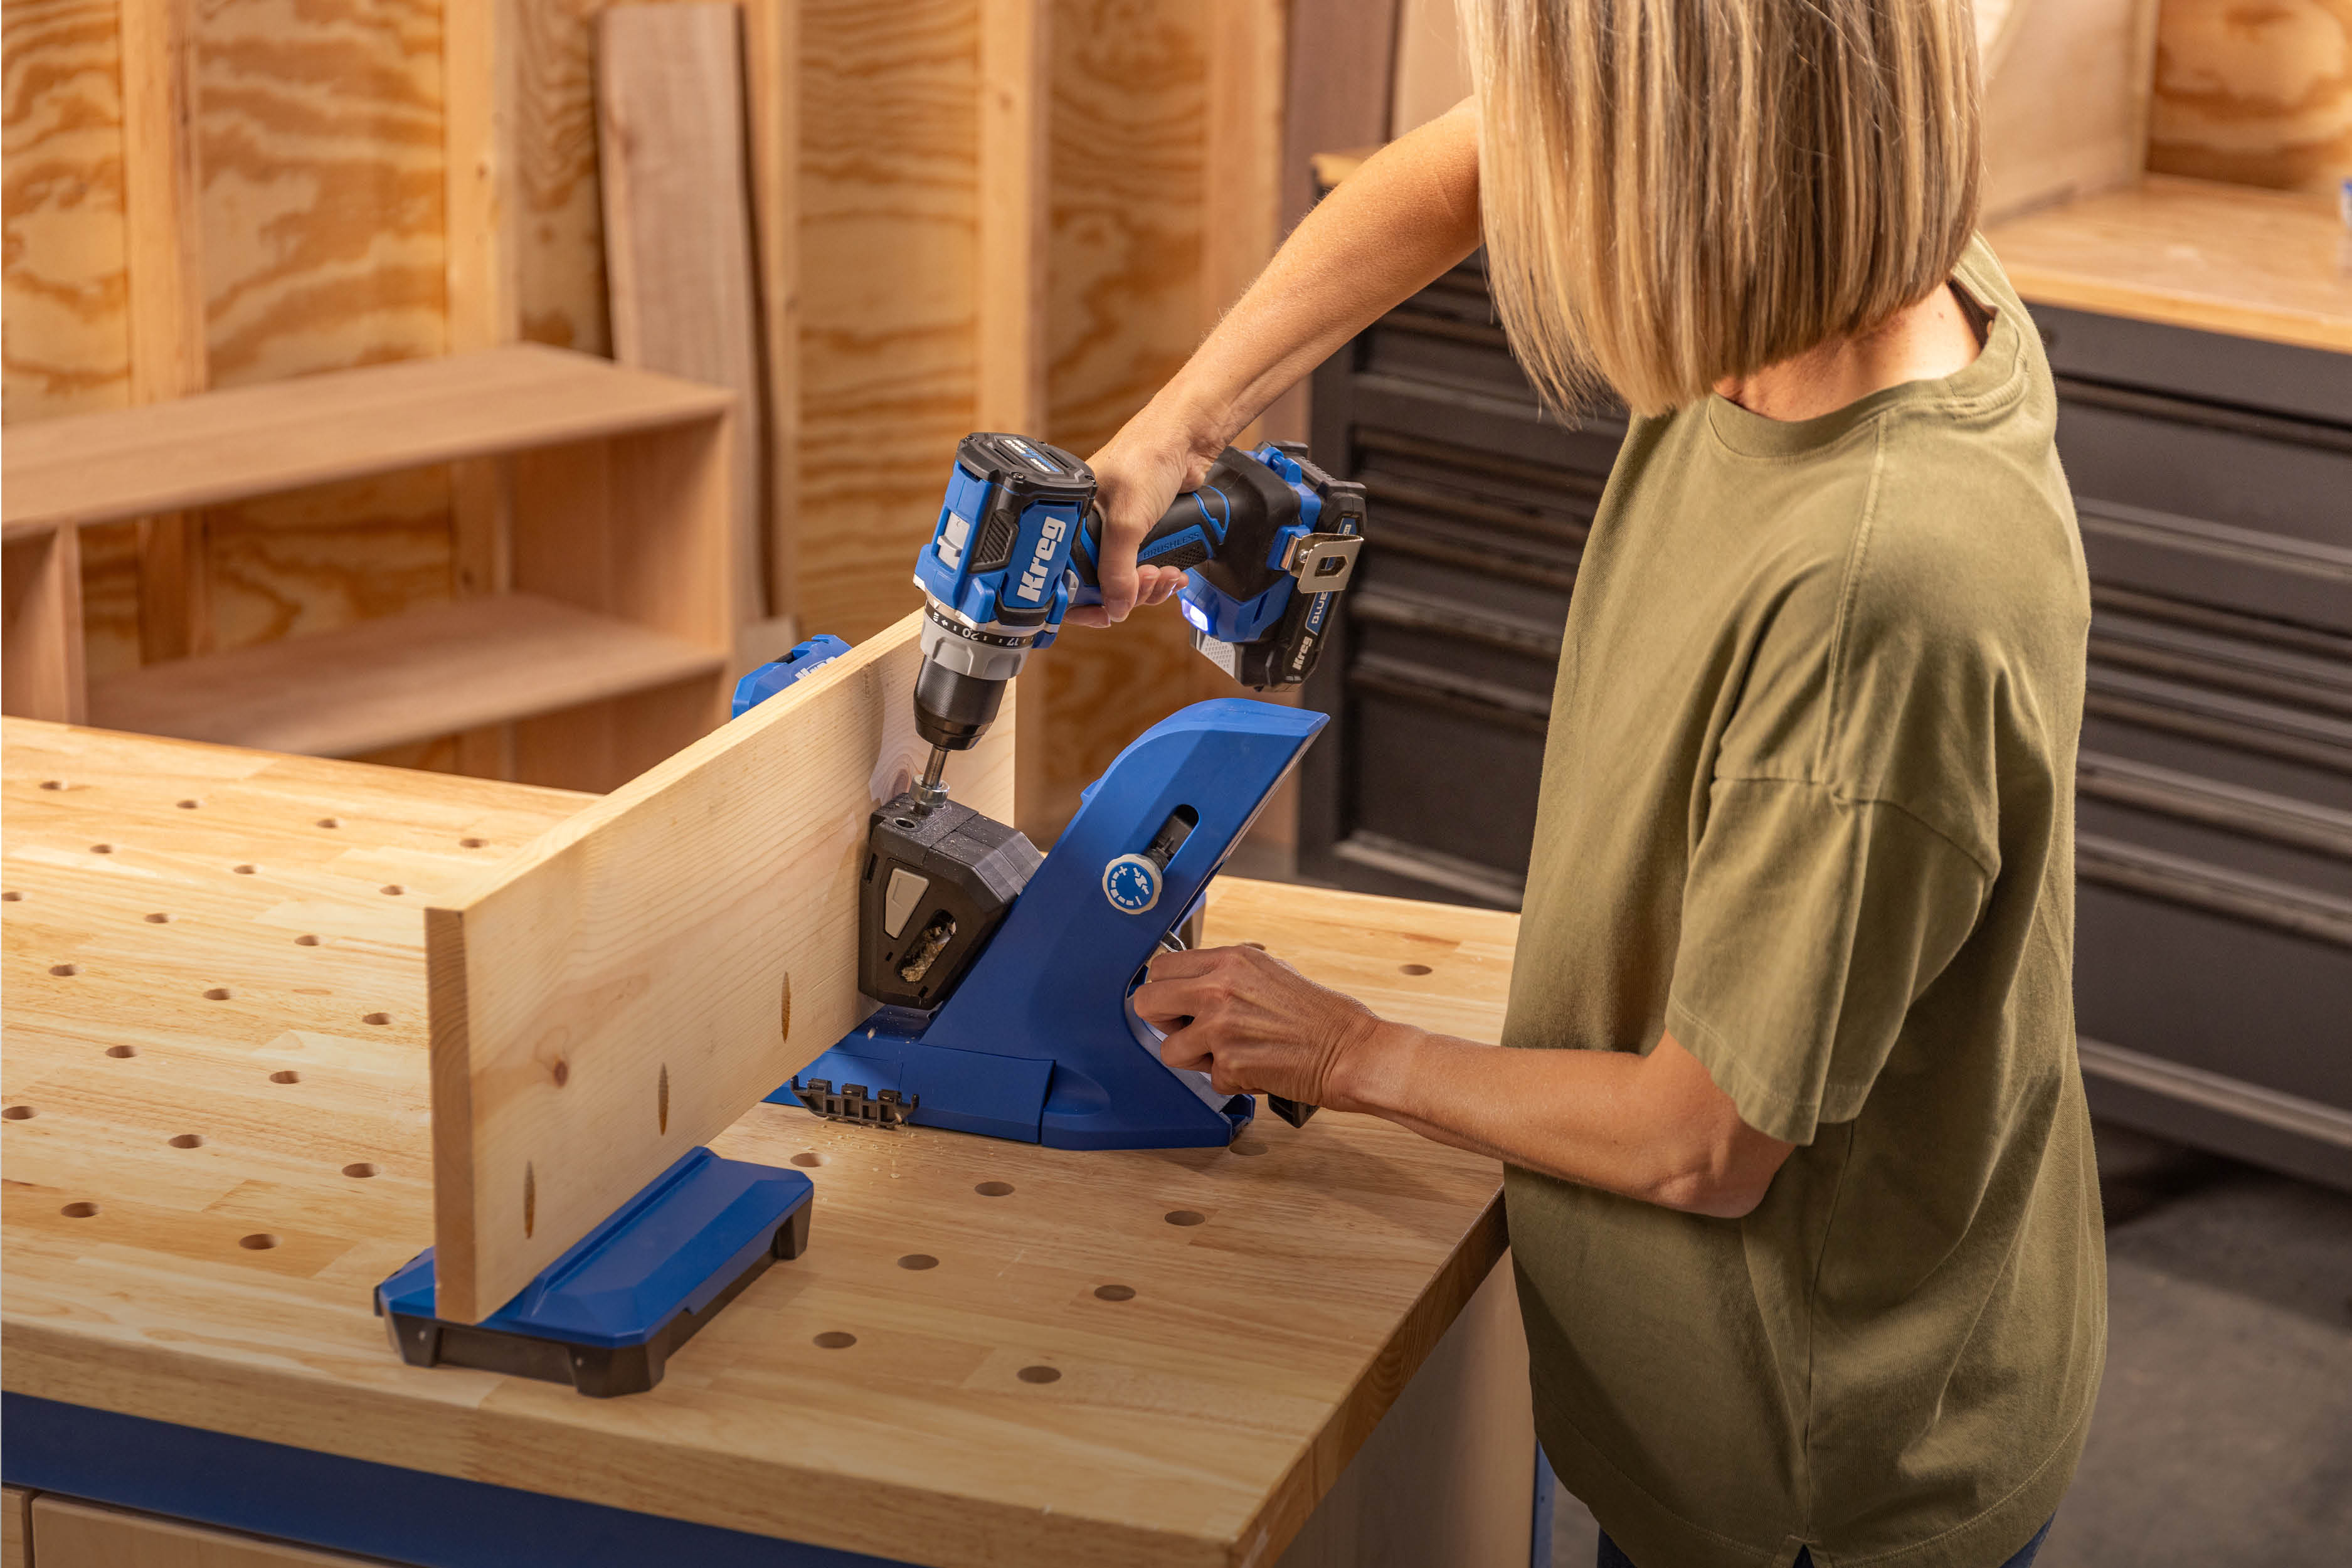
Efficient sheet goods handling starts with accurate, clean cuts using the right equipment. Specialized jigs ensure consistency across multiple units and hardware installations.
Which Cutting Tools Are Mandatory?
Use a track saw or circular saw with a straight edge to break down 4×8-foot sheets safely. A table saw with a Freud dado stack is essential for ripping, dadoing, and precision joinery. Band saws or jigsaws work well for cutting toe kick notches.
What Joinery Tools Ensure Strength?
A Kreg Pocket Hole Jig is ideal for face frames and carcass assembly because it creates strong, hidden joints. Routers with specialty bits cut dados, grooves, and hinge cups efficiently. Brad nailers and narrow crown staplers hold parts temporarily or permanently.
How Do Jigs Improve Accuracy?
Shelf pin jigs drill perfectly aligned holes for adjustable shelves. True Position jigs ensure drawer pulls are centered and uniform. Euro hinge jigs guide drill bits for precise cup depth and placement every time.
Cut Panels with Precision and Care
Factory-cut edges are often rough or out of square, requiring removal before final dimensioning. Removing these edges ensures your panels fit together perfectly during assembly.
How Do You Remove Factory Edges?
Cut side panels 0.5 inches shorter than final height initially. Rip both sides on a table saw to remove factory edges and achieve exact width. Crosscut to final height only after edges are clean and square.
Where Should Dados and Grooves Go?
Cut a ¾-inch wide by ½-inch deep dado along inner edges of side panels for the cabinet bottom. Cut a ¼-inch wide groove along back edges of sides, top, and bottom to hold the back panel while allowing wood movement.
Why Notch for Toe Kick Clearance?
Mark a 4×4 inch square in bottom corners of side panels to allow the cabinet to sit flush on flooring. Use a jigsaw with a square guide or band saw with a depth stop to cut out the notch cleanly.
Assemble Cabinet Carcass Structures
Strong, invisible joints are key to professional results when building your cabinet boxes. Follow a logical sequence to ensure squareness and alignment throughout the process.
How Do You Build a Face Frame?
Cut stiles and rails from hard maple or poplar and join them with pocket screws. Clamp tightly using spacers for even joints, then sand from 120 to 180 grit. Attach to the carcass with glue and clamps, adding brad nails only if painting.
What Is the Frameless Assembly Process?
Join sides to top and bottom using dados and SPAX screws every 6 to 8 inches. Install back nailers at top and bottom rear edges to provide a surface for the back panel. Reinforce stretchers with two screws at each end for rigidity.
Can You Build Without Glue?
The no-glue method works well for rental or painted cabinets where speed matters. Once secured to the wall and connected to adjacent units, load transfers through the structure without needing glued joints. Use narrow crown staples and self-drilling screws for this approach.
Construct Drawers and Install Slides
Drawer boxes require durable materials and precise joinery to withstand daily use. Full-extension slides with soft-close features add a premium feel to your custom build.
How Do You Build Strong Drawer Boxes?
Use 5/8-inch Baltic birch for durability and cut a ¼-inch dado on the inside bottom edge of all sides. Cut the back piece slightly above the dado line so the bottom panel slides in from the rear after assembly.
What Is the Best Way to Install Slides?
Use an installation jig with a 5mm bit and stop collar to prevent drilling through cabinet sides. Position the slide front-aligned with the cabinet front using ¼-inch plywood spacers for clearance. Attach the larger half to the cabinet and smaller half to the drawer side.
How Do You Mount Drawer Fronts Perfectly?
Place the drawer in the cabinet and add a 1/8-inch spacer strip on top of the drawer box. Hold the drawer front against spacers and temporarily screw through future pull holes. Open the drawer, drill from the back into the box, and install permanent screws.
Build and Hang Shaker-Style Doors
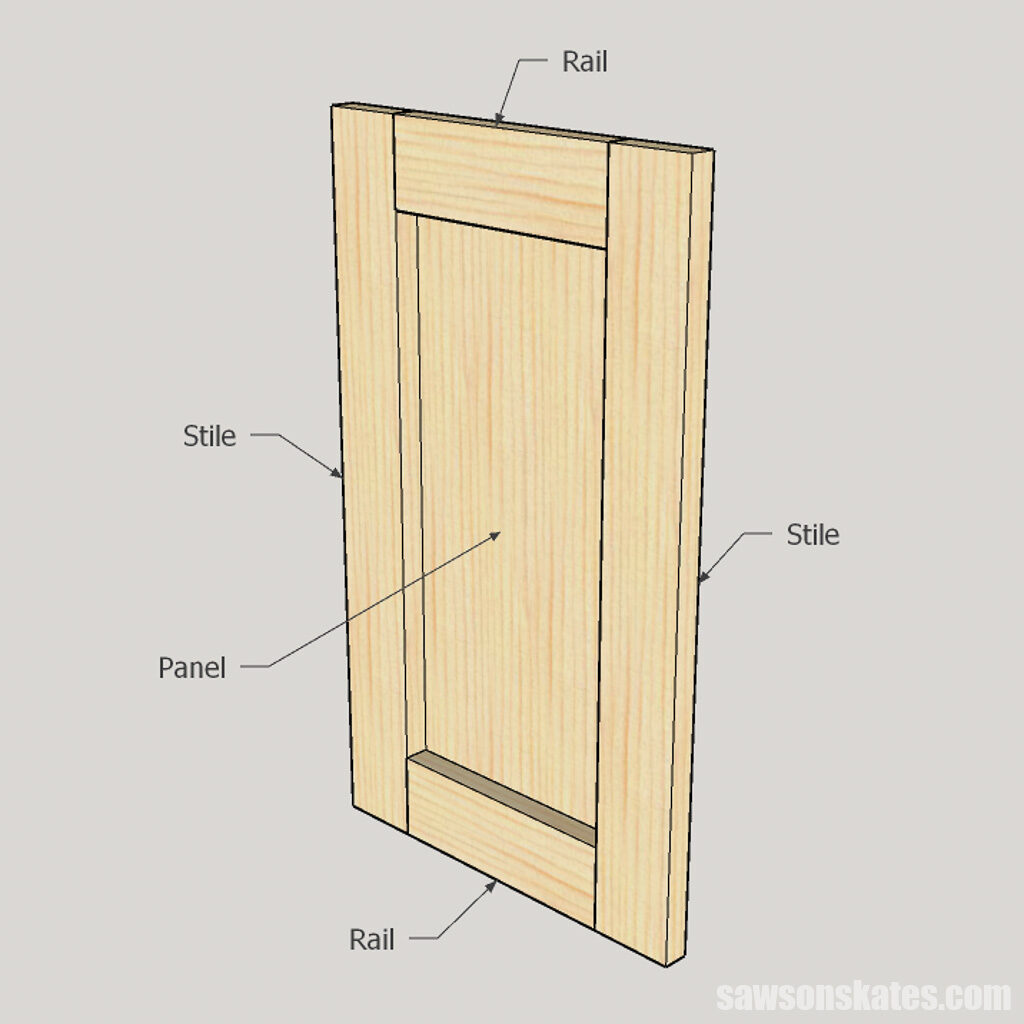
Shaker doors offer a timeless look that works in almost any kitchen style. Proper joinery and hinge installation ensure they function smoothly for years.
How Do You Cut Frame Components?
Cut frame rails and stiles from 2-inch wide hard maple. Use a router to cut a ¼-inch groove on the inner edge of all frame pieces. Cut tenons on rail ends using a dado stack or tongue-and-groove bit.
What Is the Assembly Sequence for Doors?
Apply glue to tenons and grooves, then insert the panel. Glue plywood panels in place but leave solid wood panels unglued to allow floating. Tap the final stile into place, clamp, and wipe away squeeze-out immediately.
How Do You Hang Doors with Euro Hinges?
Drill 35mm cup holes 4 inches from top and bottom using a hinge boring jig. Install mounting plates on the cabinet interior and attach hinges to the door. Rest the door on a ¼-inch spacer taped to the face frame for perfect vertical alignment.
Install Cabinets and Apply Finishes
Proper installation ensures your cabinets are level, secure, and ready for daily use. Final finishing touches protect the wood and enhance the overall appearance.
What Is the Best Installation Order?
Install upper cabinets first using a temporary ledger board for support. Secure base cabinets next using adjustable feet and shims for leveling. Connect all units by clamping edges and driving pocket screws through side panels.
How Do You Finish the Surfaces?
Sand sequentially from 120 to 220 grit and break all edges by hand. Apply high-quality primer followed by two coats of cabinet enamel using a sprayer for even coverage. Fill any holes with wood filler before the final coat.
What Maintenance Extends Cabinet Life?
Clean gently with soft cloths and mild soap, avoiding abrasive cleaners. Check hinge and slide screws annually to tighten any loose hardware. Control moisture with proper ventilation to prevent wood swelling or finish peeling.
Frequently Asked Questions About Building Custom Kitchen Cabinets
How much money can I save building my own cabinets?
Building custom kitchen cabinets yourself can save over $3,000 compared to commercial units. You avoid shipping costs and taxes while using higher quality materials like ¾-inch plywood instead of particleboard.
Do I need expensive tools to build custom cabinets?
You need a table saw, drill, and pocket hole jig as essentials, but many other tools are optional. Affordable alternatives like the Kreg Accu-Cut Jig can replace expensive track saws for straight cuts.
What is the difference between face frame and frameless cabinets?
Face frame cabinets have a hardwood frame on the front for tradition and durability. Frameless cabinets lack this frame, offering more interior space and a modern look with faster construction.
Can I build cabinets if I have uneven walls?
Yes, by using 2-inch filler strips that you scribe to match wall irregularities. Square boxes with fillers are easier to build and install than trying to angle entire cabinets to match walls.
How do I ensure my cabinet doors align perfectly?
Use a hinge boring jig for consistent cup holes and spacers during installation. Adjust the bottom hinge slightly farther from the edge than the top hinge to create a tilt-forward effect for easier opening.
Key Takeaways for Building Custom Kitchen Cabinets

Building custom kitchen cabinets rewards you with superior fit, durability, and significant cost savings compared to store-bought options. By selecting quality materials like ¾-inch plywood, using precision jigs for hardware, and following proven assembly methods, you create lasting value for your home.
Start your project by planning your layout in SketchUp and gathering essential tools like a table saw and pocket hole jig. Take your time with precise cutting and assembly to ensure professional results that will serve your kitchen for decades.


