

Is your kitchen cabinet door hanging crooked, leaving uneven gaps, or refusing to close smoothly? You’re not alone. Blum kitchen cabinet hinges are built to last, yet even premium hardware requires periodic adjustment to maintain perfect alignment. This guide focuses on how to adjust Blum kitchen cabinet hinges, specifically the popular Blum Compact BLUMOTION 38N model, using just the three built-in adjustment screws. You’ll learn to correct vertical, depth, and side-to-side misalignments, plus fine-tune the soft-close action for a flawless finish. No special tools required, no guesswork involved, just clear steps that deliver professional results.
Identify the Three Adjustment Screws on Your Blum Hinge

Every Blum Compact BLUMOTION hinge features three dedicated adjustment screws that independently control door positioning. Knowing their locations and functions is essential before making any changes.
Front Screw for Side-to-Side Alignment
The front screw sits at the forward end of the hinge arm, closest to the cabinet door. This screw controls horizontal positioning, shifting the door left or right relative to the cabinet frame. Turn it to even out gaps between adjacent doors or align the door with the cabinet edge.
Visual cue: If one side of the door has a wider gap than the other, this screw needs attention.
Back Screw for Depth Adjustment
Located at the rear of the hinge mechanism near the cabinet interior, this screw determines how deeply the door sits compared to the cabinet face. Turning it pulls the door flush, recesses it slightly, or allows it to protrude forward, depending on your design preference.
Pro tip: Always check depth alignment before fine-tuning side gaps. A door sitting too far in or out will throw off all other adjustments.
Vertical Screw on the Mounting Plate
This screw sits on the mounting plate attached to the cabinet carcass. It raises or lowers the entire door, making it critical for correcting sagging doors or matching heights across multiple cabinet doors.
Warning: Adjust both hinges equally when working on double-hinged doors to maintain proper balance.
Follow the Correct Adjustment Sequence
For optimal results, follow this proven order: vertical first, then depth, then side-to-side. Skipping steps or adjusting randomly leads to frustration and inconsistent gaps.
Fix Sagging or Misaligned Doors First
Start with the vertical screw on the mounting plate to ensure the door is level from top to bottom.
- Open the cabinet door fully.
- Locate the vertical adjustment screw on the hinge’s mounting plate inside the cabinet.
- Use a 4mm hex key (standard for Blum hinges) to turn the screw:
– Turn clockwise to raise the door.
– Turn counterclockwise to lower it. - Make small adjustments, about a quarter turn at a time, and test the alignment.
Expert note: For double-hinge doors, adjust both screws evenly. Uneven adjustment can bind the door or damage the hinge mechanism.
Set the Door Depth Correctly
Once the door is level, adjust how far it sits in front of the cabinet box.
- Locate the back screw on the hinge arm.
- With the door open, insert the 4mm hex key into the screw head.
- Turn:
– Clockwise to pull the door inward toward the cabinet body.
– Counterclockwise to push the door outward toward you. - Aim for a flush or slightly recessed position unless your design requires an overlay look.
Check this: Close the door and view it from the front. It should sit evenly with adjacent doors or frame edges.
Align Gaps Side-to-Side
Now fine-tune the horizontal position using the front screw.
- Find the front screw at the tip of the hinge arm.
- Insert the 4mm hex key and turn:
– Clockwise to move the door toward the hinge side.
– Counterclockwise to move it away from the hinge side. - Adjust until the gap between doors or between the door and frame is uniform.
Pro tip: For paired doors on double cabinets, open both and compare gaps. Adjust each hinge as needed to center the space evenly.
Fine-Tune the Soft-Close Function

Blum’s BLUMOTION technology ensures doors close smoothly without slamming, but sometimes the damping requires adjustment.
Adjust Closing Speed When Necessary
Some models feature a small switch or dial on the hinge arm for closing speed control.
- Locate the speed adjustment switch on the hinge body.
- Use a flat-head screwdriver or your fingertip to move the switch:
– Move toward (+) for slower, heavier damping on heavier doors or quiet kitchens.
– Move toward (–) for faster, lighter damping on lighter doors or if the door won’t latch fully. - Test the door. It should close gently and latch quietly without bouncing back.
Troubleshooting: If the door doesn’t close completely, reduce resistance. If it slams shut, increase damping.
Understand BLUMOTION Integration Options
BLUMOTION comes in two forms:
– Integrated: Built into hinges like CLIP top BLUMOTION or COMPACT BLUMOTION.
– Add-on: Available as a separate component (product code H006) for retrofitting non-soft-close hinges.
Note: Only BLUMOTION-equipped hinges offer speed adjustment. Standard hinges lack this feature entirely.
Handle Special Cases and Accessories
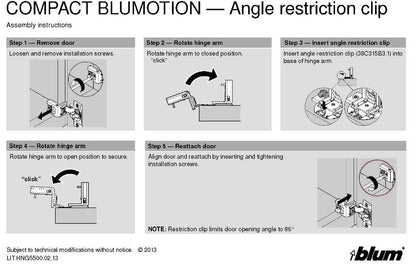
Not all installations are standard. Blum offers accessories for unique situations.
Install an 86-Degree Angle Restriction Clip
Need to limit how far a door swings open? Use the 86-degree angle restriction clip (product code H005).
- Confirm the hinge is compatible. Most Blum Compact and CLIP top models support this clip.
- Snap the clip onto the hinge arm following the instruction sheet.
- Test the opening angle. It should stop at approximately 86 degrees.
Best for: Cabinets near walls, appliances, or high-traffic areas where full swing causes interference.
Replace Older COMPACT Hinges
Upgrading from older Blum COMPACT hinges? The 45mm boring pattern ensures backward compatibility.
- Remove the old hinge from the mounting plate.
- Attach the new COMPACT BLUMOTION hinge to the same plate.
- Reconnect and adjust using the standard three-screw method.
Bonus: QR codes in replacement kits link to video tutorials showing exact installation steps.
Use Blum’s Digital Support Resources
Blum makes DIY adjustment easier with digital tools and documentation.
Access Instructions by Product Code
Each hinge model has a matching instruction sheet labeled with its product code:
| Product Code | Product Name |
|---|---|
| H001 | COMPACT wraparound hinge kit |
| H002 | CLIP top BLUMOTION 110-degree hinge kit |
| H003 | BLUMOTION for doors kit |
| H004 | COMPACT BLUMOTION soft close hinge kit |
| H005 | 86-degree angle restriction clip kit |
| H006 | BLUMOTION soft close add-on for doors kit |
Action step: Match your hinge’s code, found on the packaging or hinge arm, to the correct PDF guide.
Watch Official Assembly Videos
Blum provides assembly videos for:
– H001: COMPACT wraparound hinge installation
– H004: COMPACT BLUMOTION hinge setup
These videos demonstrate real-time adjustments and highlight common pitfalls to avoid.
Download the EASY ASSEMBLY App
Blum’s EASY ASSEMBLY app offers:
– Interactive hinge adjustment guides
– 3D models you can rotate and explore
– Direct links to instruction sheets and videos
Why it helps: The app identifies your hinge type via product code and delivers tailored steps for your specific model.
Avoid Common Adjustment Mistakes
Even small errors can ruin your alignment. Watch out for these frequent issues.
Never Adjust with the Door Closed
Always make mechanical adjustments with the door fully open. Adjusting under pressure can strip screws or damage the hinge mechanism.
Don’t Over-Tighten Screws
Blum hinges use precision plastic and metal components. Overtightening any screw can:
– Strip the thread
– Warp the hinge arm
– Lock the adjustment mechanism
Rule of thumb: Snug is sufficient. If resistance increases suddenly, stop turning immediately.
Don’t Ignore Both Hinges on Double Sets
Cabinet doors with top and bottom hinges must be adjusted in unison. Adjust one hinge completely, then mirror the same turns on the second hinge.
Quick check: After adjustment, open and close the door several times. It should move smoothly without wobbling or catching.
Confirm Compatibility and Installation Standards
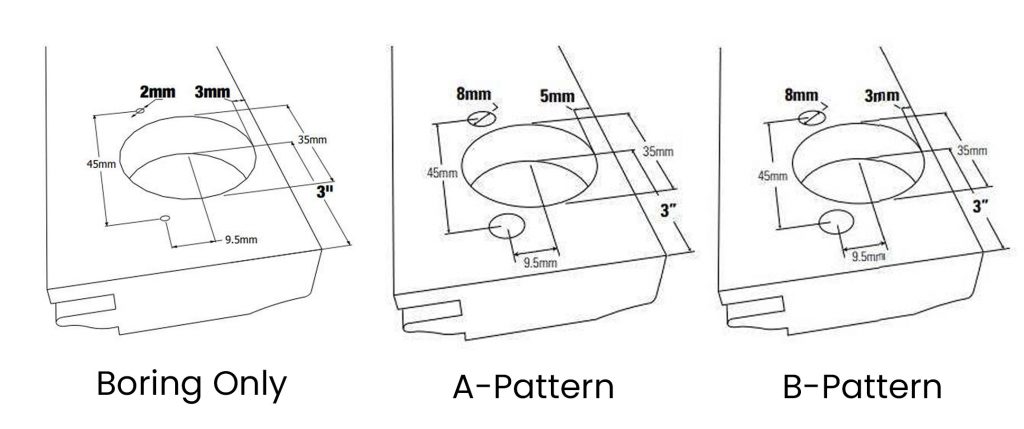
Before adjusting, verify your setup meets standard specifications.
Check the 45mm Boring Pattern
The 45mm boring pattern is standard for Blum hinges and fits most European-style cabinets.
How to verify: Measure the hole in the door where the hinge cup sits. It should be 35mm wide and 11.5mm deep, with a 45mm center-to-center distance between mounting plate holes.
If your cabinet uses this pattern, any Blum Compact or CLIP top hinge will install directly without modification.
Know Your Hinge Model
Use the model number (such as 38N355B.08) to confirm features like:
– Soft-close presence
– Adjustability range
– Weight capacity (38N equals 38 Newtons, supporting roughly 8.5 pounds per hinge)
Tip: Two hinges typically support doors up to 17 pounds. Heavier doors may require three hinges.
Frequently Asked Questions About Blum Hinge Adjustment
What tools do I need to adjust Blum hinges?
You need a 4mm hex key for all three adjustment screws. Some models with closing speed switches may require a small flat-head screwdriver. No other specialized tools are necessary.
Can I adjust the soft-close speed on all Blum hinges?
No. Only BLUMOTION-equipped hinges with a speed adjustment switch or dial offer this feature. Standard hinges lack closing speed control entirely.
How do I know if my hinge has BLUMOTION?
Check for the BLUMOTION label on the hinge arm or packaging. Alternatively, look for the small adjustment switch on the hinge body. Product codes H002 and H004 indicate BLUMOTION models.
What does the 45mm boring pattern mean?
It refers to the standard hole spacing for mounting plate screws on the cabinet frame. This pattern ensures Blum hinges fit most pre-drilled European-style cabinets without modification.
Why won’t my door close all the way after adjustment?
The damping resistance may be too high. Reduce the closing speed by moving the adjustment switch toward the minus (–) setting. If your hinge lacks this feature, check that the door isn’t hitting the frame.
Can I use the EASY ASSEMBLY app for any Blum product?
Yes. The app covers assembly and adjustment questions for all Blum fittings, including hinges, lift systems, and runners. It identifies your product via code and provides tailored guidance.
Key Takeaways for Adjusting Your Blum Hinges
Mastering how to adjust Blum kitchen cabinet hinges comes down to understanding the three-screw system and following the right sequence. Start with vertical alignment using the mounting plate screw, then set depth with the back screw, and finish with side-to-side positioning using the front screw. Always use a 4mm hex key, make small quarter-turn adjustments, and test after each change.
For soft-close models, fine-tune the closing speed using the switch on the hinge arm to achieve a smooth, quiet close. Remember that the 45mm boring pattern ensures broad compatibility across most cabinets, making installation and replacement straightforward.
Leverage Blum’s digital resources, including the EASY ASSEMBLY app, product code-matched PDFs, and assembly videos, for model-specific guidance. With these tools and techniques, your cabinet doors will align perfectly, operate smoothly, and maintain their premium feel for years to come.


