

Peeling, chipped, or outdated paint on your cabinets can make an entire kitchen or bathroom feel worn and tired. If you’re facing this common home dilemma, you’re not alone. Many homeowners search for a reliable way to strip painted cabinets and restore them to their original charm. The good news is you don’t need to replace your cabinets to get a fresh look. With the right tools, techniques, and a little patience, you can strip painted cabinets yourself and prepare them for staining, repainting, or refinishing. This guide walks you through every step, from choosing the best stripping method to final sanding, so you can achieve professional-quality results without the high cost.
You will learn about chemical strippers, heat guns, and sanding methods, helping you decide which approach fits your project best. You will also discover essential safety precautions, time-saving tips, and how to avoid common mistakes that could damage wood or delay your renovation. Whether you’re working with oak, maple, or MDF cabinets, this step-by-step process ensures a smooth, clean surface ready for transformation.
Essential Safety Gear for Cabinet Stripping

Before touching any tools, protect yourself and your workspace. Stripping paint involves hazardous materials and generates dust or fumes that can harm your health. Proper preparation prevents accidents and ensures a smooth workflow.
Protective Equipment You Must Wear
Always wear:
– Nitrile gloves because latex won’t protect against chemical strippers
– Safety goggles to shield your eyes from splashes and debris
– Respirator mask with organic vapor cartridges for chemical fumes
– Long sleeves and pants made of tightly woven fabric
Work in a well-ventilated area. Open windows and use fans to direct fumes outdoors. Never use chemical strippers near open flames or pilot lights.
Setting Up Your Work Space
Cover floors with drop cloths or plastic sheeting. Remove cabinet doors and hardware if possible to work off-site. Label each door and hinge location with tape to simplify reassembly. Store screws and knobs in labeled bags to avoid losing small parts.
Keep a bucket of water nearby in case of chemical spills. Have rags, steel wool, and a plastic scraper ready before applying any stripper. This preparation saves time and reduces frustration during the project.
Removing Cabinet Doors and Hardware
Taking doors off makes stripping faster, safer, and more thorough. It also prevents damage to hinges and drawer fronts. You can work on flat surfaces at a comfortable height instead of bending awkwardly inside cabinets.
Step by Step Door Removal
- Use a screwdriver or drill to remove hinges from the cabinet frame
- Label each door’s position, such as “Upper Right,” with masking tape
- Remove drawer fronts by unscrewing mounting brackets or clips
- Take off knobs, pulls, and handles carefully
Set hardware aside in labeled containers. Soak metal pulls in warm, soapy water to remove grime while you strip the wood. This multitasking approach saves time and keeps your workflow organized.
Choosing the Right Stripping Method
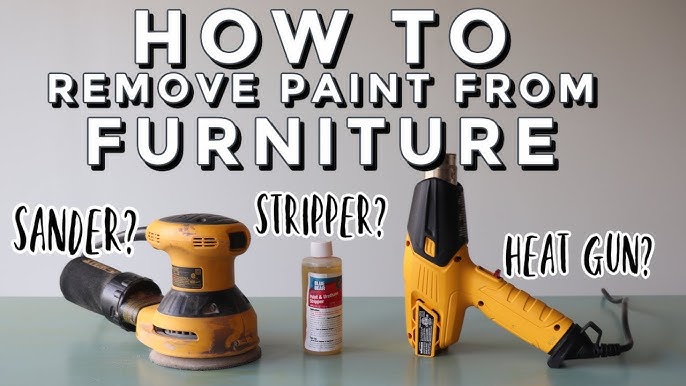
Three main methods exist for removing paint: chemical strippers, heat guns, and sanding. Each has pros and cons depending on your cabinet material and paint type. Understanding these differences helps you select the most effective approach for your situation.
Chemical Strippers for Detailed Surfaces
Chemical strippers work best for cabinets with carved panels or intricate edges. Gel-based strippers cling to vertical surfaces and break down multiple paint layers safely. They handle latex, oil-based, and lead-based paint effectively.
Time required ranges from 30 minutes to 2 hours per coat. The difficulty level is moderate. Apply with a brush in thick, even coats. Let sit for 15 to 30 minutes, following product instructions. Don’t let it dry completely. Scrape off softened paint with a plastic or metal scraper held at a 30 degree angle.
Heat Guns for Thick Paint Layers
Heat guns soften paint until it bubbles, making it easy to scrape off. This method works well for thick, old paint layers. Each door takes 1 to 2 hours, and the difficulty level is high.
Hold the gun 2 to 3 inches from the surface. Move slowly to avoid scorching wood. Never use heat guns on lead-based paint because heating releases toxic fumes. If your home was built before 1978, test for lead before using this method.
Sanding for Flat Surfaces
Sanding is simple but labor intensive. Use orbital or belt sanders with coarse grit paper, around 80 to 100 grit, to sand paint down to bare wood. This method works best for flat cabinet surfaces and small areas.
Each door takes 2 or more hours. The difficulty level is high. Start coarse, then finish with 150 to 220 grit for smooth results. Dust is heavy, so always wear a mask and use a shop vacuum with a HEPA filter.
How to Apply Chemical Stripper Properly
Chemical stripping is the most effective method for complete paint removal without damaging wood. Proper application ensures the stripper works efficiently and reduces the number of coats needed.
Step by Step Application Process
- Stir, don’t shake, the stripper to avoid creating bubbles
- Apply a 1/8 inch thick coat using a cheap brush
- Cover edges and corners first, then move to flat areas
- Wait 15 to 30 minutes, longer for thick paint
- Test a corner with a scraper to see if paint lifts easily
Avoid over applying the product. Excess stripper doesn’t work faster and becomes harder to clean. A thick, even coat works better than a heavy, uneven layer.
Scraping Off Softened Paint
Use a plastic or sharp metal scraper for best results. Hold it at a low angle of about 30 degrees to avoid gouging the wood. Work in the direction of the grain to prevent scratches. Wipe residue with denatured alcohol or citrus based cleaner.
For corners and grooves, use steel wool in 000 or 0000 grade. A stiff nylon brush also works well for detailed areas. These tools reach tight spaces that scrapers can’t access.
When to Repeat the Process
One pass rarely removes all paint. Reapply stripper to stubborn areas and let it dry completely between coats, usually 1 to 2 hours. Most projects require 2 to 3 applications for complete removal.
Never mix different chemical strippers. Residue reactions can create dangerous fumes. Stick with one product for the entire project to ensure safety and consistent results.
Sanding After Chemical Stripping
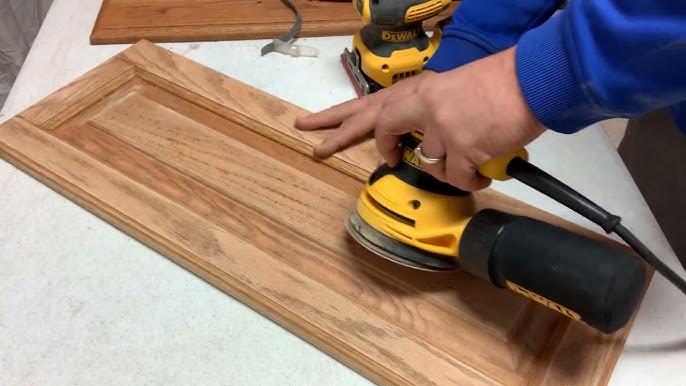
Even after stripping, wood needs smoothing before refinishing. Sanding removes streaks, leftover film, and raised grain fibers. This step creates a uniform surface that accepts stain or paint evenly.
Sanding Sequence for Best Results
- Start with 120 grit sandpaper to remove streaks and leftover film
- Switch to 180 grit for a uniform texture
- Finish with 220 grit for a silky smooth surface
Use an orbital sander for flat panels. Hand sand raised panels and details with a sanding sponge. Always sand with the grain to avoid visible scratches that show through the finish.
Wipe down each piece with a tack cloth after sanding. Regular rags leave lint behind that ruins a smooth finish. Tack cloths are available at any hardware store and cost very little.
Cleaning and Neutralizing the Wood
Residue from strippers or sanding dust can interfere with staining or painting. Proper cleaning ensures your new finish adheres correctly and lasts for years. This step is easy to skip but makes a significant difference in results.
Final Cleaning Steps
- Dampen a lint free cloth with mineral spirits or denatured alcohol
- Wipe the entire surface to remove oily residue
- Rinse with a damp cloth and mild soap if using water based stripper
- Dry immediately with a clean towel
- Let air dry for 1 to 2 hours
For extra assurance, wipe with a white cloth. Any color transfer means more cleaning is needed. Repeat the process until the cloth stays clean.
Inspecting for Damage and Making Repairs
Now that the wood is bare, check for dents, cracks, or water damage. This inspection reveals issues that were hidden under paint. Addressing them now prevents problems after refinishing.
Fixing Minor Wood Flaws
- Fill dents with wood filler that matches your cabinet species
- Patch holes with epoxy or two part filler
- Sand repairs smooth once dry
- Feather edges into the surrounding wood
For MDF cabinets, use a lightweight spackling compound. Regular wood filler may crack on engineered surfaces. Check the product label to confirm compatibility with your cabinet material.
Common Mistakes to Avoid
Avoid these frequent errors that ruin stripping projects. Awareness of these pitfalls saves time, money, and frustration.
Skipping Proper Ventilation
Chemical strippers emit strong fumes that cause headaches, nausea, or long term respiratory issues. Always work near open windows with fans blowing outward. If you feel dizzy or lightheaded, stop working and get fresh air immediately.
Using Metal Scrapers on Soft Wood
Pine or poplar dent easily. Use plastic scrapers on delicate surfaces. Switch to metal only on hardwoods like oak or maple. Testing a small area first helps you determine the right tool for your wood type.
Mixing Different Stripper Brands
Different chemical bases, such as methylene chloride, NMP, or biodegradable formulas, react unpredictably. Stick to one product per project. Mixing products can create dangerous fumes or ineffective results.
Rushing the Drying Time
Applying stain or paint too soon causes adhesion failure. Wait at least 24 hours after final cleaning before finishing. This waiting period ensures the wood is completely dry and ready to accept a new finish.
Reassembling and Refinishing Your Cabinets

Once stripped and prepped, cabinets are ready for their new look. This final phase brings your project to completion and transforms your space.
Choosing the Right Finish
- Stain and polyurethane for natural wood appearance
- Paint for modern, clean styles
- Clear coat to preserve raw wood
Apply with a high quality brush or foam roller. Let dry between coats, and lightly sand with 320 grit paper for smoothness. Multiple thin coats work better than one thick coat.
Rehanging Doors and Hardware
Reattach hinges using your labeled layout. Check alignment to ensure doors are level and evenly spaced. Tighten screws gradually to avoid warping the wood.
Install new knobs or refinished pulls. Consider upgrading hinges to soft close models for a modern upgrade. These small details enhance the overall look and function of your cabinets.
Frequently Asked Questions About Stripping Painted Cabinets
What is the fastest way to strip painted cabinets?
Chemical strippers work fastest for most projects. They break down paint in 15 to 30 minutes per coat. Heat guns also work quickly but require careful technique to avoid scorching wood. Sanding is the slowest method and best reserved for small areas.
Can I strip painted cabinets without removing doors?
Technically yes, but it’s not recommended. Removing doors allows you to work on flat surfaces at a comfortable height. You also avoid drips running down cabinet frames and onto floors. The extra time spent removing doors saves time during stripping.
How do I know if my cabinets have lead-based paint?
Test kits are available at hardware stores and are inexpensive. If your home was built before 1978, lead-based paint is possible. Never use heat guns on lead-based paint because heating releases toxic fumes. Chemical strippers are safer for lead-based paint.
What is the best chemical stripper for kitchen cabinets?
Gel-based strippers work best for vertical surfaces like cabinet doors. They cling to the surface instead of running off. Look for products that handle multiple paint layers and are safe for wood. Read labels carefully to match the product to your paint type.
How many coats of stripper will I need?
Most projects require 2 to 3 applications. Thick paint layers or multiple coats of paint may need more. Apply one coat, scrape, and assess the results. Reapply only to stubborn areas rather than the entire surface.
Can I strip painted MDF cabinets?
Yes, but with caution. MDF is softer than solid wood and can swell or crumble with too much moisture. Use a lightweight spackling compound for repairs instead of wood filler. Work gently and avoid soaking the material with chemical strippers.
Key Takeaways for Successfully Stripping Painted Cabinets
Stripping painted cabinets is a labor intensive but rewarding DIY project. By following this guide, you will remove old finishes safely and effectively, revealing the beauty beneath. Whether you choose chemical strippers, heat, or sanding, preparation and patience are key. With proper technique, even beginner woodworkers can achieve stunning results that transform a room for a fraction of the replacement cost.
Start by gathering your safety gear and removing cabinet doors. Choose a stripping method that matches your wood type and paint condition. Apply chemical strippers carefully, sand thoroughly, and clean the wood before refinishing. Avoid common mistakes like skipping ventilation or rushing drying time.
After your cabinets are refinished, maintain them with gentle cleaning and avoid harsh chemicals. With care, your newly stripped and restored cabinets can look beautiful for years to come. Begin your project this weekend and enjoy the satisfaction of a job well done.


