
Assembling cabinets can feel like a daunting task, especially if you’re tackling a full kitchen or bathroom remodel. But with the right tools, clear instructions, and a systematic approach, how to assemble cabinets becomes a manageable DIY project that saves money and delivers professional-looking results. Whether you’re working with shaker, raised panel, or European-style cabinets, most modern ready-to-assemble (RTA) models come pre-drilled and include all necessary hardware for a smooth build.
This guide walks you through every phase of cabinet assembly: from sorting hardware and preparing components, to building base cabinets, assembling drawers, installing doors, and finishing with pro-level details. You’ll learn how to avoid common mistakes like wood splitting, glue messes, and misaligned joints. We’ll also cover specialty modifications for farm sinks, double ovens, and islands, ensuring your cabinets are not only assembled correctly but ready for long-term performance.
Prepare Your Workspace and Tools
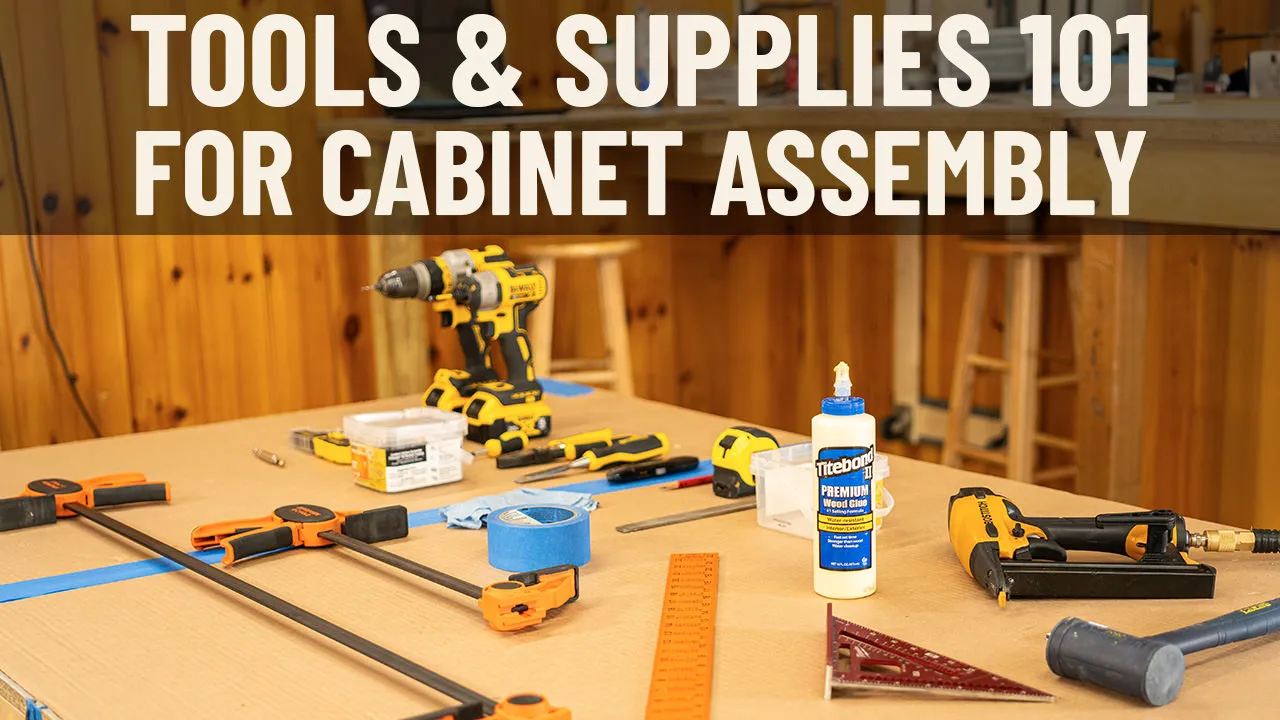
Before touching any cabinet parts, set up a clean, flat workspace with enough room to lay out multiple components. A garage floor or unfinished basement works well.
Gather Essential Tools
- 18-gauge brad nailer (air-powered or electric)
- Drill with screwdriver bit
- Rubber mallet
- Tape measure
- Level
- Pencil
- Wood glue
- Damp rag
- Safety glasses
- Clamps (optional but helpful)
Organize Materials
- 2½” screws for frame-to-frame connections
- Shims for leveling during installation
- ¾” filler boards for dishwasher panels or uneven gaps
- Scribe molding (SM8) to hide imperfect cuts
- Touch-up putty kit (color-matched, included with cabinets)
- Masking tape for pin hole repair
- Packing cardboard to protect face frames
Pro Tip: Sort all hardware before starting. Separate screws, L-brackets, hinges, and bumpers into labeled containers. Even someone without experience can help, and this simple step cuts assembly time significantly.
Identify Cabinet Box Components
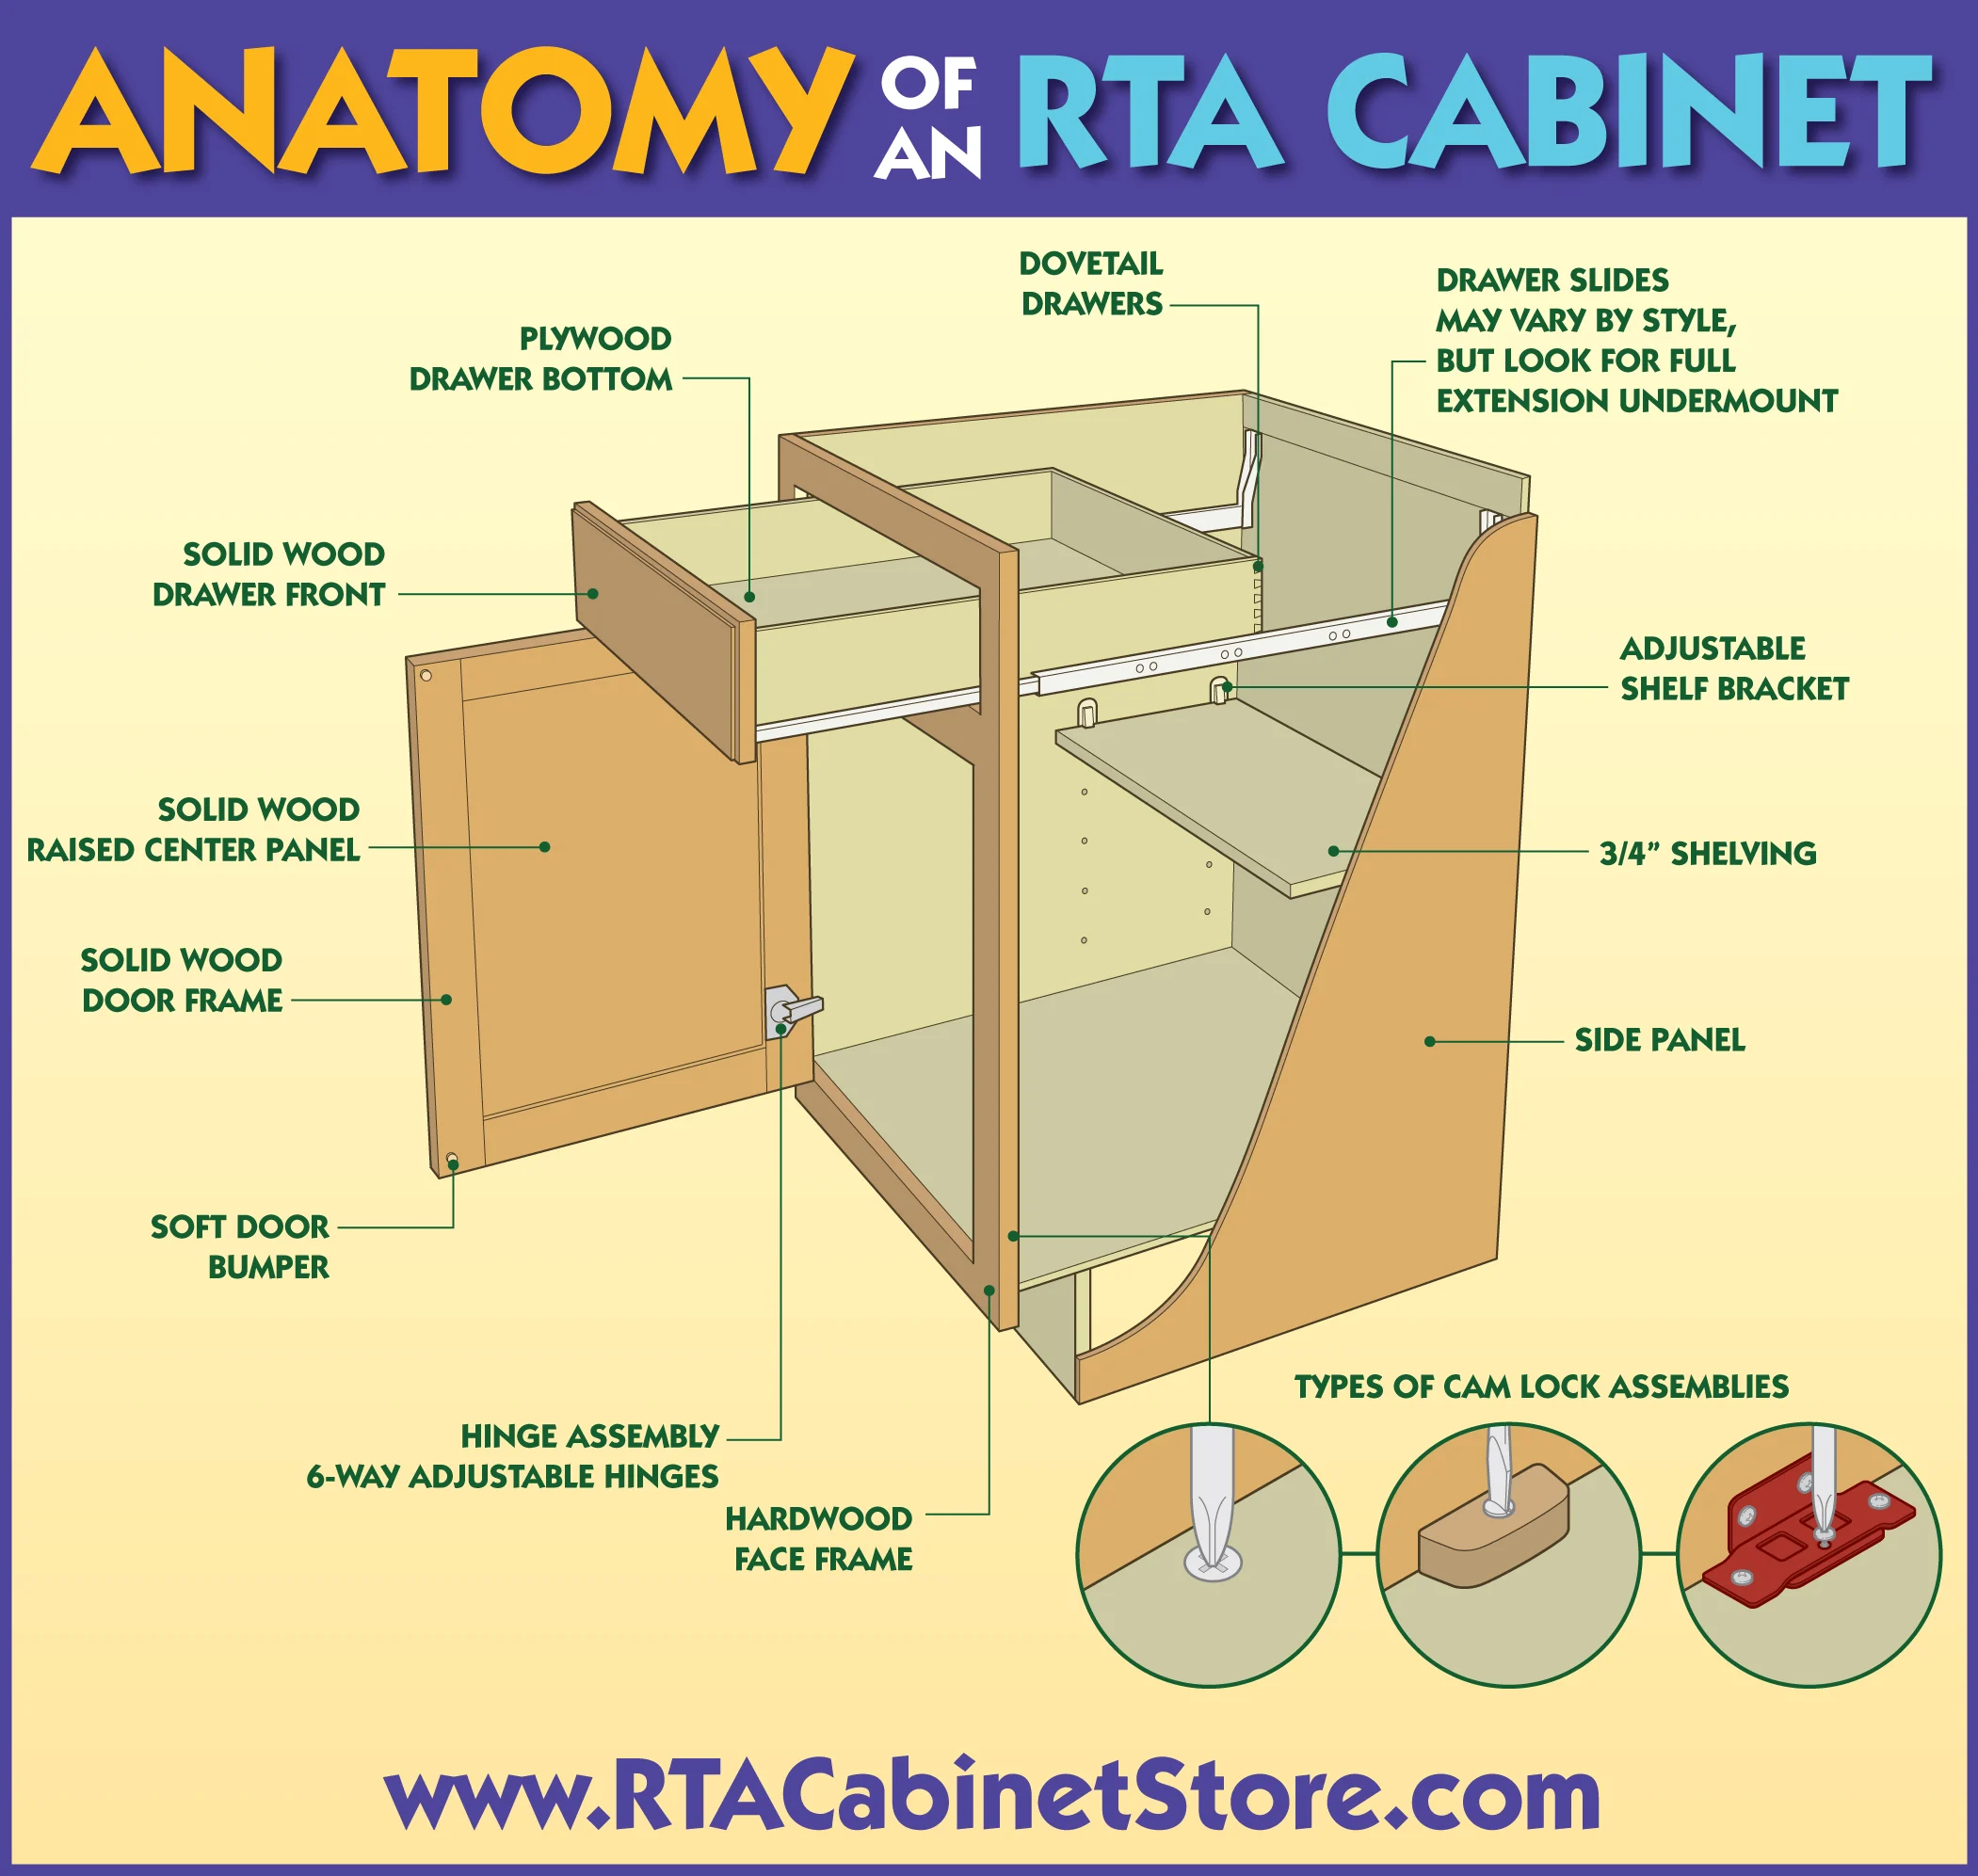
Most RTA cabinets use a two-box system that separates the structural carcass from the visible finish pieces.
Universal (Uni) Box
The universal box is the structural core of the cabinet. It contains:
- Plywood sides (AA-grade)
- Back panel
- Bottom panel
- Toe kick
- Shelf
- Drawer box
- Drawer slides
- Full hardware kit
Finish (A) Box
The finish box includes all the visible style elements:
- Face frame
- Door
- Drawer front (with pre-cut dovetails)
- Finished end panels (if applicable)
Important: If your cabinet has a finished side panel for an island or exposed end, discard the unfinished gable and install the finished one during assembly. Alternatively, apply a ¼” veneer panel over the unfinished side to match the cabinet finish.
Assemble Base Cabinets in 5 Steps
Follow this sequence for strong, square, and aligned base cabinets. Each step builds on the previous one, so resist the urge to skip ahead.
Step 1: Attach Face Frame to Sides
- Lay packing cardboard on your work surface to protect the finished face frame.
- Place the face frame face-down.
- Run a bead of wood glue along the internal channels.
- Slide the gable side panels into the sliding dovetail joint, aligning the tail with the groove.
- If using a finished side panel, install it now.
Visual Cue: The joint should slide smoothly but snugly. Do not force it. If it resists, check that the tail is properly aligned with the groove.
Step 2: Install the Bottom Panel
- Apply wood glue to the frame ledge where the bottom sits.
- Carefully drop the bottom panel into place.
- Stand the cabinet upright.
- Wipe any glue squeeze-out immediately with a damp rag.
Why It Matters: The bottom adds structural rigidity and prevents racking, which keeps the cabinet square during installation.
Step 3: Secure the Back Panel
- Apply glue to the bottom groove and side channels of the back panel.
- Tilt the cabinet slightly and slide the back panel in at a downward angle.
- Hook it onto the bottom panel.
- Lift upward and press the sides together.
- Fasten with long black screws from the hardware kit.
Pro Tip: Don’t over-tighten screws, as this can warp the cabinet and cause alignment issues later.
Step 4: Pin Nail Side Panels
- Use the brad nailer to pin every 6 inches along the back edge.
- Hold the nailer sideways (horizontal) so bent pins stay inside the cabinet wall.
For Finished Panels:
- Option 1: Skip pinning and rely on L-brackets only.
- Option 2: Pin and fill holes later with color-matched putty.
Step 5: Fasten L-Brackets
- Attach upper L-brackets to the inside front corners to pull the face frame tight.
- Prevent splitting: Spin the drill in reverse briefly before driving screws into the face frame.
- Flip the cabinet upside down.
- Install lower L-brackets and the toe kick.
- Add bonus brackets to back corners for extra strength.
Why It’s Critical: L-brackets ensure face frames are flush across multiple cabinets, making alignment seamless when joined.
Build and Install Drawers
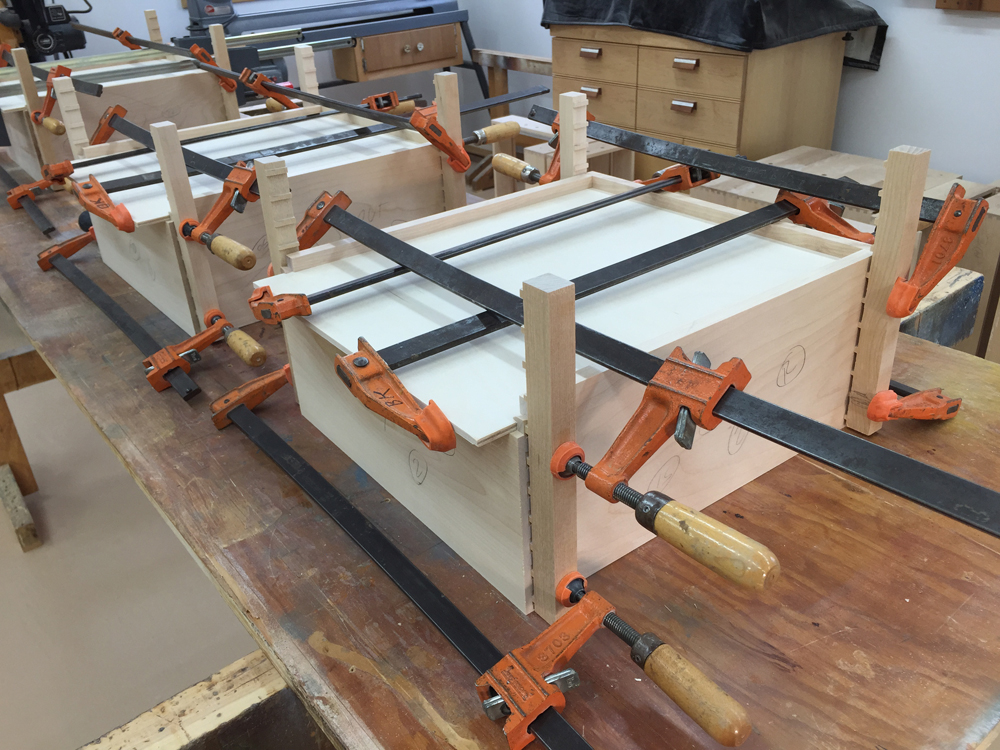
Most RTA cabinets include dovetail drawer boxes for durability and visual appeal. The dovetail joint provides exceptional strength compared to stapled or nailed alternatives.
Assemble Dovetail Drawer Joints
- Apply wood glue to each dovetail on the drawer front.
- Align the drawer side and tap gently with a rubber mallet, working back and forth evenly.
- Stop as soon as the joint is flush, and do not overdrive.
- Repeat for the drawer back.
- Check that the bottom is square; adjust if needed.
Alternative: Use brad nails for added speed, but glue alone is sufficient when done correctly.
Mount Drawer Hardware
- Attach drawer adjusters to the bottom, watching left and right markings.
- Screw drawer slides onto the drawer.
- Mount the other half of the slides to the cabinet back panel.
- Install rubber bumpers on all four corners.
- Slide the drawer in until it clicks into place.
To Remove Later: Pull the orange release tabs on each slide.
Hang Cabinet Doors
Doors are pre-hung using concealed hinges for a clean look. The face frame is pre-drilled on both sides, so you can choose which direction the door opens.
Install Hinges and Align Door
- Choose left or right hinge side, as both sides are pre-drilled.
- Attach hinges with large panhead screws, leaving slight play for adjustment.
- Press the door into the hinges.
- Tighten screws to secure.
- Press rubber bumpers onto the interior of the door.
Adjustment Tip: Most hinges allow micro-adjustments in height, depth, and lateral position. Fine-tune after all cabinets are installed.
Add Finishing Touches
Install Shelves
- Insert shelf clips into pre-drilled holes.
- Set the shelf in place.
- Adjust height as needed.
Repair Pin Holes (Finished Panels)
- Mask around each hole with small pieces of masking tape.
- Shave a piece of color-matched putty, warm it in your fingers, and press into the hole.
- Peel off tape and wipe with a damp rag.
- Step back, and the holes will be nearly invisible.
Install Cabinets: Level, Align, Secure

Now that cabinets are assembled, it’s time to mount them. Proper alignment here determines how professional the final result looks.
Mark Base Cabinet Height
- Measure up 34.5″ from the highest point on the floor, not the lowest.
- Mark a level line around the room, which ensures all cabinets sit at the same height despite floor irregularities.
Align Upper Cabinets
- Mark a line at 54″ on the wall, which is where upper cabinets align.
Level and Shim
- Use shims under base cabinets to achieve perfect level.
- Check with a 4-foot level across multiple cabinets.
Secure Cabinets Together
- Pre-drill holes to prevent splitting.
- Use 2½” screws to join cabinet frames.
- Always fasten cabinets to wall studs.
Special Installation Scenarios
Secure an Island Cabinet
- Cut 2x4s to fit inside the toe kick space.
- Attach the 2x4s to the floor.
- Set the island over them.
- Drive screws through the cabinet base into the 2x4s.
Result: A rock-solid island that won’t shift during use.
Install a Farm Sink
- Measure sink width and depth.
- Mark cutout on cabinet face.
- Make precise cuts.
- Install a 2×4 wall brace behind the sink for support.
- Use scribe molding (SM8) to hide uneven edges.
- Install before countertop, as countertop crew will glue the sink in place.
Modify for a Double Oven
- Remove top two drawers in oven cabinet.
- Cut through two drawer divider bars.
- Create a tall opening for the oven.
- Use scribe molding to trim the opening if needed.
- Same process applies for microwaves in DC330 cabinets.
Support a Dishwasher Panel
- Drill pilot holes from inside the panel into the back and bottom.
- Secure panel to both wall and floor.
- Use a ¾” filler board across the dishwasher width.
- Attach filler board horizontally between sink and dishwasher panels for stability.
Hang Crown Molding
- Ensure cabinet tops are flush with the wall during installation.
- This exposes ¾” of face frame, which is used to nail crown molding.
- For corner cuts: measure cabinet face length, mark on molding, and cut outward at 45°.
- This adds about 3″ to total length, so account for this in planning.
Cabinet Styles and Compatibility
All major styles follow the same assembly process, but check your collection for specific guides.
| Style | Collections |
|---|---|
| Shaker | Malibu White, Nantucket Bluff, Annapolis Blue |
| Raised Panel | Aspen White, Chalet White, Palm Beach Dark Chocolate |
| European | Chelsea Linen, Metro Gloss White, Charleston Driftwood |
| SLIM Shaker | Franklin White Click & Go, Brentwood Fawn |
| Worthington | Worthington Grey, Worthington White |
| Outdoor | Thos. Baker Cabinets |
Note: Slim and European styles may have narrower profiles but use identical joinery and hardware.
Avoid Common Assembly Mistakes
Prevent Wood Splitting
- Pre-drill all screw holes in face frames.
- Spin drill in reverse briefly before driving screws, which acts as a buffer and reduces splitting.
Stop Glue Squeeze-Out
- Keep a damp rag nearby.
- Wipe excess glue immediately, as dried glue is hard to remove without damaging the finish.
Protect Finished Panels
- Hold brad nailer horizontally, so if a pin bends, it stays contained.
- For visible sides, use L-brackets instead of pins or fill holes later.
Protect Drawer Joints
- Do not over-tap dovetails, as flush is enough.
- Work back and forth when tapping sides to maintain alignment.
Pro Tips for Faster, Cleaner Results
- Sort hardware first, and even kids can help.
- Work in batches, assembling all base cabinets, then all drawers.
- Use clamps during glue-up for tighter joints.
- Check squareness after each major step.
- Save touch-up for last, doing all pin hole repairs after installation.
Frequently Asked Questions About How to Assemble Cabinets
What tools do I need to assemble RTA cabinets?
You need an 18-gauge brad nailer, drill with screwdriver bit, rubber mallet, tape measure, level, pencil, wood glue, damp rag, and safety glasses. Clamps are optional but helpful for holding pieces during glue-up.
How long does it take to assemble a base cabinet?
Most base cabinets take 20 to 40 minutes each once you’ve sorted hardware and understand the process. Working in batches and following the 5-step sequence speeds things up considerably.
Can I assemble cabinets without a brad nailer?
Yes. You can rely on L-brackets and screws alone, especially for finished panels. The brad nailer adds speed and rigidity, but it’s not strictly required for a solid build.
How do I prevent wood splitting when driving screws?
Spin the drill in reverse briefly before driving each screw into the face frame. Always pre-drill holes before securing frames together. This simple technique significantly reduces splitting.
Do I need to glue dovetail drawer joints?
Yes. Apply wood glue to each dovetail before tapping the drawer side into place. Stop the moment the joint is flush, as overdriving can damage the joint.
Can I install a farm sink in a standard base cabinet?
Yes, but you’ll need to modify the cabinet. Measure the sink width and depth, mark and cut the opening, install a 2×4 wall brace for support, and use scribe molding to hide imperfect cuts. Install the sink before the countertop.
Key Takeaways for How to Assemble Cabinets
Assembling cabinets successfully comes down to preparation, sequence, and attention to detail. Sort your hardware first, protect your work surface, and follow the 5-step base cabinet assembly order: face frame, bottom, back, pin sides, then L-brackets. This systematic approach ensures square, rigid cabinets that align perfectly when installed.
The most common mistakes are all preventable. Pre-drill holes and reverse your drill spin to avoid splitting, keep a damp rag handy for glue squeeze-out, hold the brad nailer sideways to contain bent pins, and never over-tap dovetail joints. These small techniques make the difference between a frustrating build and a smooth one.
Your next step is to gather your tools and sort your hardware kit. Start with one cabinet, follow the sequence outlined here, and you’ll build confidence with each unit. For video support and downloadable templates, visit www.blueprintcabinets.ca.


