

Your kitchen or workshop feels cluttered because standard storage fails to utilize vertical space effectively. Learning how to build a wall cabinet solves this by creating custom units that fit your exact dimensions and style needs.
This guide details three construction methods ranging from quick pocket screw assembly to traditional frame-and-panel joinery. You will discover precise cutting layouts, material selection tips, and professional mounting techniques for a sturdy result.
Plan Standard Cabinet Dimensions for Perfect Fit
Accurate measurements ensure your new storage fits seamlessly above counters or appliances. Following industry standards prevents awkward gaps and ensures functional access.
Determine Installation Height and Clearance
Mount the bottom of your cabinet 18 inches above the countertop surface. With a standard 36-inch counter height, this places the cabinet base at 54 inches from the floor. In rooms with 8-foot ceilings, you have approximately 42 inches of vertical space available for the unit and any trim work.
Select Depth and Width Specifications
Standard wall cabinet depth ranges from 12 to 14 inches, with 13 inches being ideal for most applications. If you plan to use overlay doors, reduce the box depth by 1 inch so the door adds the final dimension. Cabinet widths typically vary between 12 and 36 inches to suit different wall spaces.
Account for Door Overlays and Gaps
Use a 1.5-inch overlay on the top and sides of your doors for full access. Cut the bottom edge of the door 1/4 inch shorter than the face frame opening. This specific measurement maintains even gaps and prevents the door from scraping surfaces below.
Optimize Material Layout on 4×8 Sheets
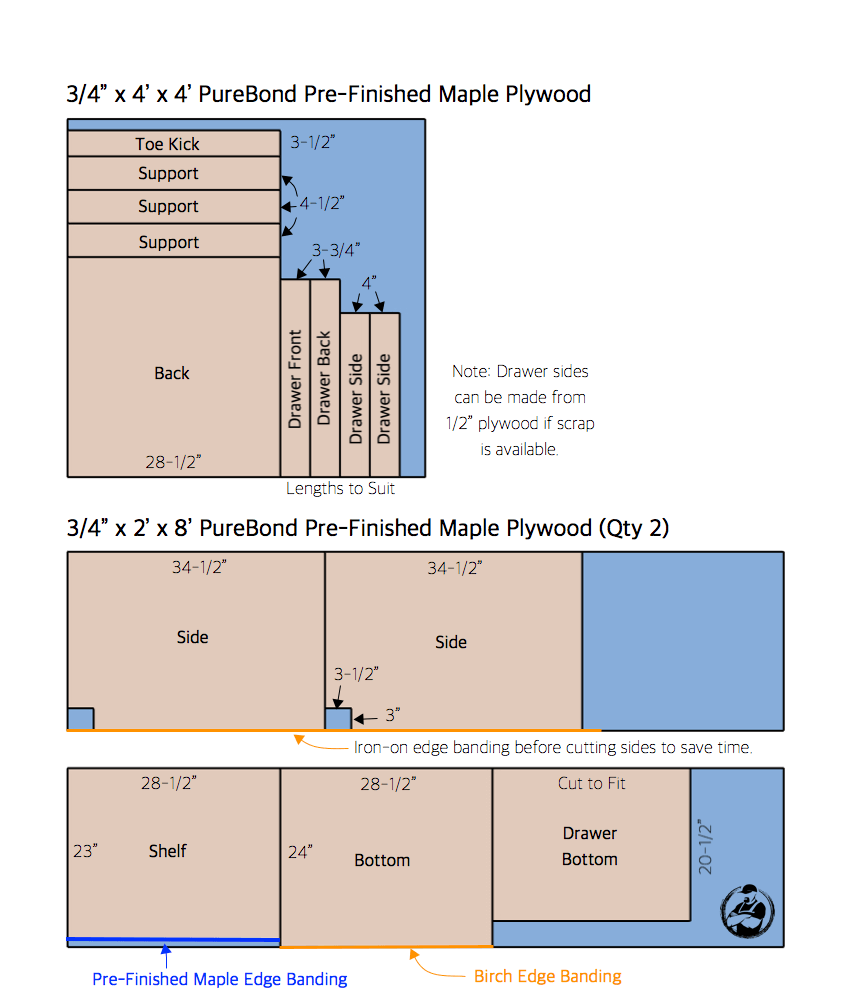
Efficient planning minimizes waste when breaking down large plywood sheets. A solid layout strategy saves money and reduces the number of trips to the lumberyard.
Map All Components Before Cutting
Sketch every part including sides, tops, bottoms, shelves, and nailers on a single 4×8 sheet plan. Group similar widths together and align grain direction for maximum strength. This visual map ensures you utilize the maximum amount of material from each sheet.
Rip Strips for Final Depth Accuracy
Rip full 4×8 sheets into 11-inch wide strips to achieve a 13-inch final depth. This calculation accounts for the 3/4-inch face frame and 1-inch door overlay. Precise ripping ensures your finished cabinet aligns perfectly with base units.
Adapt to Material Shortages Effectively
Use 1/4-inch maple for backs and faces if 3/4-inch plywood is unavailable. Combine this with solid wood rails like cherry for structural integrity. This hybrid approach reduces costs while adding unique visual interest to workshop builds.
Select Materials and Hardware for Durability
Choosing the right components determines the longevity and appearance of your project. High-quality materials resist warping and support heavy loads over time.
Build Carcass from 3/4-Inch Plywood
Use 3/4-inch maple or birch plywood for sides, tops, bottoms, and shelves. This thickness provides stability and resists warping under load. Avoid particleboard as it swells with moisture and fails quickly in humid environments.
Construct Face Frames from Solid Wood
Build face frames using pre-surfaced hard maple for a clean, durable front edge. Cut side rails 1.75 inches wide and top or bottom rails 2.5 inches wide. Use a crosscut sled to ensure every piece has square, precise ends for tight joints.
Choose Fasteners and Joinery Supplies
Select 1.25-inch pocket screws for face frame assembly and 1.75-inch screws for carcass joints. Ensure screws penetrate at least 1 inch into side panels for maximum strength. You will also need brad nails for backs, shelf clips, and European hinges for doors.
Assemble with Pocket Screws for Speed
This method offers incredible speed and strength, making it perfect for garages and utility rooms. Hidden joints provide a clean look without complex joinery tools.
Cut Components to Exact Size
Break down 3/4-inch plywood using a track saw or table saw for straight edges. Cut two side panels, a top, a bottom, and any necessary shelves. Label each piece clearly to avoid confusion during the assembly process.
Drill Pocket Holes in Side Panels
Use a pocket hole jig to drill angled holes on the inside face of both side panels. Place two holes per joint and keep them at least 1 inch from the edges. A dual-bit router system creates clean, debris-free holes for better screw retention.
Rabbet Back Edge for Panel Fit
Cut a 1/4-inch rabbet along the back edge of each side panel using a table saw. Make multiple passes while adjusting the fence until the 1/2-inch back panel fits flush. This rabbet locks the back in place and adds significant rigidity to the box.
Build the Box Face Down
- Clamp the bottom panel flush to the side panels and drive pocket screws through the sides.
- Repeat the process for the top panel while keeping the assembly face down.
- Apply wood glue to rabbets and slide the 1/2-inch back panel into place.
- Secure the back with countersunk screws and wipe away glue squeeze-out immediately.
Check that diagonal measurements match to ensure the box is perfectly square before the glue dries.
Build with Dados and Face Frame for Premium Look
Traditional methods deliver furniture-quality results suitable for visible kitchen areas. Clean lines and hidden joinery create a high-end aesthetic.
Cut Dados for Back and Panels
Use a dado stack on your table saw to cut a 1/4-inch groove for the back panel. Cut 3/4-inch deep dados for the top and bottom panels, offset 3/4 inch from the edges. These recesses create a lip for trim and allow for under-cabinet lighting installation.
Install Nailers and Back Panel
Cut two 3.5-inch wide nailers from 1/4-inch plywood and attach them inside with pocket screws. Slide the 1/4-inch back panel into the dado groove and fasten it to the nailers with brad nails. Clamp multiple cabinets together and screw through sides for wide runs.
Build and Attach Face Frame
- Cut 2-inch wide maple rails to length and drill pocket holes on rail ends.
- Assemble the frame with glue and clamps, ensuring tight joints for stained finishes.
- Sand the frame to 180 grit for a smooth surface ready for finishing.
- Attach the frame to the cabinet front using wood glue and finish nails.
Extend the wall-side frame by 3/4 inch for corner cabinets to clear drywall irregularities.
Build a Basic Six-Piece Cabinet Simply
This simplified approach works well for workshops where speed and function matter most. You can complete this project quickly without a full face frame.
List the Six Core Parts
Identify the two sides, top, bottom, back panel, and two nailers as your only components. This method eliminates the need for a face frame entirely. The result is a clean box ready for immediate use in storage areas.
Apply Edge Banding First
Cover all front edges with iron-on edge banding before assembly begins. Center the strip, heat it with a clothes iron, and press firmly with a wood block. Trim the excess with an edge band trimmer and sand smooth with a 120-grit block.
Glue and Screw Sides to Top and Bottom
- Lay one side flat and align the bottom panel using a clamping square.
- Apply a thin bead of glue and drive 1.75-inch screws with 1-inch penetration.
- Attach the second side and then the top panel using the same method.
- Accept slight wobbling at this stage as normal before back installation.
Install Back Panel and Nailers
Cut the 1/4-inch back panel to fit and apply glue to the cabinet edges. Nail it in place with flathead nails and check that diagonal measurements match. Mount top and bottom nailers 4.25 inches from the cabinet bottom and screw them into the sides.
Finish with Edge Banding and Sanding
Raw edges ruin the appearance of even the best-built cabinets. Proper finishing techniques hide plywood layers and create a professional look.
Apply Heat-Activated Edge Banding
Cut banding slightly longer than the edge and iron it on with even pressure. Let it cool completely before trimming ends with a sharp knife. Use a double-blade trimmer for clean sides and a professional finish.
Sand in Grit Progression
Start with 120 grit to remove tool marks and progress to 180 grit for smoothness. Finish with 220 grit to prepare the surface for stain or paint. Wipe everything with a tack cloth to remove all dust before applying finish.
Install Shelves and Hardware Correctly
Functional storage requires adjustable shelves and smooth-operating doors. Proper hardware installation ensures long-term usability.
Cut Shelves 1/8 Inch Smaller
Cut shelves 1/8 inch narrower than the interior width for easy installation. This gap accounts for wood movement and minor measurement inaccuracies. Apply edge banding to the front edge of each shelf for a finished look.
Install Shelf Clips and Pins
Insert plastic clips into pre-drilled pin holes located 1 inch from the front edge. Snap shelves into place and test for stability without wobble. Use side-and-bottom support pins for shelves holding heavy items.
Mount Doors with European Hinges
Drill 35mm cup holes using a door hinge jig for precise placement. Attach hinges to the face frame first, then hang the door. Adjust the screws to create perfect gaps and ensure smooth operation.
Mount Cabinet to Wall Correctly
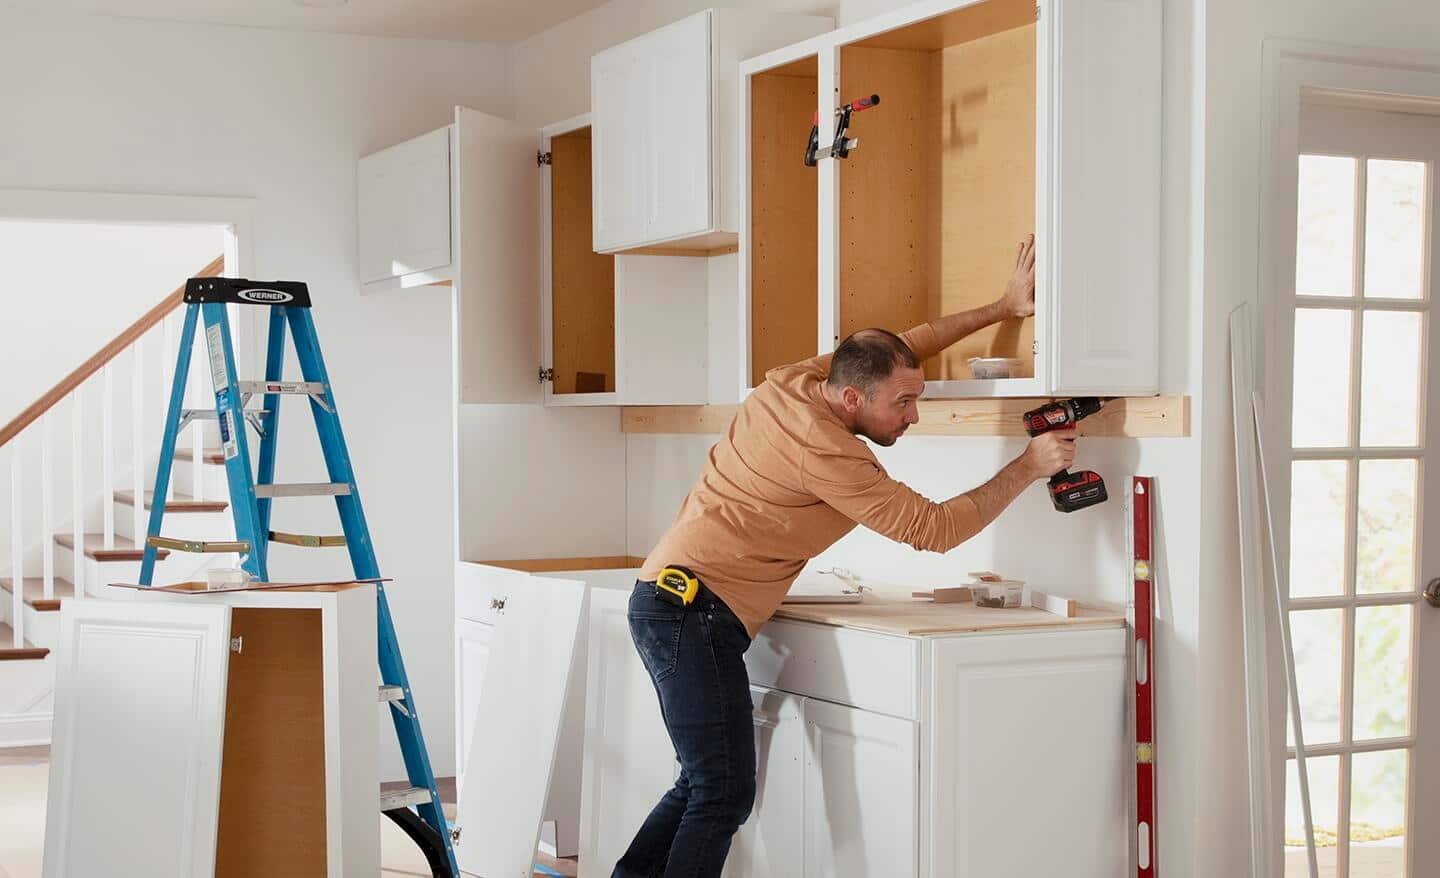
Improper installation leads to sagging or catastrophic failure. Secure mounting protects your investment and ensures safety.
Locate Studs and Set Support
Use a stud finder to mark wall stud centers accurately. Install a temporary ledger board or nail a scrap block at 54 inches height. This support holds the cabinet steady while you secure it to the wall.
Secure Top and Bottom Nailers
Drive long construction screws through nailers directly into wall studs. Use at least two screws per stud for maximum holding power. Align multiple cabinets with a laser level before attaching them to each other and the wall.
Add Trim and Final Details
Professional touches elevate your project from a basic box to custom cabinetry. These final steps hide imperfections and integrate the unit into the room.
Install Front and Side Trim
Use 1x4s or decorative molding across the front and sides for a built-in look. Install this trim before hanging doors if the doors do not reach the top. This sequence prevents interference and ensures a tight fit.
Caulk Gaps in Humid Areas
Apply painter’s caulk between the door and frame in kitchens or laundry rooms. Smooth the bead with your finger and wipe away excess immediately. This seals gaps against moisture and improves the overall appearance.
Ensure Longevity and Adjustability
Smart building practices extend the life of your cabinet. Allowing for movement and verifying squareness prevents future issues.
Verify Squareness with Diagonal Test
Measure from corner to corner after assembly to confirm the box is square. Both diagonals must be equal to prevent racking and ensure doors fit properly. Twist the box gently until measurements match before final tightening.
Allow for Wood Movement
Never glue shelf pins or clips so you can reposition shelves later. Leave a 1/8-inch gap on shelf width to prevent binding during humidity changes. These small allowances accommodate natural wood expansion and contraction.
Frequently Asked Questions About Building Wall Cabinets
What is the standard depth for a wall cabinet?
Standard wall cabinet depth ranges from 12 to 14 inches, with 13 inches being ideal. If using overlay doors, build the box 1 inch shallower so the door adds the final depth.
How high should I mount a wall cabinet?
Mount the bottom of the cabinet 18 inches above the countertop surface. This places the base at 54 inches from the floor when using standard 36-inch counters.
Can I build a wall cabinet without a face frame?
Yes, you can build a basic six-piece cabinet without a face frame for workshops. Apply edge banding to visible front edges for a clean, finished appearance.
What type of plywood is best for cabinet carcasses?
Use 3/4-inch maple or birch plywood for sides, tops, and bottoms. These materials offer stability and strength while resisting warping better than particleboard.
How do I ensure my cabinet is square?
Measure diagonally from corner to corner after assembly. Adjust the box until both diagonal measurements are exactly equal before securing the back panel.
Key Takeaways for How to Build a Wall Cabinet
Building a wall cabinet requires careful planning of dimensions and material layout to ensure a perfect fit. Whether you choose pocket screws for speed or dados for a premium look, square assembly and solid mounting are essential. Select materials based on your environment and always verify diagonal measurements before finalizing the build.
Start your project by mapping cuts on a 4×8 sheet to minimize waste. Follow the specific steps for your chosen construction method to create durable storage. With precise execution, you will have custom cabinetry that maximizes your vertical space effectively.


