

A squeaky or misaligned cabinet door can be more than just an annoyance—it’s a sign that your hinges may need replacing. Whether you’re refreshing your kitchen, repairing worn hardware, or upgrading to soft-close hinges, changing cabinet door hinges is a simple DIY project that makes a big difference. Most standard hinges wear out over time from daily use, moisture exposure, or loose screws. The good news? With basic tools and a little patience, you can replace them in minutes without hiring a professional.
This guide walks you through every step of how to change cabinet door hinges—from identifying the type you have to installing new ones properly. You’ll learn how to remove old hinges safely, choose the right replacement, align new doors, and avoid common mistakes like stripping screw holes or buying incompatible hardware. Whether you’re replacing one hinge or upgrading an entire kitchen, this step-by-step process ensures smooth, quiet operation for years to come.
Identify Your Hinge Type

Before buying new hinges, you must know what kind you’re replacing. Cabinet door hinges come in several styles, each requiring specific mounting and installation techniques.
Check for Overlay Hinges
Overlay hinges are the most common in modern cabinets. They allow the door to sit flush or slightly over the cabinet frame. These hinges attach directly to the front edge of the cabinet and the back of the door. If your door covers most or all of the cabinet opening when closed, it likely uses an overlay hinge.
There are three subtypes: full overlay (covers entire frame), partial overlay (covers about half the frame), and inset (sits inside the frame). Matching the correct type ensures proper fit and alignment.
Look for Concealed vs. Surface-Mount
Concealed hinges (also called cup or European-style) are hidden when the door is closed. You’ll see a small drilled hole (35mm diameter) on the back of the door where the hinge cup is set. These are adjustable and widely used in modern cabinetry.
Surface-mount hinges are visible when installed and attach directly to the surface of the cabinet and door. Butt hinges and pivot hinges fall into this category and are common in older or custom cabinets.
Determine Mounting Style
Check how the hinge attaches to the cabinet. Some use a side-mount system, others use face-frame or inset mounting. Take note of screw placement, hinge arm shape, and whether it has clip-on or screw-on mounting. Removing one hinge carefully lets you bring it to the store for an exact match.
Remove Old Hinges Safely
Once you’ve identified the hinge type, it’s time to remove the old ones. Work carefully to avoid damaging the wood or surrounding finish.
Unscrew the Door from the Hinge
Open the cabinet door fully and locate the screws connecting the hinge to the door. Use a screwdriver or hex key (depending on hinge type) to loosen these first. Most concealed hinges have two screws on the door side.
Hold the door with one hand while removing the last screw to prevent it from falling. Gently lift the door off the cabinet-mounted part of the hinge.
Detach the Hinge from the Cabinet
Now remove the screws securing the hinge base to the cabinet side or frame. Again, support the hinge as you remove the final screw. Keep all screws organized—some may be reusable.
If screws are stuck, apply a drop of penetrating oil and wait a few minutes before trying again. Avoid forcing the screwdriver, which can strip the head.
Inspect for Damage
After removal, check the screw holes in both the door and cabinet. Stripped or enlarged holes may need reinforcement with wood filler or toothpicks before installing new hinges.
Also examine the old hinge for wear—rust, cracked plastic parts, or bent metal indicate why it failed. Use this info when selecting replacements.
Choose the Right Replacement Hinges
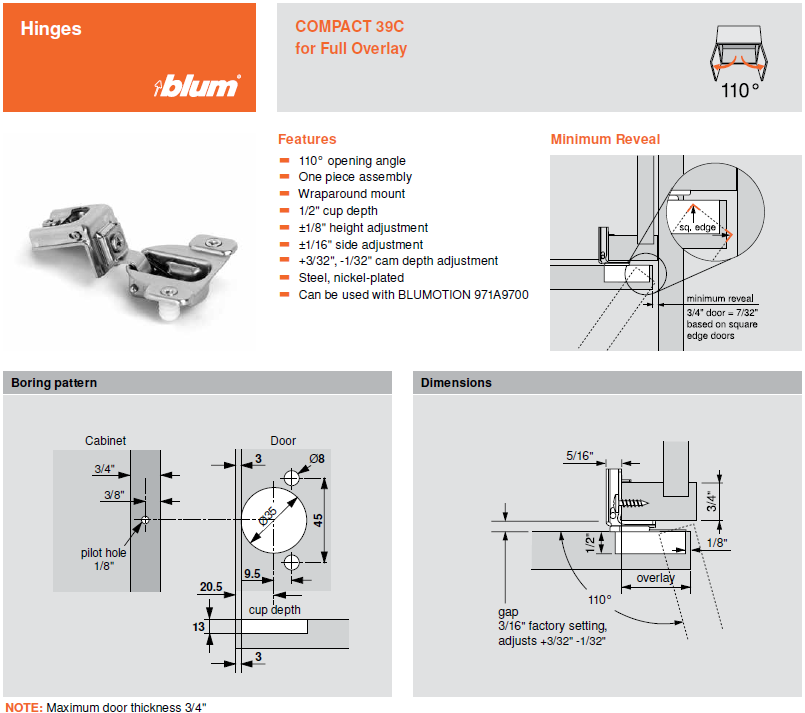
Buying the correct hinge ensures a seamless installation and long-term performance.
Match the Hinge Specifications
Take the old hinge to a hardware store or measure it precisely. Key dimensions include:
– Cup diameter: Usually 35mm for European hinges
– Mounting plate size: Varies by brand and model
– Arm length and style: Determines door clearance and opening angle
Most hinges are labeled as 95°, 107°, or 110°—this refers to how far the door opens. For standard cabinets, 95° or 107° works best.
Decide on Soft-Close Feature
Modern hinges often include soft-close mechanisms that prevent slamming. While slightly more expensive, they add comfort and reduce wear on cabinets.
If upgrading from standard to soft-close, ensure your cabinet has enough clearance and that the new hinge matches the door thickness (typically 16–20mm).
Buy Quality Over Cost
Opt for reputable brands like Blum, Hafele, or Grass. These offer better durability, smoother adjustment, and longer warranties than generic models. Even if replacing just one hinge, buying in packs (6–10) saves money if future repairs are needed.
Install New Cabinet Door Hinges
Now that you have the right hinges, it’s time to install them correctly.
Attach Hinge to the Door First
Place the new hinge into the drilled cup on the back of the door. It should fit snugly. Secure it with the provided screws using a screwdriver—don’t overtighten, as this can crack the door material.
For concealed hinges, align the mounting plate so the arm swings freely when the door opens. Double-check that the hinge rotates smoothly before moving on.
Position the Cabinet-Mounted Base
Hold the door near the cabinet opening and align the hinge arm with the cabinet side. The base plate should sit flush against the interior wall or frame.
Use the old screw holes if they’re intact. If they’re stripped, fill them first (see next section). Mark the screw positions lightly with a pencil if needed.
Secure the Hinge to the Cabinet
Insert the screws into the base plate and tighten them gradually. Don’t fully tighten one screw at a time—alternate between them to keep the plate level.
Once secured, open and close the door to test movement. It should swing freely without rubbing or sticking.
Fix Stripped Screw Holes

Stripped wood is common in older cabinets and can compromise hinge stability.
Use Toothpicks and Wood Glue
Break several wooden toothpicks into small pieces and insert them into the stripped hole. Apply wood glue around the tips and pack the hole tightly.
Snap off the excess flush with the surface and let the glue dry completely (at least 2 hours). Then reinsert the screw—it should now hold securely.
Try Wooden Dowels for Heavy Doors
For larger or heavier doors, use a wooden dowel rod instead. Drill out the old hole slightly (1/8″ larger), apply glue inside, insert the dowel, and cut it flush after drying.
Redrill a pilot hole for the screw. This creates a stronger anchor point than toothpicks.
Align and Adjust the Door

Even perfectly installed hinges may need fine-tuning for proper alignment.
Use the Three-Way Adjustment
Most concealed hinges allow adjustment in three directions:
– Up/down: Vertical alignment
– In/out: Depth relative to cabinet front
– Left/right: Horizontal positioning
Locate the adjustment screws on the hinge base and arm. Turn them slowly with a hex key while observing the door’s position.
Fix Gaps or Misalignment
If the door doesn’t line up with neighbors, adjust incrementally. For example, if the top is too far out, turn the “in/out” screw clockwise on the top hinge.
Check that all doors in a row sit evenly. Small changes make a big visual difference.
Test Door Operation
Open and close the door multiple times. Listen for scraping or binding. A properly aligned door should move smoothly and close completely without pushing.
If using soft-close hinges, ensure they engage automatically within the last few inches of closing.
Replace All Hinges for Uniform Look
If only one hinge is broken, you might be tempted to replace just that one. But mismatched finishes or wear levels can look unprofessional.
Match Finish and Style
Even if hinges are the same model, slight color differences between old and new can be noticeable, especially in brushed nickel or oil-rubbed bronze.
For a clean, updated appearance, consider replacing all hinges on visible cabinets at once.
Upgrade in Batches
If replacing all at once isn’t feasible, do upper and lower cabinets in separate phases. This maintains functionality while improving aesthetics gradually.
Label doors during removal (e.g., “Upper Left Corner”) to avoid confusion during reinstallation.
Maintain Hinges for Long Life
Proper care extends hinge life and keeps doors operating smoothly.
Clean and Lubricate Annually
Dust, grease, and grime build up on hinges, especially in kitchens. Wipe them down with a damp cloth and mild cleaner every 6–12 months.
Apply a small amount of silicone-based lubricant to moving parts. Avoid oil-based lubes, which attract dirt.
Tighten Screws Periodically
Doors shift over time due to use. Check hinge screws every 6 months and tighten any that feel loose. This prevents misalignment and further damage.
If screws continue to loosen, reinforce the holes or use thread-locking adhesive.
Watch for Early Warning Signs
Squeaks, sagging doors, or visible wobble mean it’s time to inspect hinges. Addressing small issues early prevents bigger repairs later.
Soft-close mechanisms that fail to engage should be replaced promptly to avoid door damage.
Frequently Asked Questions About Changing Cabinet Door Hinges
How do I know which hinge type my cabinet uses?
Open the door and look at how it attaches. If you see a cup drilled into the door with a concealed arm, it’s a European concealed hinge. If the hinge is visible on the surface, it’s a surface-mount hinge. Overlay hinges cover the cabinet frame when closed, while inset hinges sit flush inside the frame.
Can I replace just one hinge or should I replace all of them?
You can replace just one, but matching the finish and style of the existing hinges is critical. Slight color differences between old and new hardware are often noticeable, especially in brushed nickel or bronze finishes. For the most uniform look, replace all hinges on visible cabinets at the same time.
What tools do I need to change cabinet door hinges?
You’ll need a screwdriver (Phillips or flathead depending on screw type), a hex key for adjustment screws on concealed hinges, and possibly a drill for pilot holes. For stripped holes, keep wooden toothpicks, wood glue, and optionally wooden dowels on hand.
How do I fix a cabinet door that won’t close properly?
First check that the hinge screws are tight. If they are, use the three-way adjustment screws on the hinge to shift the door vertically, horizontally, or in depth. For soft-close hinges, ensure the mechanism engages in the last few inches of closing. If the door still won’t close, the hinge may be damaged or the door may be warped.
What does the degree rating on a hinge mean?
The degree rating (95°, 107°, 110°) indicates how far the door opens. A 95° hinge opens to a right angle, which is standard for most cabinets. Higher degree ratings allow wider openings, useful for corner cabinets or pull-out shelves. Match the degree to your existing hinge for consistent operation.
How do I prevent hinge screws from stripping again?
Use wood glue and toothpicks to fill stripped holes before reinstalling screws. For heavy doors, drill out the hole and insert a wooden dowel for a stronger anchor. Avoid overtightening screws, and check them every 6 months to catch looseness early.
Key Takeaways for Replacing Cabinet Door Hinges
Changing cabinet door hinges is a straightforward project that improves both function and appearance. The most critical steps are identifying your hinge type before purchasing, matching the correct specifications, and aligning the door properly after installation. Skipping any of these steps can lead to misaligned doors, stripped screws, or hinges that don’t fit.
Remember these three essentials:
– Identify first: Know your hinge type (overlay, concealed, or surface-mount) before buying replacements
– Match specs: Bring the old hinge to the store or measure cup diameter, plate size, and opening angle
– Adjust after install: Use the three-way adjustment screws to fine-tune alignment for smooth operation
Start by removing one hinge from your most troublesome door and bringing it to a hardware store for an exact match. With the right hardware and this guide, you’ll have all your cabinet doors operating smoothly in a single afternoon.


