

Installing crown molding on kitchen cabinets adds a polished, custom look, but cutting it correctly is crucial. If you’re working with 5-inch crown molding like the type described in a popular contractor forum, you’re dealing with a tall profile that demands precision. The challenge is that many crown molding pieces come with a pre-attached mounting strip that can interfere with clean, safe cuts on your miter saw.
This guide walks you through exactly how to cut crown molding for cabinets, including whether to remove the mounting strip, how to position the molding on the saw, and pro techniques for repeatable, accurate cuts without damaging your tools or material.
Remove the Mounting Strip Before Cutting
Most cabinet crown molding comes with a 2-inch by 3/4-inch mounting strip already attached. This strip is often secured with hot-melt glue and plastic nails or staples, not strong adhesive. As one contractor noted, these fasteners are rarely placed where you want them and always seem to land right at your cut line.
Why the Strip Must Go
- Staples or nails can damage your saw blade if hit during a cut
- The strip may shift or split when clamped against the saw fence
- You gain better control and accuracy when cutting bare molding
Pro Tip: Take the molding off the strip before installing cabinets. Use pliers to pull out plastic nails, then reattach the strip with wood glue and clamps for a solid bond. Let it cure for at least an hour before handling.
💡 Why It Matters: A securely reattached nailer ensures consistent spring angle and prevents breakage during installation.
Use the Upside-Down, Backward Method
The best way to cut crown molding for cabinets is upside down and backward on a compound miter saw. This mimics how the molding sits when installed, with the top edge against the wall and the bottom edge against the cabinet.
Set Up Your Saw Correctly
- Lay the molding upside down on the saw base
- Tilt the molding backward so the top edge leans into the fence, replicating the spring angle
- The bottom of the molding touches the saw table while the top rests against the fence
This setup allows you to make simple miter cuts by just swiveling the saw head without adjusting the bevel. For standard 90-degree cabinet corners, use 45-degree miters.
✅ Key Benefit: With this method, bevel stays at 0 degrees and only the miter angle changes. This makes it much easier to dial in precise joints.
Build a Simple Height Jig for Accuracy
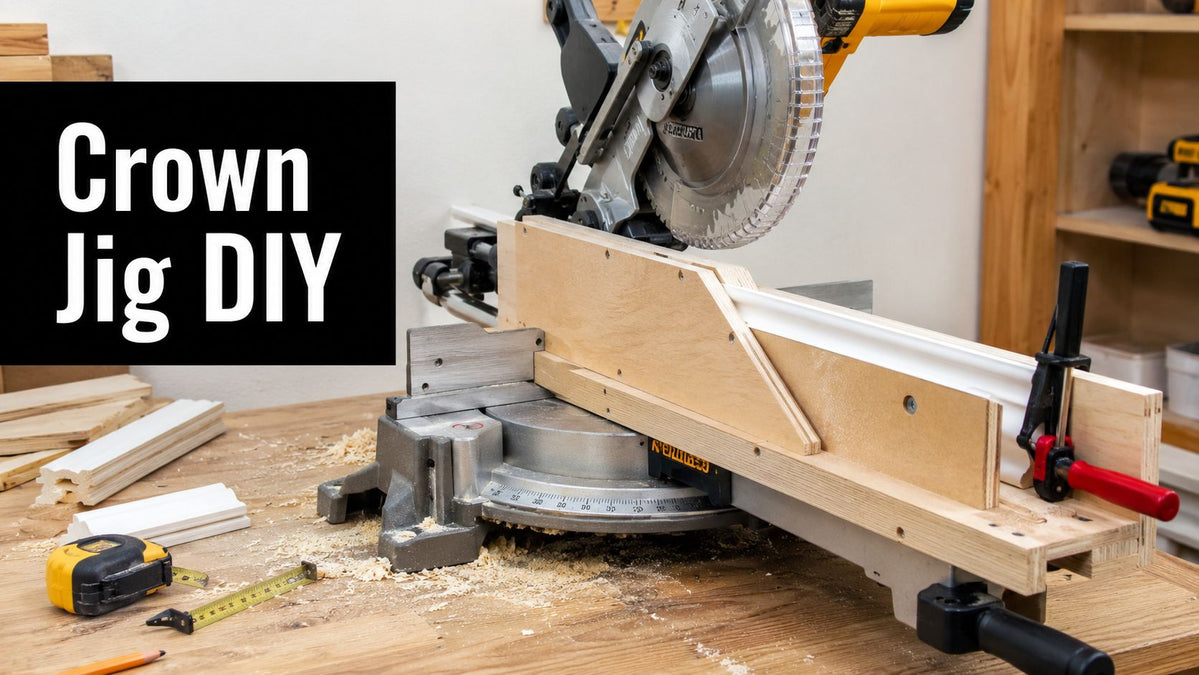
To ensure every piece is cut at the same height and angle, build a quick height jig using scrap plywood. This jig gives you perfect placement and repeatability for every cut you make.
Create a Repeatable Stop Block
- Rip a piece of 3/4-inch plywood to the exact height from the bottom of the crown to its spring point where it meets the cabinet
- For many 5-inch crowns, this is around 2 7/8 inches
- Attach this strip vertically to the back of your saw fence
- Place the bottom of the molding flush with the top of the jig
Now each time you place the molding in position, it sits at the correct angle and depth. The height isn’t critical as long as every piece is cut at the same height.
🔧 Pro Tip: Mark the jig with the correct height for future use. Label it “Cabinet Crown 5 Inch” so you can reuse it on other jobs.
Cut with the Mounting Strip Removed
Even though the original molding came with a strip, do not cut with it attached, especially if it’s held by weak fasteners. Contractors who have worked with these pre-attached nailers consistently recommend removing them before any cutting.
Avoid These Risks
- Staples hitting the blade can cause damage or kickback
- Inconsistent pressure against the fence due to loose strip
- Misaligned cuts from shifting material
Instead, remove the strip, cut all pieces cleanly, and reattach the strip afterward with wood glue and finish nails.
⚠️ Warning: Never let metal staples or nails contact the saw blade. Always inspect each piece before cutting.
Handle Short Pieces Safely
Short returns and end caps are tricky when working with pre-attached nailers. Some short sections may have only one or no staples and can fall apart during handling, requiring you to glue and nail them back together.
Prevent Breakage
- Cut returns after the main run so you can match grain and color
- Use a 1×2 sacrificial block along the fence to support small pieces
- Clamp or hand-hold securely but keep fingers clear
🛠️ Safety First: Use push sticks or backup blocks to avoid positioning your hands near the blade.
Make Test Cuts Before Final Cuts

Even with perfect setup, crown molding can have slight warps or inconsistencies, especially MDF-based veneer wrapped products. A 5-inch crown can have a belly, so your best test cuts may not come out exactly as expected.
Do This
- Cut two test scraps at 45-degree miters
- Join them together and hold against a mock cabinet corner
- Check for gaps on the front show surface and the back fit to wall or cabinet
If there’s a gap, adjust the miter slightly to 44 or 46 degrees until tight. You can always fit a little with a block plane, but you cannot add material back once removed.
🔍 Visual Check: Look for light passing through the joint. No light means a good fit.
Avoid Coping When Possible
While coping is common for wall crown, it’s not ideal for cabinets. The narrow cabinet tops leave less room for deep cope cuts, and coping increases the risk of chipping delicate veneers.
Why Miter Instead of Cope
- Cabinet tops are narrow with less surface area for cope joints
- Coping can damage thin veneer edges
- Miters are faster and cleaner when angles are accurate
Stick with precision miters for cabinet crown and save coping for tall wall crown applications.
Use the Right Saw and Blade
A 10-inch sliding compound miter saw works for most 5-inch crown, but some profiles won’t fit under the guard. The crown you’re using may just barely fit under a 10-inch saw, so a 12-inch saw provides more clearance.
Upgrade When Needed
- Use a 12-inch saw if the crown is too tall for your current setup
- Choose an 80-tooth fine-cut blade for clean cuts on veneered MDF or solid wood
- Apply masking tape along the cut line to reduce tear-out
✅ Blade Tip: Keep your blade sharp. Dull blades crush veneer edges and create ragged cuts.
Install Crown While Cabinets Are on the Floor
Attaching crown to cabinets can be challenging because there isn’t much room on the face frames. Nailing them on can result in splitting either the molding or the frame, and if walls aren’t high enough, you can’t get room for a drill on top.
Benefits of Floor Installation
- More room to clamp and nail
- Easier access to top edges
- Less risk of splitting face frames overhead
When possible, attach the crown while the cabinet is on the floor. This doesn’t always work for a long run, but it makes the job significantly easier when the layout allows.
Fix Fit Issues with a Block Plane
Even perfect cuts may need minor adjustments. Use a low-angle block plane to shave high spots on mitered edges, feathering the edge slightly so the front closes tightly.
Fine-Tune Joints
- Use a block plane to remove small amounts from mitered edges
- Sand lightly with 180-grit paper, avoiding rounding the show face
- Check the fit against the back fence, not just the table stop
The fit to the back fence is what controls the accuracy of the cut. Make sure the molding fits there regardless of how it fits the table stop.
🎯 Goal: A seamless front joint. You should not see a gap when viewing straight on.
Reattach the Mounting Strip Properly
Once all cuts are complete, reattach the mounting strip with wood glue and clamps. Let it cure for about an hour before installation.
Proper Reattachment Steps
- Remove any remaining plastic nails or staples from the strip
- Apply wood glue to the back of the crown where the strip sits
- Clamp the strip firmly for at least one hour
- Use 1-inch brad nails for additional holding power if needed
Some contractors prefer to make their own nailers using construction adhesive to glue the molding in place. This provides confidence that the crown will stay attached over time.
Summary: Key Steps to Cut Cabinet Crown Molding
| Step | Action |
|---|---|
| 1 | Remove the mounting strip before cutting |
| 2 | Cut crown upside down and backward on miter saw |
| 3 | Use a 3/4-inch plywood height jig for consistency |
| 4 | Keep bevel at 0 degrees and adjust only miter angle |
| 5 | Make test cuts and dry-fit joints |
| 6 | Avoid coping and use precision miters |
| 7 | Reattach nailer with wood glue after cutting |
| 8 | Install crown before hanging cabinets when possible |
Frequently Asked Questions About Cutting Crown Molding for Cabinets
Should I remove the mounting strip from crown molding before cutting?
Yes, remove the mounting strip before cutting. The strip is typically attached with hot-melt glue and plastic nails that can damage your saw blade. Remove it, cut your molding, then reattach the strip with wood glue and clamps.
What angle do I cut crown molding for cabinets?
For standard 90-degree cabinet corners, cut 45-degree miters. Cut the crown upside down and backward on the miter saw so the bevel stays at 0 degrees and only the miter angle changes.
How do I hold crown molding when cutting on a miter saw?
Place the molding upside down with the top edge leaning into the fence and the bottom edge on the saw table. Use a height jig made from 3/4-inch plywood attached to the saw fence for consistent positioning.
Can I cut crown molding with a 10-inch miter saw?
A 10-inch saw can work for most 5-inch crown molding, but some profiles barely fit under the guard. A 12-inch saw provides more clearance and is recommended if your crown is too tall.
Why does my crown molding have gaps at the joints?
Gaps usually come from inconsistent positioning or warped molding. Make test cuts first, check for light passing through joints, and use a block plane to fine-tune mitered edges. Cut consecutive pieces from the same length to minimize variation.
Do I need to cope crown molding for cabinets?
No, coping is not ideal for cabinet crown molding. Cabinet tops are narrow with less room for cope cuts, and coping risks chipping delicate veneers. Precision miters work better for cabinets.
Key Takeaways for Cutting Cabinet Crown Molding
Cutting crown molding for cabinets doesn’t require advanced skills, just the right setup and attention to detail. The most important step is removing the pre-attached mounting strip before any cutting to protect your blade and ensure accuracy. This simple action prevents damage and gives you full control over each cut.
Using the upside-down and backward method with a height jig gives you consistent, repeatable cuts every time. Keep the bevel at 0 degrees and adjust only the miter angle for clean, professional joints. Make test cuts before committing to final pieces, and use a block plane for minor adjustments.
Take your time, go slow, and never rush the first piece. With this method, even a first-timer can install flawless cabinet crown molding that looks professionally done.


