
Peeling laminate cabinets create an immediate eyesore in any kitchen, often starting with a small bubble or lifting corner near the sink. You do not need to replace your entire kitchen to solve this, as learning how to fix peeling laminate cabinets is a manageable DIY project for most homeowners.
This guide details every step required to restore your cabinetry, from assessing damage and selecting the right adhesive to clamping techniques and moisture prevention. You will discover how to reattach loose layers securely and seal edges so the problem does not return.
Assess Cabinet Damage Before Applying Glue
Rushing into a repair without understanding the root cause often leads to failure. You must identify the construction type and severity of the peeling to choose the correct restoration strategy.
Identify Heat-Laminated Construction
Most kitchen cabinets feature heat-laminated faces where pressure fuses a thin plastic layer to particleboard. Inspect the interior door or back panel for manufacturer tags or alphanumeric codes to help match materials later. If tags are missing, document the style, color, and texture for your records.
Categorize the Severity of Peeling
- Minor Damage: Small bubbles or localized lifting at edges caused by minor adhesive failure.
- Extensive Damage: Large sections of delamination or warping indicating systemic issues.
- Moisture Check: Press gently on lifted areas. If the substrate feels damp or spongy, you must address moisture before gluing.
Pro Tip: Higher-grade laminates resist moisture better. If your cabinets are older or lower grade, they are more prone to premature peeling in high-traffic zones.
Clean and Prep Surfaces for Strong Adhesion
Adhesive cannot bond to dirt, grease, or moisture. Proper surface preparation is the single most critical factor for a lasting repair.
Execute Proper Cleaning Protocols
- Remove all loose particles and dust from the exposed substrate.
- Wash the area with a mild detergent solution and a soft, non-abrasive cloth.
- Avoid harsh chemicals or solvents that could degrade the laminate surface.
- Dry the area thoroughly using a clean cloth or air drying.
Sand and Test Hidden Areas
Lightly sand slick surfaces or hardened adhesive residues with fine-grit sandpaper to create mechanical tooth. Wipe away all dust with a tack cloth before proceeding. Always test your chosen adhesive on a hidden spot to ensure it does not discolor the finish.
Critical Note: In humid climates, run a dehumidifier in the room for 12 to 24 hours before starting. Moisture is the primary enemy of laminate adhesion.
Reattach Peeling Laminate with Flexible Adhesive
For minor to moderate peeling, direct re-adhesion is the most cost-effective solution. Success depends on choosing the right product and applying it correctly.
Select the Correct Adhesive Type
- E6000 Adhesive: Ideal for small to medium repairs due to its flexibility and strength.
- Contact Cement: Best for larger areas requiring an instant, strong bond.
- Clear Flexible Glue: Acceptable if specifically labeled for laminate use.
Apply Adhesive and Reposition Material
- Inject or brush a thin layer of adhesive onto the exposed substrate.
- Warm stiff laminate with a low-heat hair dryer to make it pliable.
- Press the laminate back into place, working from the center outward to remove air.
- Wipe away excess glue immediately with a damp cloth.
Warning: Do not over-apply glue. Excess squeeze-out is difficult to clean and can ruin the surrounding finish.
Clamp Repairs for Maximum Bond Strength
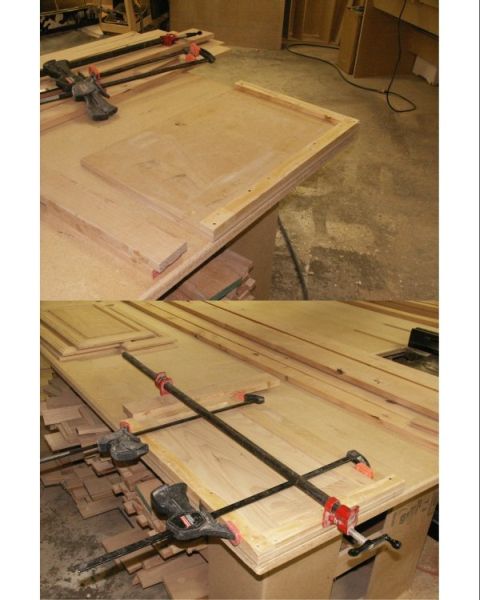
Pressure ensures full contact between the laminate and substrate. Without adequate clamping, the repair may lift again as the adhesive cures.
Apply Even Distributed Pressure
Place a clean cloth or wax paper over the repair to protect the surface finish. Use bar clamps, spring clamps, or heavy books to apply firm pressure across the entire repaired area. Focus extra attention on edges and corners where peeling frequently recurs.
Allow Full Curing Time
Leave clamps or weights in place for at least 24 hours. Waiting 48 hours is better for maximum bond strength. Removing pressure too early is a common cause of re-peeling.
Seal Edges to Prevent Future Moisture Intrusion
Even a perfect glue job will fail if water penetrates the seam. Sealing the perimeter is non-negotiable for long-term durability.
Apply Silicone or Edge Tape
Run a thin bead of clear silicone caulk along the reattached edge and smooth it with a damp finger. Alternatively, apply matching laminate edge tape for a rigid, factory-like seal. Trim any excess tape flush with a utility knife.
Maintain Edge Integrity
Wipe away excess sealant immediately before it dries. Allow the sealant to cure fully for 24 hours before exposing the area to moisture or cleaning products. Regular inspection of these seals helps catch issues early.
Repair Cosmetic Chips and Small Gaps

When the laminate is damaged rather than just loose, you need a cosmetic filler rather than just adhesive.
Use Laminate Matching Repair Kits
Products like FormFill 4012 are designed to fill chips and tiny gaps while matching color and texture. Clean the area, apply the putty with a plastic tool, and let it cure before buffing.
Understand Limitations
- These kits provide a cosmetic fix, not structural support.
- They work best in low-stress areas away from heavy use.
- Visible seams may appear if application is not precise.
Address Severe Delamination and Damage
If the laminate is cracked, torn, or the substrate is swollen, simple re-gluing will not suffice.
Consider Professional Refacing
Specialists can strip old laminate and apply new sheets using industrial heat presses. This offers a durable, like-new finish and is cost-effective if cabinet boxes remain solid.
Evaluate Replacement Options
Replace individual faces or entire units if matching is impossible. Be aware that finding exact matches for older cabinets is difficult due to fading and discontinued styles. Custom options may be required.
Prevent Laminate Peeling with Proper Maintenance
A repair is only as good as its longevity. Stop peeling before it starts by controlling your kitchen environment.
Control Humidity and Heat
- Wipe spills immediately, especially near edges and seams.
- Use a dehumidifier in humid climates or bathrooms.
- Keep heat sources like toasters and hair dryers away from cabinet fronts.
Clean Safely and Gently
Use damp cloths rather than soaking wet ones for cleaning. Avoid harsh chemicals like bleach or ammonia that break down adhesive bonds. Dry edges thoroughly after every cleaning session.
Choose the Right Fix for Your Situation
| Damage Level | Best Solution | Tools Needed | Durability |
|---|---|---|---|
| Small edge lift | Re-glue and clamp | E6000, clamps, cloth | High |
| Minor bubble | Inject adhesive | Syringe, hairdryer | High |
| Chip or scratch | Repair kit | FormFill, putty knife | Medium |
| Large delamination | Professional reface | N/A (hired pro) | Very High |
| Cracked laminate | Replace door | Measuring tape, screwdriver | Permanent |
Frequently Asked Questions About Fixing Peeling Laminate Cabinets
What is the best adhesive for fixing peeling laminate cabinets?
E6000 adhesive is highly recommended for its flexibility and strength. Contact cement works well for larger areas requiring an instant bond. Ensure the product is labeled for laminate use.
Can I fix peeling laminate without replacing the whole cabinet?
Yes, most minor to moderate peeling can be fixed by cleaning, re-gluing, and clamping the loose sections. Severe damage or swollen substrates may require face replacement.
Why does my laminate keep peeling after repair?
Moisture intrusion is the most common cause. If you do not dry the substrate thoroughly or seal the edges, water will weaken the new bond. Poor surface preparation also leads to failure.
How long should I clamp the repaired laminate?
Leave clamps or heavy weights in place for at least 24 hours. Waiting 48 hours ensures the adhesive reaches maximum strength and prevents the laminate from lifting again.
Is peeling laminate a sign of water damage?
Often, yes. If the substrate feels spongy or looks swollen, water has penetrated the core. You must address the moisture source and dry the area completely before attempting repairs.
Key Takeaways for Fixing Peeling Laminate Cabinets
Fixing peeling laminate cabinets requires accurate assessment, thorough cleaning, and the right flexible adhesive. By clamping repairs for 24 to 48 hours and sealing edges against moisture, you can restore your kitchen’s appearance without full replacement.
Start by drying the area completely and testing your adhesive on a hidden spot. For extensive damage, consider professional refacing or replacement to ensure a lasting result. With proper maintenance and moisture control, your repaired cabinets will look great for years.


