
Hanging upper cabinets is one of the most challenging tasks in kitchen remodeling. If you’ve ever tried lifting a heavy cabinet, aligning it perfectly, and securing it while it teeters on edge, you’re not alone. Many DIYers and even pros still use what one cabinetmaker jokingly calls the “caveman way”: brute strength, a helper, and lots of shimming. But there’s a better way. With modern techniques like French cleats, adjustable stands, and pre-built hanging systems, you can hang upper cabinets faster, more accurately, and often by yourself.
This guide breaks down the most effective, time-tested methods for hanging upper cabinets, whether you’re working with custom builds or store-bought units. You’ll learn how to eliminate repeated lifting, achieve perfect alignment, and scribe like a pro, all without needing a second person for every step.
Use a French Cleat System
The French cleat is a game-changer for hanging upper cabinets. It’s a simple 45 degree beveled strip of wood or metal that splits into two interlocking parts: one mounted to the wall, the other to the cabinet. When joined, they form a secure, self-locking joint that supports heavy loads and allows for fine adjustments.
Install Wall Cleat First
Before lifting any cabinet, install the wall-side cleat. Cut a 3/4 inch plywood strip and rip it at a 45 degree angle using a table saw or circular saw with a guide. Attach the wall cleat to studs only, using 3 inch screws every 8 to 12 inches. Use a laser level or long straightedge to ensure it’s perfectly level across the run.
Pro Tip: Position the cleat so the cabinet sits at the correct height when the bottom edge rests on it. This avoids guesswork during installation.
Attach Cabinet Cleat Securely
On the cabinet, attach the mating cleat to the back panel. But don’t just screw into thin plywood. Reinforce the back if needed. For store-bought cabinets with hollow backs, fill the gap with solid poplar or MDF before mounting the cleat. This gives you solid material for screws and prevents pull-out.
Glue and pin the cleat in place, then screw through the wall cleat into studs once hung.
Adjust and Scribe Without Removal
One major advantage: you can adjust the cabinet laterally along the cleat after hanging. Need to scribe the end cabinet to an uneven wall? Slide it into position, mark the gap with a compass or scribing tool, then remove just the stile or panel, not the whole cabinet.
Expert Note: A 3/4 inch cleat allows up to 5/8 inch of scribe clearance, making it ideal for crooked walls.
Build In the System Early
The smartest time to plan your hanging method is before assembly, especially for custom cabinets.
Design With Cleats From the Start
Johnny Means recommends installing a full-length French cleat along the back edge of the entire cabinet run before final assembly. This ensures all cabinets sit on the same plane and align perfectly when slid into place.
Once the first cabinet is hung and plumb, the rest slide into alignment like puzzle pieces. No more checking level on each one.
Turn Multi-Person Jobs Into Solo Work
With the cleat system built in, hanging becomes a one-person task. Lift, slide, lock. No helper needed. This saves time and labor costs, especially if you’re paying $30 per hour for assistance.
Real-World Impact: One pro estimates he saves 2 to 3 hours per kitchen using this method.
Support With a Temporary Ledger
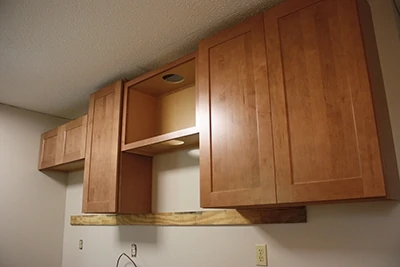
For those not using cleats, a temporary ledger board offers a low-tech but effective alternative.
Install a 1×3 Pine Support Strip
Richard Dragin suggests screwing a 1×3 pine board to the wall at cabinet height. Use a level and attach it to studs. This acts as a shelf, supporting the cabinet while you secure it.
Once all cabinets are fastened, remove the ledger and patch the holes.
Best for Full Runs
This method shines when installing multiple cabinets in a row. It eliminates the need to hold each one up individually and ensures consistent height across the run.
Warning: Don’t rely on drywall anchors. The ledger must be screwed into studs only to support weight.
Try Adjustable Roller Stands

If you’re lifting cabinets manually, adjustable roller stands can reduce strain and improve control.
Position and Slide Into Place
Steve Bracken uses homemade stands with swivel casters and adjustable heights. Roll the cabinet into position under the mounting area, raise it until snug, then slide it onto the wall cleat or ledger.
These stands allow fine lateral and vertical adjustments, making alignment easier even on uneven floors.
Ideal for Heavy or Tall Cabinets
Roller stands are especially helpful for tall pantry units or glass-front cabinets that need careful handling.
DIY Option: Build yours from 2x4s, threaded rods, and locking casters. Add a small roller at the top for smooth wall contact.
Modify Store-Bought Cabinets
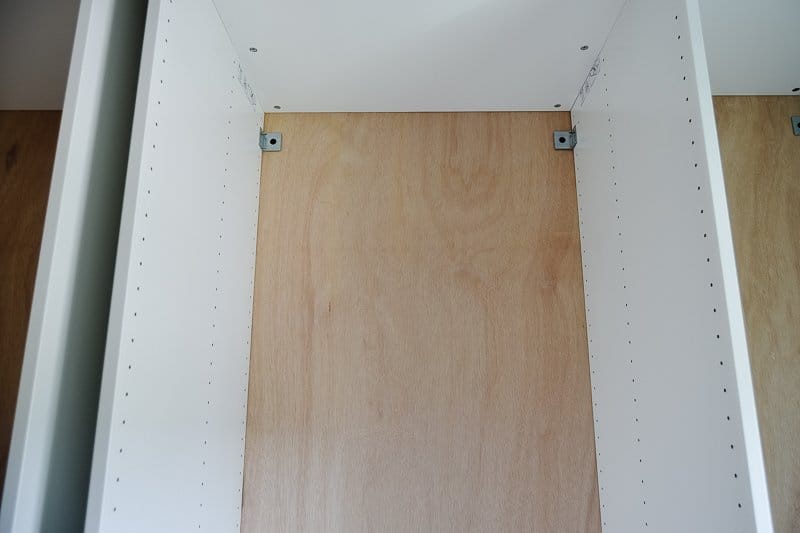
Most prefab cabinets aren’t designed for easy hanging. But with a few modifications, you can make them as secure and adjustable as custom units.
Fill the Back Pocket
Many stock cabinets have a recessed back panel that creates a gap between the cabinet and wall. This weakens any cleat or screw attachment.
Fill this pocket with a solid strip of poplar, plywood, or MDF. Glue and screw it flush with the back edge to create a solid mounting surface.
Add Cleats for Stability
Once reinforced, attach a 3/4 inch plywood cleat cut at 45 degrees. Use wood glue and 1 1/4 inch brad nails, then reinforce with screws through the wall-side cleat.
Time-Saving Hack: Pre-install cleats in your shop before delivery. Saves hours on-site.
Consider the Gill Lift (With Caution)
The Gill Lift is a mechanical lift designed for solo cabinet installation. While powerful, it has limitations.
Pros: Solo Installation, Height Control
- Lifts cabinets up to 12 feet.
- Adjustable arms support various widths.
- Great for high-up placements like transom cabinets.
At $30 per hour for labor, saving one helper’s time can justify the cost over a few jobs.
Cons: Tippiness and Bulk
- Base is only 9 inches wide, which can tip on long cabinets.
- Hard to level across wide spans.
- Bulky to store and transport.
Best Use Case: Smaller, lighter cabinets where precision matters more than speed.
When to Use It
Pair the Gill Lift with a French cleat for best results. Use the lift to raise the cabinet, then slide it onto the cleat for final positioning. This reduces stress on the machine and improves stability.
Use an Adjustable Rail System
For ultimate precision, consider a rail-mounted adjustment system, similar to high-end drawer slides.
Hang and Fine-Tune Like a Drawer
Frank Shic describes a system where the cabinet mounts to a wall rail that allows micro-adjustments in all directions. Think of it like a Blum hinge for whole cabinets.
- Move up, down, left, right, and in and out after initial hang.
- Perfect for cabinets with applied end panels or face frames.
Works With Other Tools
Combine with a Gill Lift or roller stand for initial placement. Then use the rail to dial in alignment, even after neighboring cabinets are installed.
Downside: Higher cost and complexity. Best for high-end custom work.
Scribe Smarter, Not Harder
Scribing is inevitable on older homes with uneven walls. But you don’t need to hang, remove, recut, and rehang repeatedly.
Scribe While Cabinet Is on Ground
Instead of mounting first, place the cabinet on the floor near the wall. Use a loose stile or temporary strip along the end, held in place with tape or clamps. Slide it toward the wall until it touches, then trace the contour with a pencil or compass.
Cut along the line with a jigsaw, then hang the cabinet, already scribed and ready.
Use a Compass Tool for Accuracy
A woodworker’s compass or scribing gauge maintains constant distance from the wall. Set it to the gap at the top, middle, and bottom, then trace the exact profile.
Pro Tip: Always scribe with the cabinet in its final orientation. Don’t flip it, or the line will be reversed.
Final Checks and Best Practices
Once cabinets are hung, verify everything before moving on.
Check for Plumb and Level
Use a 4 foot level on both front and side edges. Even with cleats, cabinets can twist during fastening.
Adjust with shims behind face frames or between cleats if needed.
Secure Every Stud Connection
Drive at least two 3 inch screws into each stud behind the cabinet. Don’t rely on nails or short screws.
For face-frame cabinets, screw through the top rail into the cleat or wall. For frameless, use cabinet-specific fasteners.
Leave Gaps for Expansion
Allow 1/8 inch gap between cabinets for seasonal wood movement. Use spacers or nickels as guides.
At corners or ends, leave space for trim or fillers, typically 1/4 inch.
Frequently Asked Questions About Hanging Upper Cabinets
What is the best way to hang upper cabinets by yourself?
The French cleat system is the most effective solo method. Install the wall cleat first, then lift the cabinet and slide it into place along the cleat. The self-locking joint holds the cabinet securely while you drive screws into studs.
How much weight can a French cleat hold?
A properly installed 3/4 inch plywood French cleat can support several hundred pounds when anchored into studs. The 45 degree angle creates a strong mechanical lock that distributes weight evenly across the joint.
Do I need to screw upper cabinets into studs?
Yes, always anchor upper cabinets into wall studs. Drywall anchors alone cannot safely support the weight of loaded cabinets. Use at least two 3 inch screws per stud for each cabinet.
How do I scribe an upper cabinet to an uneven wall?
Place the cabinet on the ground near the wall with a loose stile attached. Slide it toward the wall until it touches, then trace the wall contour with a compass or scribing tool. Cut along the line with a jigsaw before hanging.
Can I hang store-bought cabinets with French cleats?
Yes, but you must reinforce the back first. Fill any hollow pocket with solid wood like poplar or MDF, then attach the cleat to this solid surface. This prevents screw pull-out and ensures a secure mount.
What is the Gill Lift and is it worth buying?
The Gill Lift is a mechanical device that raises cabinets for solo installation. It’s useful for high or heavy cabinets but has a narrow base that can feel tippy on long units. It’s worth the cost if you frequently work alone and value labor savings.
Key Takeaways for Hanging Upper Cabinets Successfully
The most efficient way to hang upper cabinets is to build the hanging system into the cabinet from the start. French cleats installed during construction turn a two-person struggle into a smooth solo operation. For store-bought units, reinforce the back panel and add cleats before you begin.
Pair your hanging method with smart supports like roller stands or temporary ledgers to reduce strain and improve accuracy. Always scribe before hanging whenever possible, and verify plumb and level after each cabinet is secured.
Your next step: choose one method from this guide and practice it on a single cabinet. Once you master the technique, you’ll cut your installation time in half and never go back to the caveman way again.


