
Creating custom cabinet doors doesn’t require expensive machinery or years of woodworking experience. With a router and a few essential tools, you can craft beautiful, professional-looking doors in your own workshop. Whether you’re upgrading kitchen cabinets or building new ones from scratch, using a router to make cabinet doors gives you full control over the design, profile, and finish. This method is cost-effective, customizable, and surprisingly accessible, even for intermediate DIYers.
The key to success lies in understanding how to use your router effectively for routing stiles, rails, and panel profiles. Most custom cabinet doors use a classic cope-and-stick joint, which creates a seamless frame-and-panel design. This technique involves routing interlocking profiles on the edges of stiles and rails so they fit perfectly around a central panel. With the right router bits, setup, and technique, you can produce dozens of consistent, durable doors that look like they came from a high-end shop.
In this guide, you’ll learn exactly how to make cabinet doors with a router, including bit selection, jig setup, cutting techniques, common mistakes to avoid, and time-saving tips. By the end, you’ll have everything you need to start building your own cabinet doors with confidence.
Choose the Right Router and Bits
Use a Fixed-Base Router with 2+ HP
For cabinet door work, a fixed-base router with at least 2 horsepower is ideal. The fixed base offers better depth control and stability, which is critical when making repeated, precise cuts. While compact routers may work for light trimming, they lack the power and rigidity needed for continuous edge profiling. A plunge router can be used for certain tasks like panel raising, but a fixed-base model mounted in a router table delivers the most consistent results.
Ensure your router accepts 1/2-inch shank bits, as most cope-and-stick sets are designed for this size. Larger shanks reduce vibration and deliver cleaner cuts, especially in hardwoods like maple, cherry, or oak.
Select a Cope-and-Stick Bit Set
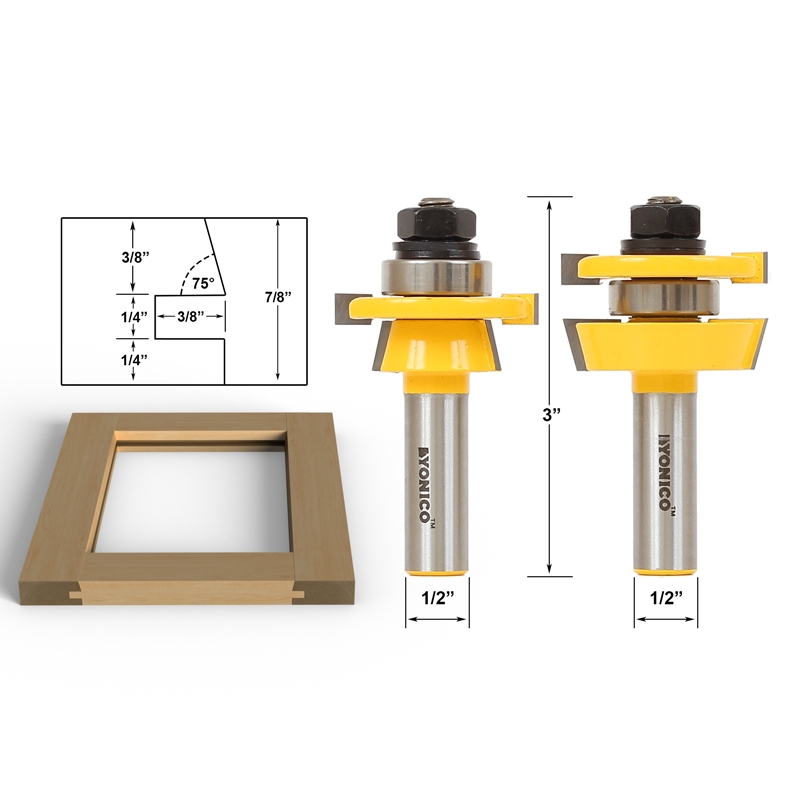
To make traditional frame-and-panel cabinet doors, you need a cope-and-stick bit set. These matched router bits create the interlocking profiles on stiles and rails:
- Stile and Rail Bit (Outer Profile): This bit cuts the decorative outer edge, such as ogee, chamfer, or square, and the stick profile, which is the groove that accepts the panel’s edge.
- Cope Bit (End Mill): A vertical bit used to cut the end of the rail so it copes into the profiled edge of the stile.
Common bit types include:
- 1/4-inch or 3/8-inch rail and stile bits for smaller doors or shaker-style designs
- 1/2-inch or 1-inch bits for larger, more ornate profiles
- Shaker-style bits that produce a clean, square-lipped frame ideal for painted cabinets
Always buy high-quality carbide-tipped bits from reputable brands. Cheap bits burn wood, chatter, and wear quickly.
Prepare Your Wood and Cut Stock
Use Straight, Kiln-Dried Lumber
Start with stable, straight-grained hardwood such as maple, poplar, cherry, or oak. Avoid warped, twisted, or cupped boards. Kiln-dried lumber minimizes movement after assembly, which is crucial for long-term durability.
Cut your stock slightly oversized, about 1/4 inch longer and wider than final dimensions. This allows room for jointing, planing, and final trimming after routing.
Joint and Plane All Edges
Before routing, ensure all stile and rail edges are perfectly flat and square. Use a jointer to flatten one face and one edge of each board. Then, run the boards through a planer to achieve uniform thickness. Finally, rip the rails and stiles to final width using a table saw with a sharp blade.
Square ends are essential for clean cope cuts. Use a crosscut sled or miter saw to trim ends precisely at 90 degrees.
Set Up the Router Table
Install the Stile and Rail Bit Safely
Mount the stile and rail bit in your router table with a 1/2-inch collet. Raise the bit so the cutting profile extends just above the table surface, typically 3/8 to 1/2 inch depending on the bit size.
Use a starter pin or fence block to guide the workpiece safely. Adjust the router fence to align with the bearing on the bit. The bearing rides along the edge of the wood, ensuring a consistent profile.
Always use featherboards to hold the workpiece firmly against the fence and table. This prevents lifting and kickback.
Test Cut on Scrap Wood
Never skip test cuts. Run a scrap piece of your stock material through the router to check:
- Depth of cut
- Fit of the profile
- Surface finish, checking for burning or chipping
Adjust bit height or feed rate as needed. If the wood burns, lower the bit slightly or slow your feed speed. If the profile looks incomplete, raise the bit incrementally.
Route the Stiles and Rails
Cut the Outer Profiles First
Run all stiles and rails through the stile and rail bit with the edge against the fence. This cuts the outer decorative profile and the groove, or stick, that will house the panel.
Keep feed direction correct: right to left when standing in front of the router table. Push the workpiece smoothly and steadily, and don’t force it.
After routing, label each piece, such as Top Rail or Left Stile, to avoid confusion during assembly.
Cope the Rail Ends for Perfect Fit
To connect rails to stiles, you must cope the ends of the rails so they fit snugly into the profiled edge of the stiles.
Mount the Cope Bit Vertically
Install the cope bit, which is a straight or down-spiral end mill, in a handheld router or router table. Use a fence or jig to guide the cut. The bit should match the diameter of the curved section inside the stile profile.
Use a Cope Jig for Accuracy
A cope jig holds the rail at 90 degrees and slides along the router fence. Position the rail so the cope bit trims only the end grain, following the contour of the stile’s profile.
Make several light passes, increasing depth gradually until the cope fits flush. Test-fit frequently, and the joint should slide together by hand with no gaps.
Pro Tip: Label stiles and rails in pairs after test-fitting. Wood can vary slightly, and matched sets ensure perfect alignment.
Cut and Fit the Center Panel
Raise or Frame the Panel Correctly
The center panel can be raised with profiled edges or flat as a floating panel. For a traditional look, use the same stile and rail bit or a panel raising bit to shape the panel edges.
For flat panels, which are common in shaker doors, cut the panel 1/4 inch smaller than the frame’s inner opening to allow for wood movement. Glue is avoided on the panel, and instead, it floats in the groove.
Sand All Pieces Before Assembly
After routing, lightly sand all components with 120- and 220-grit paper. Remove any fuzz or tear-out, especially on cope joints. Wipe down with a tack cloth to remove dust before glue-up.
Assemble the Cabinet Doors

Dry-Fit Before Gluing
Always dry-fit every door before applying adhesive. Slide the panel into the grooves and check for gaps, misalignment, or binding. If the cope joints are too tight, lightly sand the mating surfaces.
Use corner clamps or a door assembly jig to hold the frame square during glue-up.
Glue and Clamp with Care
Apply wood glue only to the cope joints, and never on the panel edges. Over-gluing can clog the groove and prevent proper expansion.
Use bar clamps or corner clamps to draw joints tight. Place clamping cauls over the frame to distribute pressure evenly and prevent bowing.
Wipe off excess glue immediately with a damp cloth. Let the door sit for at least 2 hours, then remove clamps and let cure overnight.
Sand and Finish
Sand in Stages for Smooth Results
Begin with 120-grit sandpaper on a random orbital sander to level joints and remove tool marks. Progress to 180- and 220-grit for a glass-smooth finish.
Pay extra attention to cope joints, as they often leave small ridges that need hand-sanding.
Avoid rounding over sharp edges, and maintain crisp profiles for a professional look.
Apply Finish for Protection
Choose a durable finish based on your use case:
- Polyurethane for tough, moisture-resistant protection, ideal for kitchens
- Conversion varnish for professional-grade durability
- Water-based finish for low odor, fast drying, and a clear coat
- Paint for shaker-style doors, using a primer first
Apply 2 to 3 even coats, sanding lightly with 320-grit between coats.
Troubleshooting Common Issues
Gaps in Cope Joints
If rails don’t fit snugly into stiles, check:
- Bit alignment, as stile and cope bits must match exactly
- Feed direction, since wrong direction causes tear-out
- Wood movement, so store wood in a stable environment before cutting
Re-cut the cope if necessary using shallow passes.
Burning or Chatter Marks
Causes include:
- Dull or cheap router bits
- Feed speed too slow
- Router underpowered for the cut
Solution: Sharpen or replace bits, increase feed rate, and ensure proper bit height.
Panel Binding in Frame
If the panel doesn’t float:
- The groove may be too shallow or narrow
- The panel may be oversized
- Glue may have been applied to the panel
Always allow 1/8 inch clearance on each side for expansion.
Frequently Asked Questions About Making Cabinet Doors with a Router
What router bits do I need for cabinet doors?
You need a matched cope-and-stick bit set. The stile and rail bit cuts the outer profile and groove, while the cope bit trims rail ends to fit into the stile profile. High-quality carbide-tipped bits are recommended for clean cuts.
Can I make cabinet doors with a handheld router?
Yes, you can use a handheld router for cope cuts and edge profiling. However, a router table provides better stability and consistency for long stiles and rails. For best results, use a fixed-base router mounted in a table.
What wood is best for cabinet doors?
Hardwoods like maple, cherry, oak, and poplar are excellent choices. Kiln-dried, straight-grained lumber minimizes warping and movement after assembly.
How much clearance should a cabinet door panel have?
Allow about 1/8 inch clearance on each side of the panel within the frame groove. This permits natural wood expansion and contraction without binding.
Why are my cope joints gapped?
Gaps usually result from mismatched bits, incorrect feed direction, or wood movement. Verify that your cope and stile bits are a matched set, feed correctly, and store wood in a stable environment before cutting.
How long should glue dry on cabinet doors?
Leave clamped doors for at least 2 hours, then remove clamps and let the glue cure overnight. This ensures a strong, durable bond before sanding and finishing.
Key Takeaways for Making Cabinet Doors with a Router
Making cabinet doors with a router is a rewarding skill that elevates your woodworking game. With the right tools, setup, and patience, you can produce custom doors that rival store-bought ones at a fraction of the cost. Focus on precision during setup, test every cut, and take your time with assembly.
Remember to choose a fixed-base router with at least 2 horsepower and a quality cope-and-stick bit set. Prepare your wood carefully, route profiles and copes accurately, and always dry-fit before gluing. Sand in stages and apply a durable finish for lasting results.
Once mastered, this technique opens the door, literally, to endless design possibilities for kitchens, bathrooms, and built-ins. Start with a single door, practice your technique, and soon you’ll be crafting custom cabinetry with confidence.


