

You have stared at your solid kitchen cabinet doors and thought about how much brighter the space would feel with glass panels instead. You are not alone. Many homeowners are transforming plain cabinet fronts into elegant, light-filled features by cutting out sections for glass inserts. Whether you want a classic shaker look or a modern open display, adding glass can elevate your kitchen’s style. This guide walks you through the exact steps, tools, and pro tips to cut out cabinet doors for glass safely and professionally, based on real experiences from skilled woodworkers who have done it successfully.
We will cover everything from layout and cutting techniques to glass selection and frame reinforcement. You will learn how to avoid common pitfalls and achieve a clean, lasting result that looks like it was done by a professional cabinet maker.
Plan Your Glass Insert Design
Before making any cuts, you need to define the final look and structure of your glass insert. Most cabinet doors have a raised or recessed panel in the center, and this is the section you will remove. The goal is to create a clean opening that fits securely within the door’s existing frame.
Choose Insert Style and Placement
Decide whether you want a full-panel glass door or a smaller, centered insert. Common styles include:
- Full-overlay glass: Remove the entire center panel for maximum visibility
- Centered rectangle or square: Leave a consistent wood border around the glass
- Multiple smaller inserts: Create a grid pattern for traditional designs
Use a pencil and measuring tape to mark the cutout area. Always double-check for squareness using a combination square or framing square to ensure corners are exactly 90 degrees.
Calculate Glass Size and Frame Depth
The glass must fit snugly but not press tightly against bare wood. Account for these factors:
- Glass thickness: Most projects use 1/8 inch or 1/4 inch tempered glass
- Rebate depth: Cut a shallow groove around the inside edge to seat the glass
- Border width: Maintain at least 1 inch of solid wood around the cutout
Pro Tip: Dry-fit a piece of cardboard cut to glass size before final routing. This helps you visualize the final look and catch measurement errors early.
Select the Right Tools and Materials
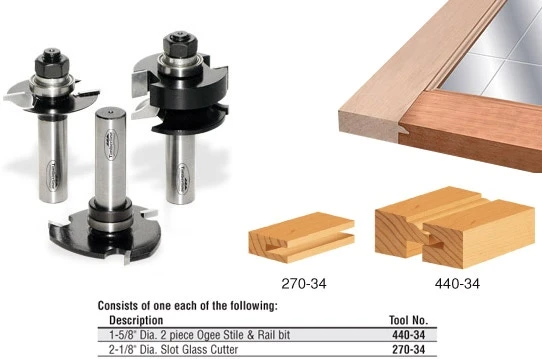
Using the correct tools ensures clean, safe cuts and professional results. Based on feedback from experienced woodworkers, here are the essential tools and materials you will need.
Essential Cutting Tools
- Router with straight bit: Ideal for precise, controlled cuts into the panel
- Clamped straightedge or router guide: Ensures straight, square cuts
- Table saw with dado blade: Useful for creating recessed areas for glass seating
- Chisels and mallet: For cleaning up corners and removing waste material
- Drill with paddle or Forstner bit: To start internal cuts when using a jigsaw
Glass and Framing Supplies
- Tempered glass: Never use regular glass, as tempered is safer and more durable
- Hardwood frame strips: For mitered picture-frame style surrounds
- Silicone gasket or glazing compound: Seals edges and cushions the glass
- Brad nails or small finish nails: To secure frame or retainer strips
- Wood glue and clamps: For assembling custom frames
Avoid cheap glass from hardware stores. Order custom-cut tempered glass from a local glass shop for a perfect fit.
Cut the Cabinet Door Opening
Now it is time to make the cut. Accuracy is critical because once wood is removed, it cannot be replaced. Follow a methodical approach for clean results.
Mark and Secure the Door
Lay the door flat on a workbench with the front facing up. Recheck your layout lines carefully. Use blue painter’s tape along the cut lines to reduce splintering on the finished surface.
Clamp a straightedge guide parallel to the cut line if you are using a router. This keeps the tool on track and prevents wandering during the cut.
Use a Router for Clean, Controlled Cuts
A router with a straight bit is the top choice for precision work. Here is the step-by-step process:
- Set the bit depth to match the glass thickness or rebate depth
- Start routing from the inside corner, moving counterclockwise around the perimeter
- Make multiple shallow passes instead of one deep cut to reduce strain and tear-out
- Stop routing about half an inch before each corner and finish with a chisel
Check the fit frequently with a test piece of scrap wood or cardboard. This allows you to catch any issues before the final cut is complete.
Alternative Methods Without a Router
If you do not have a router, you have other options:
- Jigsaw method: Drill starter holes in each corner, then cut along the lines with a fine-tooth blade
- Dado blade on table saw: Best for creating recessed frames, then assemble like a picture frame
These methods work but require more cleanup and precision. Budget extra time for sanding and fitting.
Reinforce the Door Frame
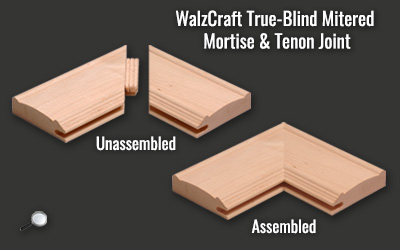
Cutting out the center panel removes structural support from the door. Without reinforcement, the door may warp, sag, or rattle over time. This step is essential for long-term durability.
Add Edge Support or a Rebate
Weakening the door is a real risk when removing the center panel. Mitigate this by:
- Cutting a full perimeter rebate: This groove supports the glass and maintains frame rigidity
- Installing a thin plywood backer: Glue a thin sheet behind the glass to stabilize the opening
- Using thicker frame stiles: Ensure vertical and horizontal frame members are wide enough for strength
Consider a Mitered Frame Insert
Building a separate picture-frame style insert is a professional approach:
- Cut four hardwood pieces with 45 degree miters
- Assemble into a square using wood glue and brad nails
- Route a shallow groove on the back to hold the glass
- Insert the glass with a silicone gasket, then glue the frame into the door opening
This method looks professional and allows for easier glass replacement in the future.
Install the Glass Securely
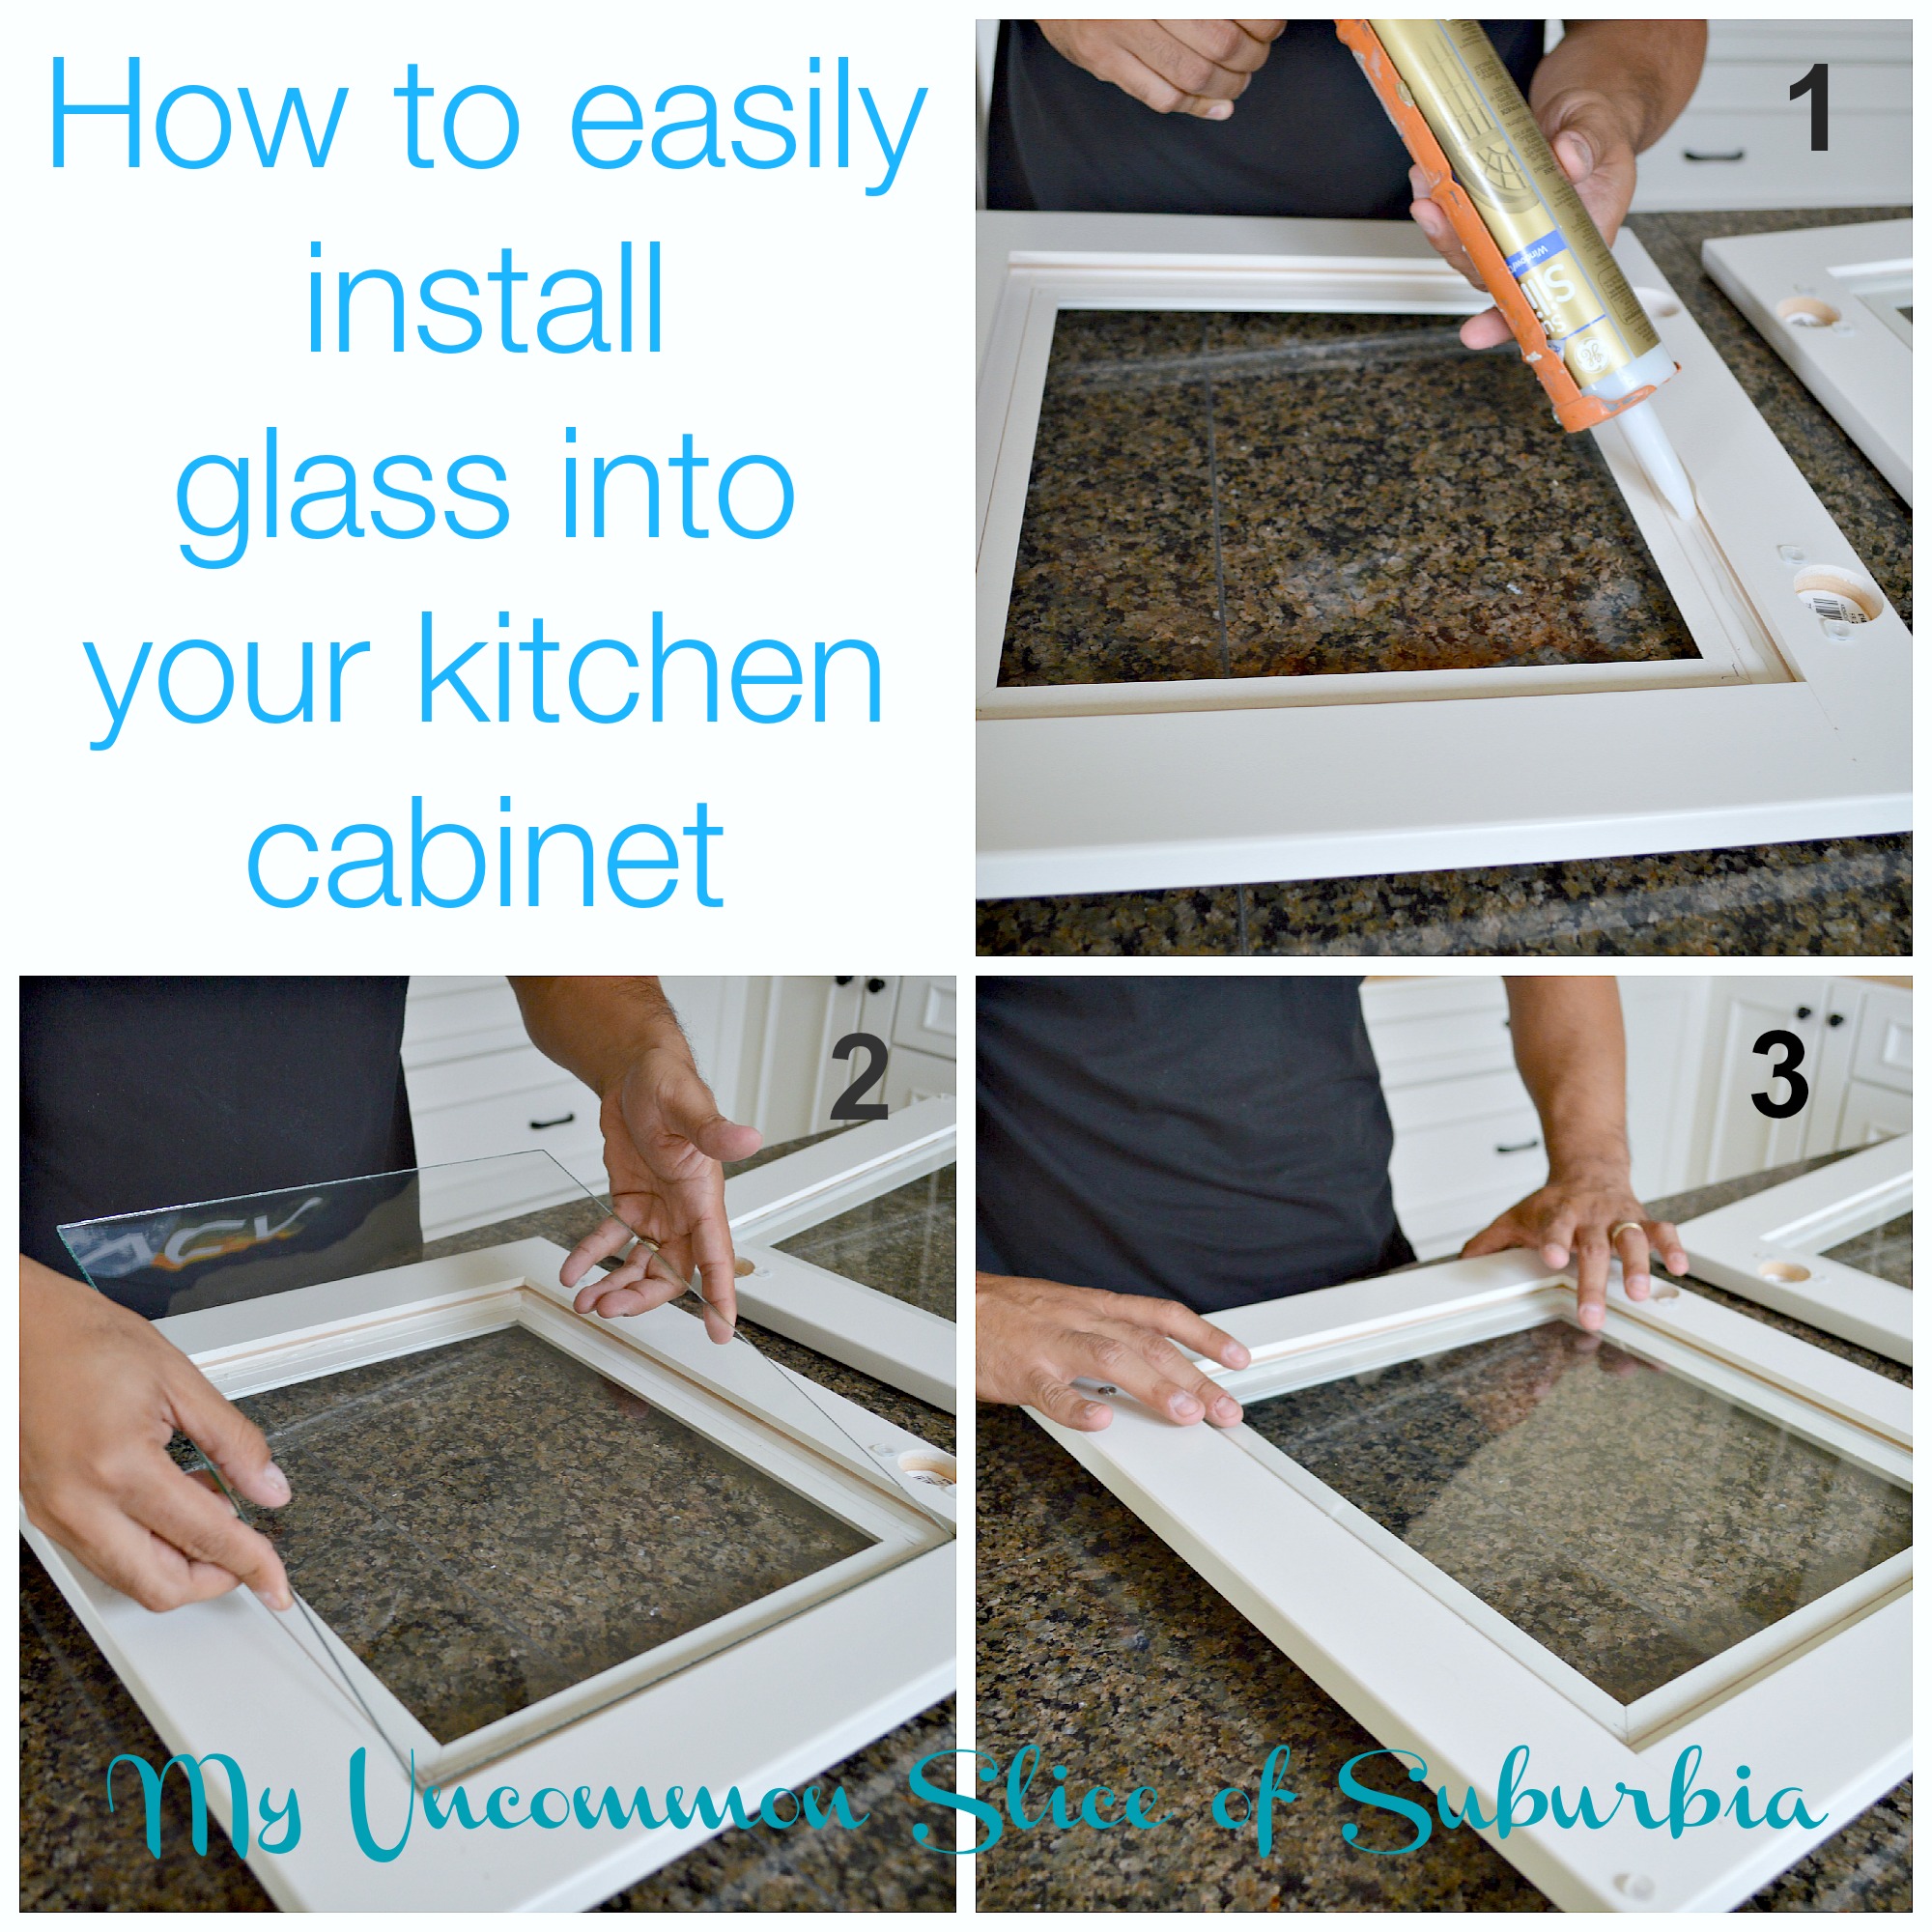
Now that the opening is cut and reinforced, it is time to install the glass. A loose or improperly sealed panel can rattle, fog, or break, so take your time with this step.
Prepare the Glass Panel
Order tempered glass to your exact dimensions, typically slightly smaller than the opening to allow for expansion. Specify beveled edges for a refined look if you want a more polished appearance.
If you are adding a frame, dry-fit the glass first. Sand any sharp edges on the wood opening to prevent damage to the glass.
Choose a Retention Method
You have several options to hold the glass in place:
Option 1: Silicone Gasket
- Press a flexible silicone gasket into the rebate
- Gently seat the glass into the gasket without glue
- Add a thin bead of clear silicone caulk around the inner edge for moisture sealing
Option 2: Wood Glazing Beads
- Cut thin wood strips to fit around the inner edge
- Nail or glue them in place to clamp the glass
- Paint or stain to match the door
Option 3: Pre-Made Glass Inserts
- Buy pre-made inserts with the frame already built
- Remove the center panel and press or screw the unit into place
This option saves time and reduces the risk of errors, especially for large projects.
Finish and Maintain the Glass Doors
Once installed, you need to finish the doors to match your kitchen and protect the wood from moisture and wear.
Sand and Finish the Edges
Lightly sand any rough areas around the cutout. Apply the same stain or paint used on the rest of the door. Use a small brush to coat the inside edges of the rebate.
Let the finish dry completely before installing the glass to avoid trapped moisture.
Prevent Fogging and Moisture
In humid environments like kitchens, condensation can form behind glass. Prevent this by:
- Leaving small ventilation holes in the top and bottom of the door frame
- Using desiccant strips behind the glass
- Sealing all wood with a moisture-resistant finish
Maintenance Tips
- Clean glass with a vinegar-water solution and avoid ammonia-based cleaners
- Check gaskets annually for brittleness or cracking
- Tighten any loose frame pieces or glazing beads as needed
Troubleshooting Common Issues
Even careful work can lead to unexpected problems. Here is how to fix the most common issues.
Glass Does Not Fit Flush
Cause: Inconsistent routing depth or inaccurate measurements.
Fix: Lightly sand high spots or re-cut the rebate. If the opening is too deep, add a thin wood shim behind the glass.
Door Sags or Wobbles
Cause: Over-removal of center support.
Fix: Reinforce with corner braces or install thicker hinge plates. Consider retrofitting with a full-frame glass insert.
Visible Gaps or Uneven Borders
Cause: Misaligned cuts or a warped door.
Fix: Sand or trim the border slightly. For future doors, use a template to ensure consistent layout.
When to Consider Pre-Made Inserts
Not every project demands full DIY. If you are working on multiple doors or lack confidence with power tools, pre-made glass inserts are a smart alternative.
Benefits of Pre-Made Inserts
- Precision-cut glass and frame
- No routing or measuring errors
- Faster installation
- Available in standard sizes
Drawbacks of Pre-Made Inserts
- Less customization
- Higher cost per door
- May not match existing wood tone
Use them for rental properties or quick upgrades. Save custom cuts for high-end renovations where you want a unique look.
Frequently Asked Questions About Cutting Cabinet Doors for Glass
Can I use regular glass instead of tempered glass?
No, you should always use tempered glass for cabinet doors. Regular glass can shatter into dangerous shards, while tempered glass breaks into small, less harmful pieces. It is also stronger and more durable for everyday use.
What is the best tool for cutting cabinet door panels?
A router with a straight bit is the best choice for clean, precise cuts. It gives you the most control and produces the smoothest edges. A table saw with a dado blade is a good alternative for creating recessed frames.
How much wood border should I leave around the glass?
You should maintain at least 1 inch of solid wood around the cutout. This provides enough structural support to prevent warping or breakage. A border of 1.5 to 2 inches looks balanced and professional.
Do I need to reinforce the door after cutting?
Yes, reinforcing the door is essential. Removing the center panel weakens the structure, so you should add a rebate, plywood backer, or mitered frame to maintain rigidity. Skipping this step can lead to sagging or rattling over time.
Can I install glass without a router?
Yes, you can use a jigsaw with starter holes or a table saw with a dado blade. These methods require more cleanup and precision, but they work well. You can also use pre-made glass inserts that do not require any cutting.
Key Takeaways for Cutting Cabinet Doors for Glass
Cutting out cabinet doors for glass is a rewarding upgrade that blends function and style. With the right tools, careful planning, and attention to reinforcement, you can achieve a professional look without replacing entire doors.
The most important points to remember are to use tempered glass, maintain at least 1 inch of wood border, and always reinforce the door after cutting. Measure twice and cut once to avoid costly mistakes.
Whether you route your own opening or opt for pre-assembled inserts, this transformation can breathe new life into your kitchen. Start with a single door to build your confidence, then expand to the rest of your cabinets as you master the technique.


