You walk into a room and instantly feel the difference with clean lines, hidden clutter, and every inch working hard. That is the power of cabinet built-ins ideas. Unlike standalone furniture, these custom solutions transform awkward corners, low ceilings, and dead wall space into sleek storage that feels part of the architecture.
These are not just cabinets nailed to a wall but engineered features designed to fit your space exactly. From floating desks to hidden compartments and wall-to-wall entertainment centers, you can achieve a high-end look without custom millwork prices. This guide reveals how to turn unused nooks into organized sanctuaries using durable materials and pro installation tricks.
Design a Focused Home Office with Integrated Cabinetry
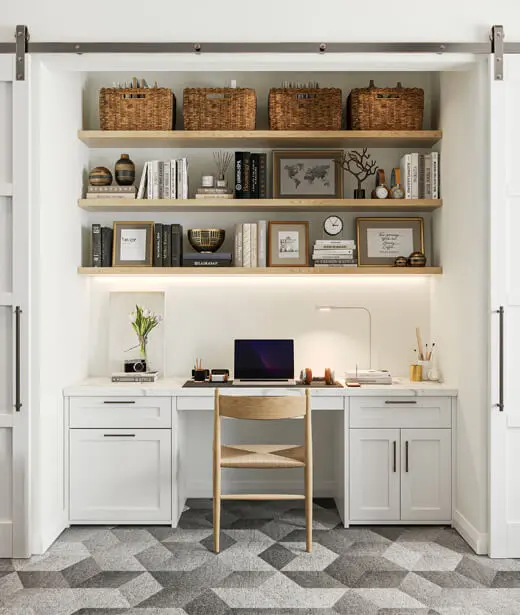
A cluttered desk kills productivity, but built-in cabinets solve this by integrating storage and workspace into one unit. The result is a minimalist office that feels like a retreat rather than a task zone. You can create a distraction-free environment by ensuring every item has a designated place within the cabinetry structure.
Integrate a Floating Desk Directly Into Base Cabinets
Forget bulky standalone desks that waste floor space. A floating desk built directly into the base cabinets creates a clean, open feel using 3/4-inch birch plywood. Anchor the desktop securely to wall studs and extend the surface from the cabinetry with no visible supports for a sleek slab appearance.
Set the desk height at 29 to 30 inches for proper ergonomics and leave space beneath for a chair. Ensure the depth is at least 20 inches for comfortable typing and align the desk with upper shelves so the eye moves vertically. Cut a notch in the back panel for cables to keep power strips and USB hubs hidden but accessible.
Add Hidden Storage Compartments for Documents
Security and organization go hand-in-hand when you use recessed cabinet panels to hide secret compartments. These false drawers or flip-up doors are perfect for storing tax files, passports, or valuables out of sight yet easy to reach.
Install full-extension drawer slides in 3/4-inch plywood boxes for everyday supplies like pens and notepads. Match the drawer fronts to cabinet doors for a seamless look and include smaller dividers inside for tech accessories. Label only the inside of drawers to keep the exterior clean and minimalist.
Install LED Strip Lighting for Task Clarity
Poor lighting strains your eyes and dulls focus, so add LED strip lighting under upper cabinets or inside glass-front shelves. Choose a 3000K to 4000K color temperature for balanced, natural light that reduces glare during long work sessions.
Wire the lights to a switch or plug them into a hidden outlet by notching the cabinet back panel slightly. Use aluminum LED channels to diffuse the light evenly and avoid harsh hotspots on your workspace. This installation typically takes about 30 minutes for a standard 8-foot unit.
Create a Statement Wall with Living Room Built-Ins
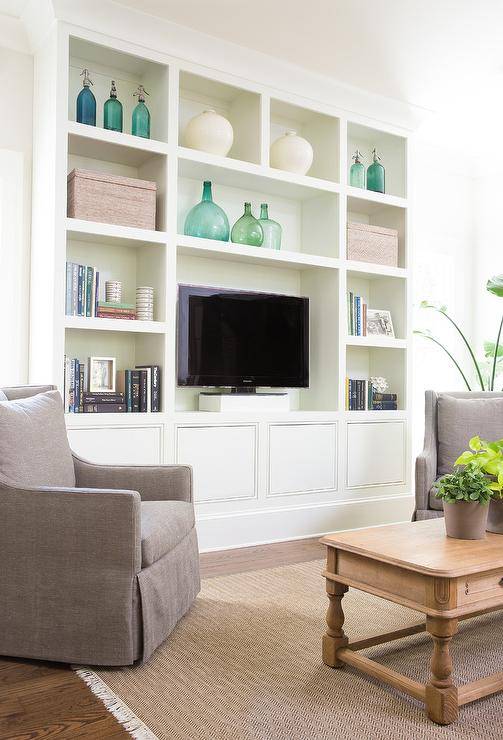
Living rooms thrive on personality, and built-in cabinets turn blank walls into display zones and entertainment hubs. Whether your style is modern or traditional, a well-designed unit becomes the room’s focal point while anchoring the space.
Build Wall-to-Wall Entertainment Centers
Maximize every inch with floor-to-ceiling cabinets that span from corner to corner to eliminate gaps. This approach creates a bold architectural statement and provides ample room for media gear and decor.
Use a mix of closed cabinets and open shelves to balance function and style:
* Closed cabinets hide remotes, game consoles, and media gear effectively.
* Open shelves display books, plants, or art pieces for visual interest.
* A center niche houses the TV, ideally mounted at eye level when seated.
Frame the TV area with trim or lighting to draw attention and keep the base cabinet depth at 16 to 18 inches. Avoid installing cabinets too tall by leaving 2 inches between the top and ceiling to allow for leveling on uneven floors.
Use Glass Fronts to Showcase Collections
If you collect vinyl records, ceramics, or coffee table books, glass-front cabinets protect them from dust while putting them on display. Choose low-iron glass for maximum clarity and add LED lighting inside to highlight your favorite pieces.
Install adjustable shelf pins so you can reconfigure spacing for tall vases or stacked books as your collection grows. Reinforce shelves with plywood strips underneath if you plan to store heavy items to prevent sagging. Pair glass fronts with warm interior stains to add depth and contrast against painted exteriors.
Add Crown Molding for a Custom Architectural Look
Off-the-shelf furniture often looks flat, but crown molding gives built-ins a high-end, built-from-the-ground-up feel. Install the molding so the bottom sits 1 inch below the cabinet top to ensure full coverage and a proportional look.
Use end caps glued inside the molding edge to hide cut ends so there are no visible seams. Match the molding style to your home architecture:
* Modern homes suit simple, flat trim profiles.
* Traditional homes look best with layered crown and dentil details.
* Farmhouse styles benefit from chunky, hand-hewn profiles.
Combine Seating and Storage in Entryway Built-Ins
The entryway is the first impression of your home, so a built-in bench with cabinets underneath turns this transitional space into a functional drop zone. This design maximizes utility in high-traffic areas while maintaining a clean aesthetic.
Build a Storage Bench Under Low Windows
Low, centered windows often waste space, but a window seat bench with storage below solves that problem effectively. Construct the bench frame from 3/4-inch plywood with internal dividers and use pocket hole joinery for strong, hidden connections.
Install full-extension drawers in the front for quick-access items like gloves or dog leashes. Add open shelves above the bench for baskets, books, or potted plants, keeping the height under the window sill so natural light is not blocked. Omit a solid bottom and use drawer systems instead to save material and simplify construction.
Include Multi-Drawer Systems for Daily Items
In high-traffic areas, organization is key, so install stacked drawers within the bench frame for maximum efficiency. Use the top drawer for keys, sunglasses, and masks while reserving the bottom drawer for scarves, leashes, and umbrellas.
Use soft-close slides for quiet operation and label drawers on the inside only to maintain a clean front appearance. Match drawer fronts to cabinet doors using the same 3/4-inch plywood and trim to create unity across the entire unit.
Finish With Baseboard Continuity for Seamless Integration
To make the built-in feel like part of the house, install standard baseboard along the bottom of the unit. Cut it flush with the cabinet ends so it looks like the unit grew from the floor rather than sitting on top of it.
Use caulk to seal gaps between the baseboard and wall to hide minor installation inconsistencies. This technique gives a factory-built appearance and ensures a professional finish. Use pre-primed MDF baseboard for easy painting and consistent color with your cabinets.
Select Durable Materials for Long-Lasting Built-Ins
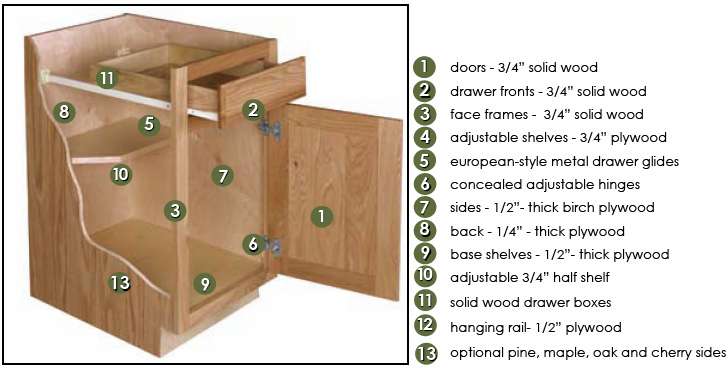
The right materials ensure your built-ins last decades and look custom rather than DIY. Choosing high-quality substrates and trim is essential for both structural integrity and visual appeal.
Use 3/4-Inch Birch Plywood for Core Structure
Birch plywood is the go-to material for cabinet boxes, shelves, and desktops because it is strong and stable. The 3/4-inch thickness supports heavy loads like books and electronics while resisting sagging over time.
- It provides clean edges when trimmed with iron-on veneer or solid wood banding.
- It handles moisture better than particleboard, which swells and fails under stress.
- Furniture-grade options like Baltic birch offer void-free layers for superior strength.
While birch plywood costs more than MDF, it lasts longer and provides a better surface for painting or staining.
Install Face Frames Using 1×3 and 1×4 Lumber
Face frames hide raw plywood edges and provide a mounting surface for doors and hinges. Build frames with 1×3 lumber for top and bottom rails and 1×4 lumber for vertical stiles to ensure durability.
Assemble with a pocket hole jig like the Craig Micro for small, less visible holes. This technique is faster and stronger than nails. Overhang the face frame 1/2 inch on the wall side and 1/4 inch on top to allow for field trimming when walls are not square.
Choose Trim That Matches Your Home Style
Trim makes or breaks the finished look, so use pre-made trim rectangles from hardware stores for affordability. These match common cabinet styles and save time on custom milling.
- Use miniature base cap molding on door fronts for a custom touch.
- Apply 1×3 trim to the top of base cabinets for a furniture-like transition.
- Paint trim the same color as cabinets for a seamless look or contrast it for visual interest.
Sand and prime all trim before installation to ensure even paint coverage and a professional result.
Enhance Function and Ambiance with Lighting and Hardware
Lighting is not just practical but emotional, setting the mood and highlighting your best design choices. Proper hardware ensures smooth operation and a clean aesthetic.
Install LED Strips Inside Cabinets for Visibility
LED lighting transforms dark interiors, so use double-sided tape to mount strips under upper cabinets or inside glass doors. Choose between plug-in strips for easy installation, hardwired systems for a permanent hidden power source, or battery-powered options for outlets behind closed doors.
Run wires through notched back panels and use wire clips to keep them tidy. Place lights 1 to 2 inches from the front edge of the shelf to avoid shadows and ensure even illumination across the surface.
Use Hidden Hinges and Soft-Close Drawer Slides
Modern built-ins rely on concealed hinges like European cup hinges for a clean, handle-free look. They allow full door access and are adjustable for perfect alignment after installation.
Pair these with soft-close drawer slides to prevent slamming and reduce wear on the cabinetry. These are essential in high-use areas like kitchens or offices. Drill hinge holes with a 35mm Forstner bit and test fit before final mounting for best results.
Adapt Installation Techniques for Imperfect Walls
No home is perfectly square, so built-ins must adapt to real-world conditions. Professional installation techniques ensure a seamless fit despite architectural imperfections.
Handle Out-of-Square Walls With Face Frame Overhangs
Walls that bow or lean are common, so solve this by building face frames with a 1/2-inch overhang on the wall side. During installation, scribe the overhanging edge to match the wall contour using a compass or scribing tool.
Trim the scribed line with a jigsaw to create a gap-free fit without needing shims. After trimming, caulk the seam so it disappears when painted, leaving a flawless appearance.
Leave Ceiling Clearance for Leveling Adjustments
Ceilings are rarely flat, so building cabinets flush to the ceiling often results in a crooked look. Make upper cabinets 2 inches shorter than the ceiling height after adding crown molding to allow for leveling.
This gap lets you level the unit using shims at the top during installation. Once level, cover the gap with crown molding to hide the adjustment and make it look intentional. This process takes about 15 minutes per cabinet.
Notch Cabinets for Electrical Access
Outlets and switches cannot be buried, so plan early to maintain access. Notch the back panel or divider to expose electrical boxes, cutting just large enough to access the switch or plug.
For bench units, notch the divider so outlets remain usable and cover with a decorative plate if needed. Always turn off power at the breaker before cutting near wiring to ensure safety during installation.
Achieve a Professional Finish with Paint and Stain
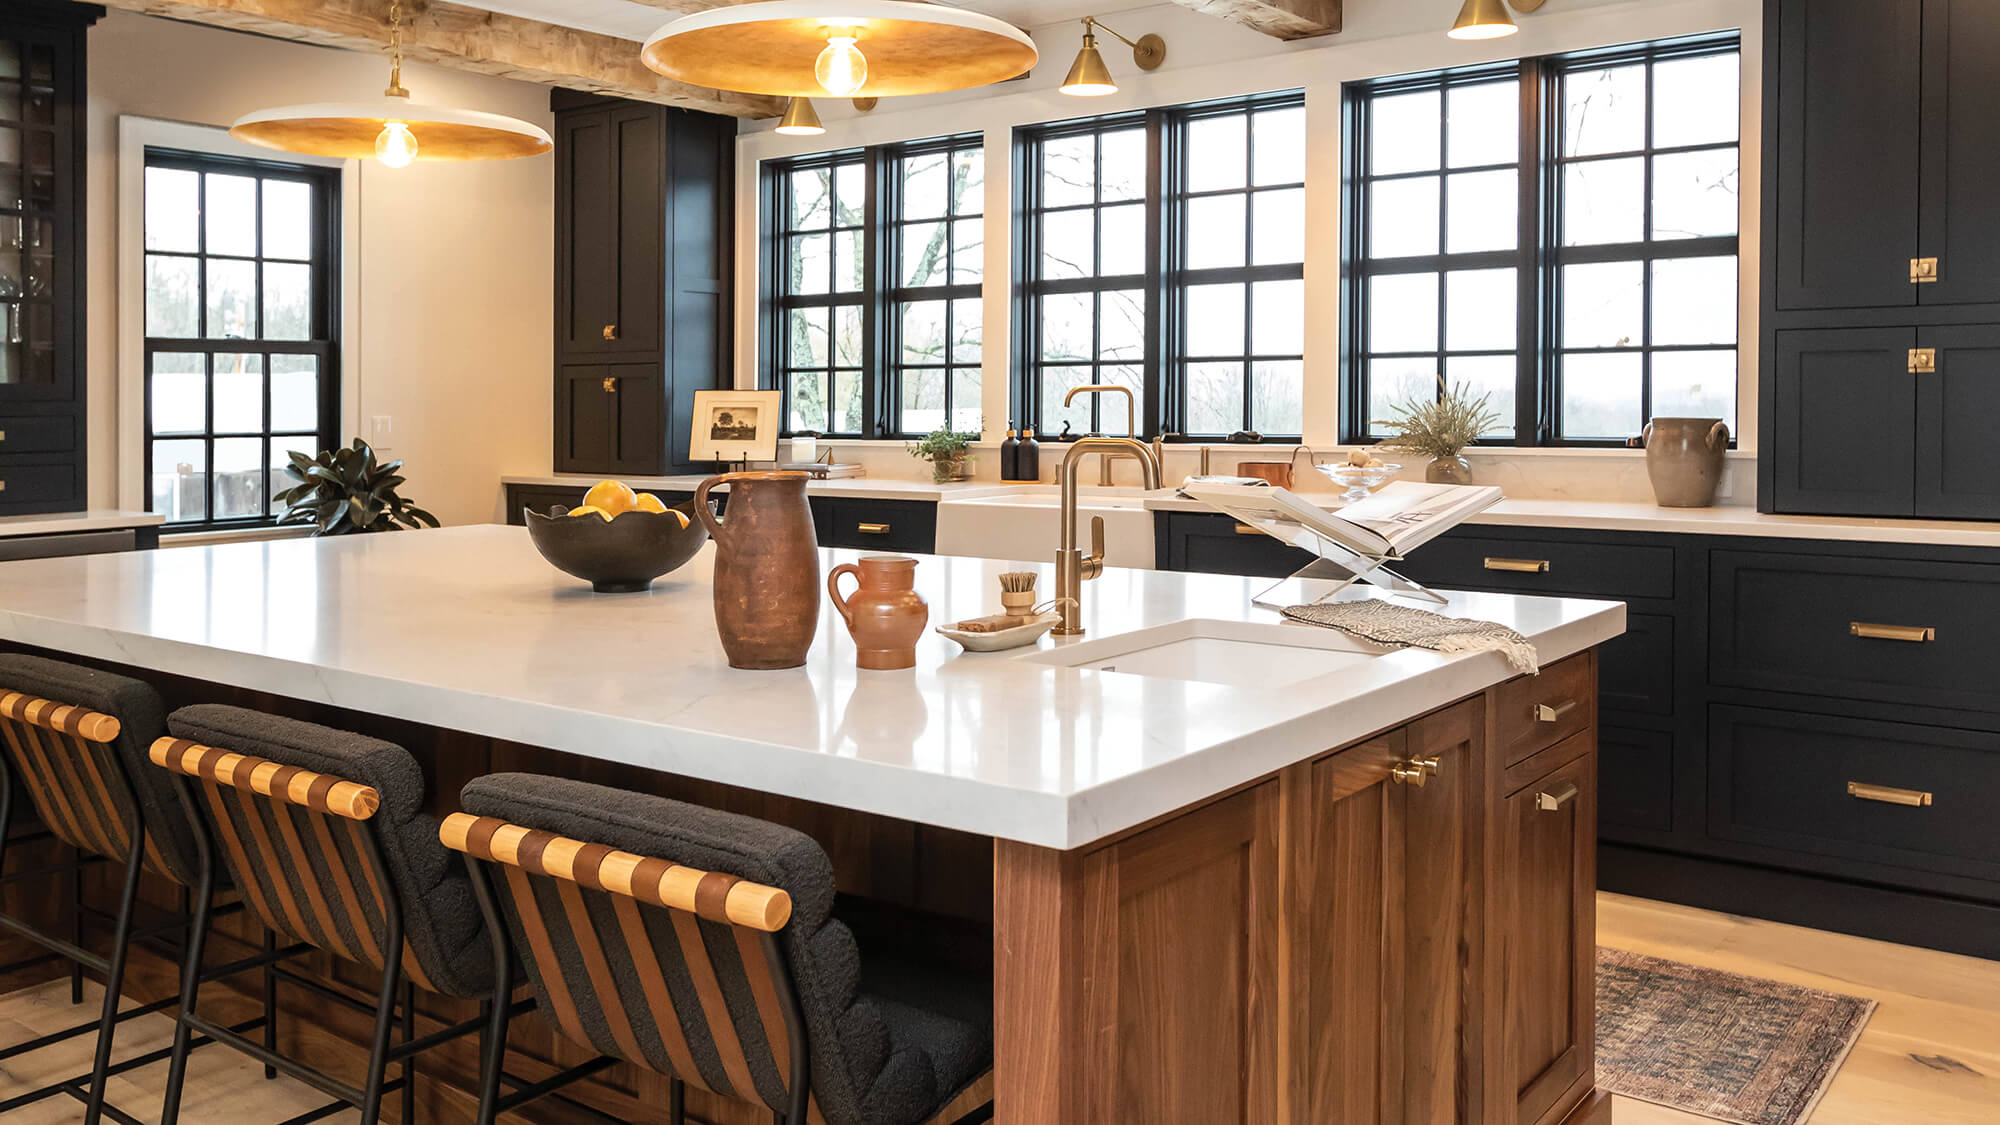
The final finish ties everything together, transforming raw materials into a cohesive design element. A thoughtful finish enhances durability and visual appeal.
Try a Two-Tone Paint and Stain Combination
A two-tone finish adds depth by painting the exterior to match the wall color so cabinets recede visually. Stain the interior shelves and tops with warm tones to highlight contents and add contrast.
- Paint with a brush for smooth coverage then roll for even sheen.
- Sand lightly between coats for a flawless surface.
- Touch up trim details by hand to ensure precision.
This contrast makes the space feel larger while adding warmth and character to the design.
Match Style to Your Home Aesthetic
Built-ins should reflect your personal style while complementing existing architecture. Look at your flooring and trim to match the built-in style for cohesion.
- Modern styles feature slab doors, no trim, handleless cabinets, and monochrome palettes.
- Traditional designs include arched tops, crown molding, wood stain, and visible trim.
- Minimalist approaches focus on floating shelves, hidden lighting, and neutral tones.
Frequently Asked Questions About Cabinet Built-Ins Ideas
What materials are best for DIY cabinet built-ins?
Use 3/4-inch birch plywood for durability and clean edges on boxes and shelves. Pair this with 1×3 and 1×4 lumber for face frames to hide raw edges and provide a solid mounting surface for doors.
How do you handle walls that are not square?
Build face frames with a 1/2-inch overhang on the wall side so you can scribe and trim them on-site. This technique allows for a perfect fit against uneven walls without visible gaps.
Can built-in cabinets be installed without removing baseboards?
It is best to remove existing baseboards along the back wall so cabinets sit flush against the studs. You can then reinstall baseboard trim flush with the cabinet ends for a seamless, built-from-scratch look.
How much clearance is needed between cabinets and the ceiling?
Design upper cabinets to be exactly 2 inches shorter than the ceiling height after adding crown molding. This gap allows for leveling adjustments and hides ceiling irregularities effectively.
What type of lighting works best inside built-in cabinets?
LED strip lights with a color temperature of 3000K to 4000K provide balanced, natural light. Mount them 1 to 2 inches from the shelf edge to avoid shadows and ensure even illumination.
Key Takeaways for Successful Cabinet Built-Ins Projects
Successful cabinet built-ins ideas rely on precise measurement, strategic material selection, and adaptation to architectural imperfections. By using 3/4-inch birch plywood, integrating hidden storage, and applying professional finishing techniques, you can create custom solutions that maximize space and style.
Start your project by measuring your space accurately and planning for electrical access early. With the right approach, you can transform awkward nooks into functional, beautiful features that add lasting value to your home.