

Building your own storage solution solves the frustration of ill-fitting, flimsy store-bought units. Learning how to build a cabinet with shelves gives you total control over dimensions, materials, and durability for any room.
This guide details the exact steps to construct a sturdy base cabinet using ¾-inch plywood and efficient joinery methods. You will discover how to cut panels precisely, assemble a square box without glue, and install hardware for a professional finish.
Choose Between Frameless and Face Frame Designs
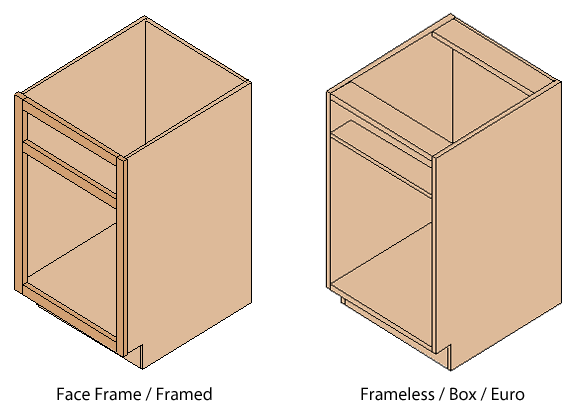
Selecting the right style dictates your material list and construction method. Your choice impacts both the interior capacity and the final aesthetic of the project.
Evaluate Space and Style Needs
Frameless cabinets maximize interior storage by attaching doors directly to the box sides. This modern “Euro-style” is ideal for workshops or minimalist kitchens where every inch counts. Face frame designs feature a hardwood border on the front, offering a traditional look that hides edge imperfections and adds structural rigidity.
Determine Standard Dimensions
Industry standards ensure your new unit fits existing countertops and appliances seamlessly.
* Base Height: 34.5 inches (allows for a 1.5-inch countertop to reach 36 inches total).
* Base Depth: 24 inches standard depth.
* Width: Build in 3-inch increments like 18, 21, or 24 inches.
* Upper Depth: 12 inches for wall-mounted units.
Avoid widths under 15 inches as they offer little practical utility for storage organization.
Plan Material Efficiency
Maximize your 4×8-foot plywood sheets by cutting side panels slightly undersized. Cut base sides to 23.75 inches wide instead of a full 24 inches to remove rough factory edges. This strategy ensures straight, square sides while allowing you to use offcuts for internal stretchers and nailers.
Select Plywood and Essential Tools
Using the correct materials prevents structural failure and ensures a clean finish. Proper tool selection streamlines the entire building process.
Use ¾-Inch Plywood for Durability
Pre-finished maple plywood is the top choice for shop cabinets because it requires no sanding or sealing. Laminate plywood works well too, but avoid particleboard as it swells easily and holds screws poorly. Ensure all panels measure exactly ¾ inch thick to maintain consistent joinery fits.
Prepare Hardwood for Frames
If you choose a face frame design, select hard maple for its strength and finish quality. Joint one face and edge, then plane the stock to exactly ¾ inch thick before ripping it to width. Label every piece immediately to avoid confusion during the assembly phase.
Gather Required Tools
You do not need a massive shop, but specific tools ensure accuracy.
* Track saw or circular saw with a straight edge for sheet goods.
* Table saw with a crosscut sled for precise panel cuts.
* Router with undersized bits for rabbets and dados.
* Brad nailer or narrow crown stapler for temporary tacking.
* Drill with self-centering bits for hinge installation.
* Spax screws (1.75 or 2 inches) for permanent fastening.
Cut Panels with Precision and Care
Accurate cuts are the foundation of a square, professional-looking cabinet. Rushing this stage leads to gaps and misalignment later.
Trim Factory Edges First
Factory edges are often damaged or uneven, so trim them off before final sizing. Cut your side panels to height first, such as 34.5 inches for a base unit. Then rip them to the final width, ensuring you mark a reference edge to maintain orientation throughout the build.
Size Shelves and Fixed Components
Cut fixed shelves to 23.5 inches deep to allow room for the back panel within a 24-inch cabinet. Top and bottom panels should match the side depth exactly. Use a crosscut sled on your table saw to guarantee clean, square cuts on every piece.
Apply Edge Banding If Needed
If using raw plywood, apply iron-on edge banding after cutting panels to their final size. Use a heat gun and roller to smooth out bubbles, then trim excess material with a sharp chisel. Pre-finished plywood eliminates this step entirely, saving you significant time.
Assemble the Cabinet Box Without Glue
Modern construction often skips glue in favor of mechanical fasteners that allow for repairs. This method is fast, strong, and perfect for utility cabinets.
Cut Rabbets and Dados for Joinery
Use a router with undersized bits to create perfect-fitting joints without gap issues. Cut a rabbet on the inside top edge of side panels to hold the top. Cut dadoes at your desired height for fixed shelves. Finally, rout a rabbet along the back inside edge to seat the back panel securely.
Tack and Screw Joints Together
Align the bottom panel with one side panel, ensuring front edges are flush. Secure the joint temporarily with 1.25-inch brad nails or narrow crown staples. Attach the second side panel similarly, then install back and front stretchers. Drive 2-inch Spax screws every 6 to 8 inches along all joints for permanent strength.
Add Skitters for Floor Protection
Attach quarter-inch plywood strips called “skitters” to the cabinet bottom. These strips allow you to drag the heavy unit across the floor without damaging the bottom edges or your flooring.
Install Back Panel and Structural Stretchers
The back panel locks the cabinet square and provides a mounting surface for wall attachment. Stretchers maintain the box shape over time.
Choose Back Panel Thickness
Use quarter-inch plywood for lightweight stability in most base cabinets. Opt for ¾-inch plywood if building a standalone unit or wall-mounted upper that requires extra rigidity. Cut the panel to fit within the rabbet, typically half an inch smaller than the opening.
Secure Panel with Nailers
For quarter-inch backs, attach the panel to a nailer frame around the perimeter using 1.25-inch screws. For thicker backs, screw directly into the side, top, and bottom panels. Ensure screws are spaced every 6 to 8 inches for maximum hold.
Utilize Offcuts for Stretchers
Cut your stretchers from the leftover material generated when trimming factory edges. This approach saves up to half a sheet of plywood per project. Install the back nailer at the top and bottom, adding the front top stretcher last to maintain access during assembly.
Build Frame-and-Panel Doors for Style
:max_bytes(150000):strip_icc()/100505204-0b980c080c6f40e1bb9111b5379634ab.jpg)
Custom doors elevate the look of your cabinet and provide a professional finish. This process requires precise joinery to allow for wood movement.
Cut Frame Parts to Size
Cut vertical stiles to the height of the cabinet opening minus one inch for clearance. Calculate rail width by subtracting twice the stile width from the opening width, then adding one inch for the tongue overlap. Accuracy here prevents binding later.
Route Grooves and Cut Tongues
Route a half-inch deep groove along the inside edge of all frame parts. Use a tenoning jig to cut matching tongues on the ends of the horizontal rails. Test the fit to ensure the tongue slides smoothly into the groove without being too loose.
Assemble Door Without Gluing Panel
Apply glue only to the rail tongues, never to the panel edges, to allow for natural wood expansion. Insert the top rail, slide in the panel, attach stiles, and finally insert the bottom rail. Check for square before clamping gently to avoid cracking the frame.
Mount Hinges and Install Hardware
Proper hardware installation ensures smooth operation and long-term reliability for your new cabinet.
Select Correct Hinge Type
Frameless cabinets require soft-close overlay hinges that mount directly to the box side. Face frame cabinets need specific hinges rated for frames, as standard Euro hinges will not fit correctly. Always verify compatibility before purchasing.
Install Hinges Using a Jig
Mark four inches from the door edge for standard hinge placement. Transfer this mark to the cabinet interior. Use an acrylic hinge jig and a self-centering bit to drill precise cup holes. Install base plates in the cabinet first, then attach the doors for easy adjustment.
Add Shelf Pins After Doors
Drill holes for shelf pins only after hanging the doors. This sequence ensures you do not drill where a door or drawer might interfere. Use a shelf pin jig to maintain consistent alignment across both sides of the cabinet interior.
Level and Secure Base Cabinets
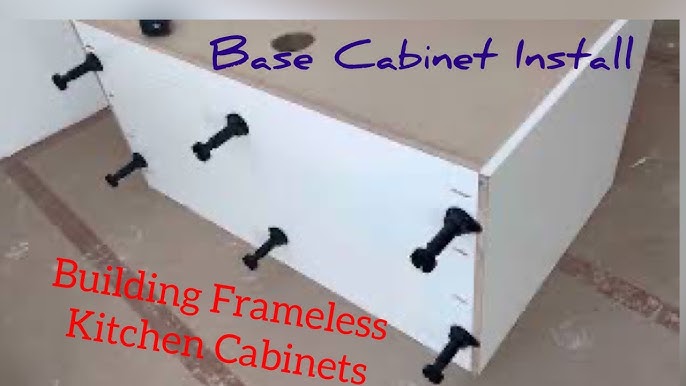
A level cabinet prevents doors from swinging open or closed on their own. Proper securing protects against tipping hazards.
Use Two Feet and Ledger Method
Install a 1×4 ledger board on the wall 4.5 inches above the floor. Attach two adjustable leveling feet to the front corners of the cabinet. Set the back edge on the ledger and adjust the front feet until the unit is perfectly level. This method is faster and more stable than using four individual feet.
Anchor to Wall Studs
Always secure cabinets to wall studs using 2.5-inch screws through the top rear rail. This step is critical for safety, preventing the unit from tipping forward, especially in homes with children or in seismic zones.
Organize Interior for Maximum Utility
Transform your new cabinet into a highly functional storage system with simple additions.
Add Hooks and Hangers
Mount metal hooks inside for aprons, gloves, or tools. Install pegboard sections or slatwall panels on the inside of doors for versatile hanging options. Magnetic tool strips work well for frequently used metal items.
Designate Specific Zones
Create dedicated areas for safety gear like helmets and goggles. Assign a zone for power tools and another for supplies like fasteners and sandpaper. Labeling these shelves helps maintain organization over time.
Install Magnetic Catches
Use magnetic door catches to keep heavy doors securely closed. This is especially important in workshops where vibrations from machinery might otherwise cause doors to swing open.
Final Tips and Common Mistakes to Avoid
Learning from common errors saves time and materials on your first build.
Avoid These Pitfalls
Never rely on factory edges for critical joints as they are rarely straight. Do not use 1.5-inch nails on ¾-inch material since they will penetrate the other side. Avoid gluing pre-finished or laminate plywood because adhesives will not bond effectively to these surfaces.
Pro Tips for Better Results
Use offcuts for stretchers to minimize waste and save money. Ease all exposed edges with a block plane for a comfortable, professional feel. Install soft-close hinges to enhance usability and prevent slamming damage.
Performance Expectations
With practice, you can assemble a base cabinet in as little as 15 minutes using this glue-free method. The combination of ¾-inch plywood and Spax screws creates a rigid structure that lasts for decades.
Frequently Asked Questions About Building Cabinets
What is the best wood for building a cabinet with shelves?
Pre-finished maple plywood is ideal for shop and utility cabinets because it requires no sanding or finishing. For face frames, hard maple offers superior durability and a clean finish.
How do I make sure my cabinet is perfectly square?
Cut all panels with a crosscut sled for precision. During assembly, install the back panel early as it locks the box into a square shape. Use a carpenter’s square to check corners before driving permanent screws.
Can I build a cabinet without a table saw?
Yes, you can use a track saw or a circular saw with a straight edge guide to break down sheet goods. A router with a straight bit can also trim panels to final size if used with a guide.
Why should I avoid using glue for cabinet assembly?
Glue makes disassembly impossible if you need to repair or modify the unit. Mechanical fasteners like Spax screws provide sufficient strength for utility cabinets while allowing for future adjustments.
How deep should shelves be for a standard base cabinet?
Cut shelves to 23.5 inches deep for a standard 24-inch deep cabinet. This reduction allows space for the back panel and ensures the shelf fits inside the box without binding.
Key Takeaways for Building Your Cabinet with Shelves
Building a custom cabinet provides superior fit and function compared to store-bought options. By using ¾-inch plywood, removing factory edges, and employing mechanical fasteners, you create a durable unit tailored to your specific space. Remember to level the base carefully and secure it to the wall for safety.
Start your project by planning dimensions and generating a cut list to minimize waste. With the right tools and these proven techniques, you can build a professional-grade cabinet that organizes your space efficiently. Begin with a single unit to refine your process before tackling larger storage systems.


