

Tired of cluttered bathroom floors and mismatched storage boxes? A custom linen cabinet solves both by offering sleek vertical storage in tight spaces like hallways or powder rooms. This DIY project uses red oak and a glass front to maximize storage while adding elegance to any room.
You will learn how to build a sturdy cabinet from scratch even with limited tools. This guide covers cutting materials, assembling with dowels, and installing a locking glass door for professional results.
Construct Side Panels Using Dowel Joinery
Start your project by building two tall side panels that form the foundation of your cabinet. Since the unit is narrow at 12 inches wide, strong vertical panels are essential for overall stability.
Glue Red Oak Boards Together
Use two red oak 1×6 boards per side to reach the full 60-inch height. Edge-glue them using dowel joints to ensure perfect alignment and strength.
- Cut both boards to exactly 60 inches long.
- Flatten edges slightly with a hand plane if they do not mate perfectly.
- Use a dowel jig to drill evenly spaced holes across the seam.
- Insert hardwood dowels coated in wood glue and clamp the joint.
Let the glue cure overnight before moving the panels. A high-torque cordless drill makes driving screws into dense red oak much easier.
Sand Panels Flush and Smooth
Once the glue dries, unclamp the boards and sand the seams until they are flush. Use 120-grit sandpaper followed by 180-grit for a clean surface. This ensures a seamless fit when you attach the top, bottom, and back later.
Assemble the Cabinet Carcass Structure

With the side panels ready, build the main structure using plywood for internal parts. This box, or carcass, holds everything together.
Cut Top, Bottom, and Shelves
Measure and cut your plywood pieces to fit inside the side panels.
- Cut one top panel to 12 by 12 inches.
- Cut one bottom panel to 12 by 12 inches.
- Cut two interior shelves to 10.5 by 10.5 inches.
Use scrap plywood to save costs. A cordless circular saw with a straightedge guide ensures precise, square cuts every time.
Attach Top and Bottom Sections
Position the side panels upright and clamp the top and bottom pieces between them.
- Pre-drill holes to prevent the wood from splitting.
- Use 1.5-inch wood screws driven with a hammer drill.
- Drive screws through the sides into the ends of the top and bottom pieces.
Screws will be visible at this stage, but trim will hide them later.
Secure the Back Panel
Cut a back panel from ¼-inch plywood to 60 by 12 inches. Attach it using dowels along the edges for alignment. Add screws at the corners and center for rigidity. This strengthens the box and keeps it square during use.
Install Trim and Face Frame Details
Transform the raw box into a finished piece with solid wood trim and a face frame. These elements add durability and visual appeal.
Apply Vertical and Horizontal Trim
Use 1×2 red oak boards for light trim and 1×4s for the base.
- Glue and finish-nail 1×2 trim to the front edges of both sides.
- Add a horizontal 1×2 mid-panel for visual balance.
- Attach a 1×4 along the bottom front for a heavier look.
Sand all trim flush after nailing to ensure smooth surfaces.
Build the Front Face Frame
A face frame reinforces the front and hides plywood edges effectively.
- Cut two 1×2 stiles to 60 inches.
- Cut one 1×4 rail to 12 inches.
- Use dowels and glue to assemble into a U-shape.
- Clamp to the cabinet front and secure with brad nails.
Check for square with a framing square before the glue sets completely.
Add Crown and Base Molding
Attach crown molding at the top using glue and finish nails. Install baseboard trim at the bottom, using a 1×4 to raise it for proper fit. These details make the cabinet look like part of the home’s architecture.
Construct the Glass Door Frame
The glass door adds light and lets you see stored items, which is ideal for small bathrooms.
Build the Door Perimeter
Create a 1.5-inch thick frame by gluing two 1×2 red oak boards together.
- Cut two vertical stiles to 55.5 inches long.
- Cut two horizontal rails to 10.5 inches long.
- Clamp and glue the perimeter into a rectangle.
Let the frame dry completely before adding dividers or routing.
Prepare the Center Divider
Add a vertical center rail to support the glass pane securely. Cut a 1×2 divider slightly shorter by trimming 1/8 inch from the length. This allows the 1/8-inch tempered glass to sit flush against the back of the rabbet.
Cut Rabbets for Glass Fit
Use a rabbeting router bit to cut a 1/8-inch deep groove on the inner face of all frame pieces. Route the groove along the inside edge where the glass will sit. Ensure depth matches glass thickness for a snug, secure fit.
Assemble and Finish the Door
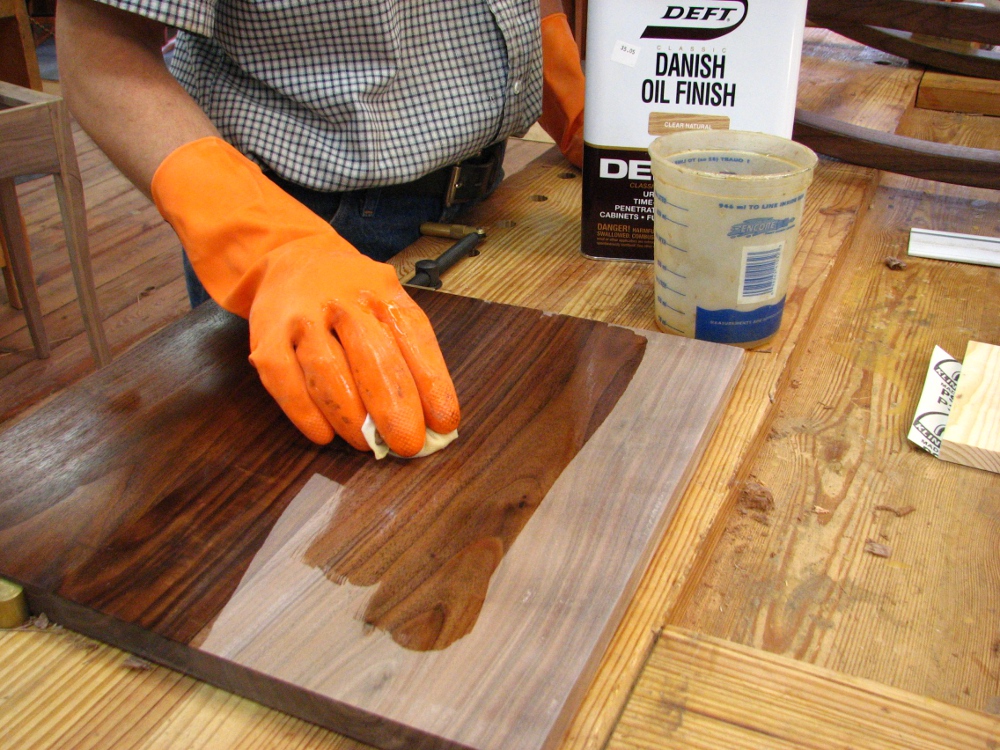
Bring the door together with precision joinery and a refined finish for best results.
Dowel the Door Joints
Use the same dowel jig method as the side panels. Mark and drill holes in stiles and rails. Use washers on jig pins to align holes across thick material. Assemble top and bottom rails first to test fit. Remove washers before drilling into thicker sections. Glue and clamp all joints, then let them cure overnight.
Route Decorative Edges
Add elegance with profiled dividers. Use a Roman ogee router bit to shape the edges of the center divider. Sand lightly with 220-grit after routing. This subtle detail catches light and elevates the design significantly.
Apply Natural Wood Finish
Finish the door to highlight the red oak grain. Wipe on Walrus Oil Old Furniture Finish with a clean cloth. Let it soak for 15 minutes, then wipe off excess. After 24 hours, apply a thin coat of beeswax. Buff to a soft sheen for a durable, non-toxic result.
Install Door Hardware and Glass
Final assembly brings function and security to your new linen cabinet.
Mount the Hinges
Attach the door with four small butt hinges. Position hinges on the stile and cabinet side, leaving a 1/8-inch gap for clearance. Pre-drill screw holes to prevent splitting. Use the hammer drill on low torque to avoid stripping screws. Test the swing and adjust alignment as needed.
Add Adjustable Shelves
Install shelf pins for flexible storage options.
- Mark shelf heights on both side panels.
- Use a level to keep holes aligned.
- Drill 1/8-inch holes at 1-inch depth.
- Insert metal pins and test shelf fit.
Place shelves at varying heights to store towels and toiletries.
Install the Locking Mechanism
Add a Cremona bolt at the top for security and style. Drill a hole through the top rail. Insert the bolt and secure with a knob inside and outside. Adjust so it latches smoothly when the door closes. This vintage-style lock keeps contents secure.
Insert the Tempered Glass
Now install the 1/8-inch tempered glass panel. Clean glass thoroughly with glass cleaner to remove oils. Apply a thin bead of clear Gorilla Glue into the rabbet. Carefully slide the glass into the recess from the front. Press gently to seat it fully.
⚠️ Safety First: Always wear flexible safety gloves when handling glass. Edges are extremely sharp.
Let the glue cure 24 hours before moving or using the cabinet.
Final Assembly and Placement
With all parts complete, put the cabinet in place and load it up for use.
Insert Shelves and Position Unit
Slide pre-cut plywood shelves onto the pins inside the cabinet. Arrange them to fit your storage needs. Place the cabinet in a narrow gap beside a vanity or in a hallway. Its 12-inch depth will not obstruct foot traffic.
Style and Organize Contents
- Use woven baskets or labeled bins inside.
- Fold towels neatly for visual appeal.
- Keep frequently used items at eye level.
The glass door keeps everything visible and accessible at all times.
Maintain and Customize Your Cabinet
Keep your linen cabinet looking great and make it your own over time.
Clean Without Damage
Wipe wood with a damp microfiber cloth and never soak it. Use mild soap for stains, then dry immediately. Polish annually with furniture wax to refresh the finish. Avoid ammonia-based cleaners near the glass-to-wood joint.
Customize for Your Space
- Paint the interior for contrast.
- Swap glass for frosted glass for privacy.
- Add LED strip lighting inside to highlight contents.
- Use magnetic catches instead of a Cremona bolt.
For rentals, build with removable legs instead of fixed base trim.
Frequently Asked Questions About Building a Linen Cabinet
What tools are essential to build a linen cabinet?
You need a cordless drill, circular saw, router with a Roman ogee bit, and a dowel jig. Safety gear like gloves and eye protection is also mandatory for this project.
Can I use plywood instead of red oak for the sides?
The guide specifies red oak 1×6 boards for side panels to ensure strength and aesthetics. Plywood is recommended only for the top, bottom, back, and interior shelves.
How do I ensure the glass fits securely in the door?
Cut a 1/8-inch deep rabbet on the inner frame edges using a router bit. This recess holds the 1/8-inch tempered glass flush and secure when glued.
What type of finish works best for a bathroom cabinet?
Use a natural oil finish like Walrus Oil followed by beeswax. This combination is durable, non-toxic, and resists moisture better than many varnishes.
How can I make the shelves adjustable?
Drill 1/8-inch holes at 1-inch depth into the side panels at your desired heights. Insert metal shelf pins to support removable plywood shelves.
Key Takeaways for Your DIY Linen Cabinet Project
Building a custom linen cabinet provides a perfect storage solution for narrow spaces while adding value to your home. By using dowel joinery, solid red oak, and a glass door, you create a durable piece that looks built-in.
Start by gathering your materials and measuring your space accurately. Follow the steps to cut, assemble, and finish your cabinet for a professional result that eliminates clutter forever.


