Building your own storage might feel overwhelming, but learning how to build cabinets for beginners is easier than you think with the right plan. You do not need a massive workshop or expensive machinery to create custom units that look professional and fit your space perfectly.
This guide walks you through every stage, from selecting affordable materials to installing doors and drawers with confidence. You will discover how to avoid common pitfalls, use simple jigs for accuracy, and construct sturdy boxes that last for years.
Plan Your Cabinet Layout and Dimensions First

Skipping the planning phase often leads to misaligned units or cabinets that simply do not fit your space. You must measure your installation area carefully before buying any wood or making a single cut.
Measure the Installation Space Accurately
Start by recording the exact width, height, and depth of your target area. Note any obstructions like pipes, electrical outlets, or uneven floors that could affect placement. For base cabinets, the standard height is 34½ inches without the countertop, which creates a 36-inch work surface once the counter is added.
Upper cabinets typically sit 18 inches above the countertop to allow room for appliances and backsplash. If your ceiling is 8 feet high, your upper units should generally be 30 to 36 inches tall to maintain proper proportions.
Choose Standard Cabinet Dimensions
Sticking to standard sizes simplifies the process and ensures your hardware fits correctly.
* Base cabinets: 24 inches deep and 34½ inches tall (excluding countertop)
* Widths: 15, 18, 21, 24, or 27 inches (avoid widths over 27 inches for base units)
* Upper cabinets: 12 inches deep with heights ranging from 30 to 42 inches
Use a sink base of 30 or 36 inches wide if your design includes plumbing fixtures. These standard measurements help you source compatible doors and slides later.
Sketch Your Design with Free Software
Create a digital layout using free tools like SketchUp to visualize your project. This step helps you see how base and upper cabinets align and where corners or appliances might interfere. Beginners should start with simple box designs before attempting complex joinery or custom features.
A digital prototype prevents costly material mistakes and ensures all parts fit together before you spend money on lumber.
Select the Right Materials for Durability
Choosing the correct materials saves money while improving the final appearance and strength of your build. You do not need the most expensive options to achieve professional results.
Use Cabinet-Grade Plywood for the Box
Construct the main box, or carcass, using ¾-inch cabinet-grade plywood. Birch, Maple, or Oak veneers are durable options that accept stain well for a beautiful finish. Avoid OSB or sheathing plywood because they are too rough and weak for fine cabinetry.
Baltic Birch is stronger and flatter but costs 50–60% more than standard options. It is excellent for drawer boxes or visible edges but often overkill for hidden cabinet structures.
Pick Face Frame Wood Based on Finish
Your choice of wood for the face frame depends on whether you plan to stain or paint the final product.
* Hard Maple: Best for natural finishes due to its durability and grain
* Poplar: Ideal for painted cabinets because it sands very smooth
* Select Pine 1x2s: A budget-friendly choice for shop cabinets or painted projects
Use ¼-Inch Plywood for Back Panels
A ¼-inch plywood back fits into a groove along the rear edge of the cabinet box. This adds rigidity and covers raw internal edges effectively. For extra strength in shop cabinets, you can use ½-inch plywood and attach it directly to the back without cutting a groove.
Avoid These Common Material Mistakes
Do not use Radiata Pine unless you are on a tight budget and accept that it dents easily. Skip edge banding if a face frame will hide the front edges entirely. Never use construction-grade lumber for doors or face frames because it warps and lacks a professional look.
Gather Essential Tools for Success
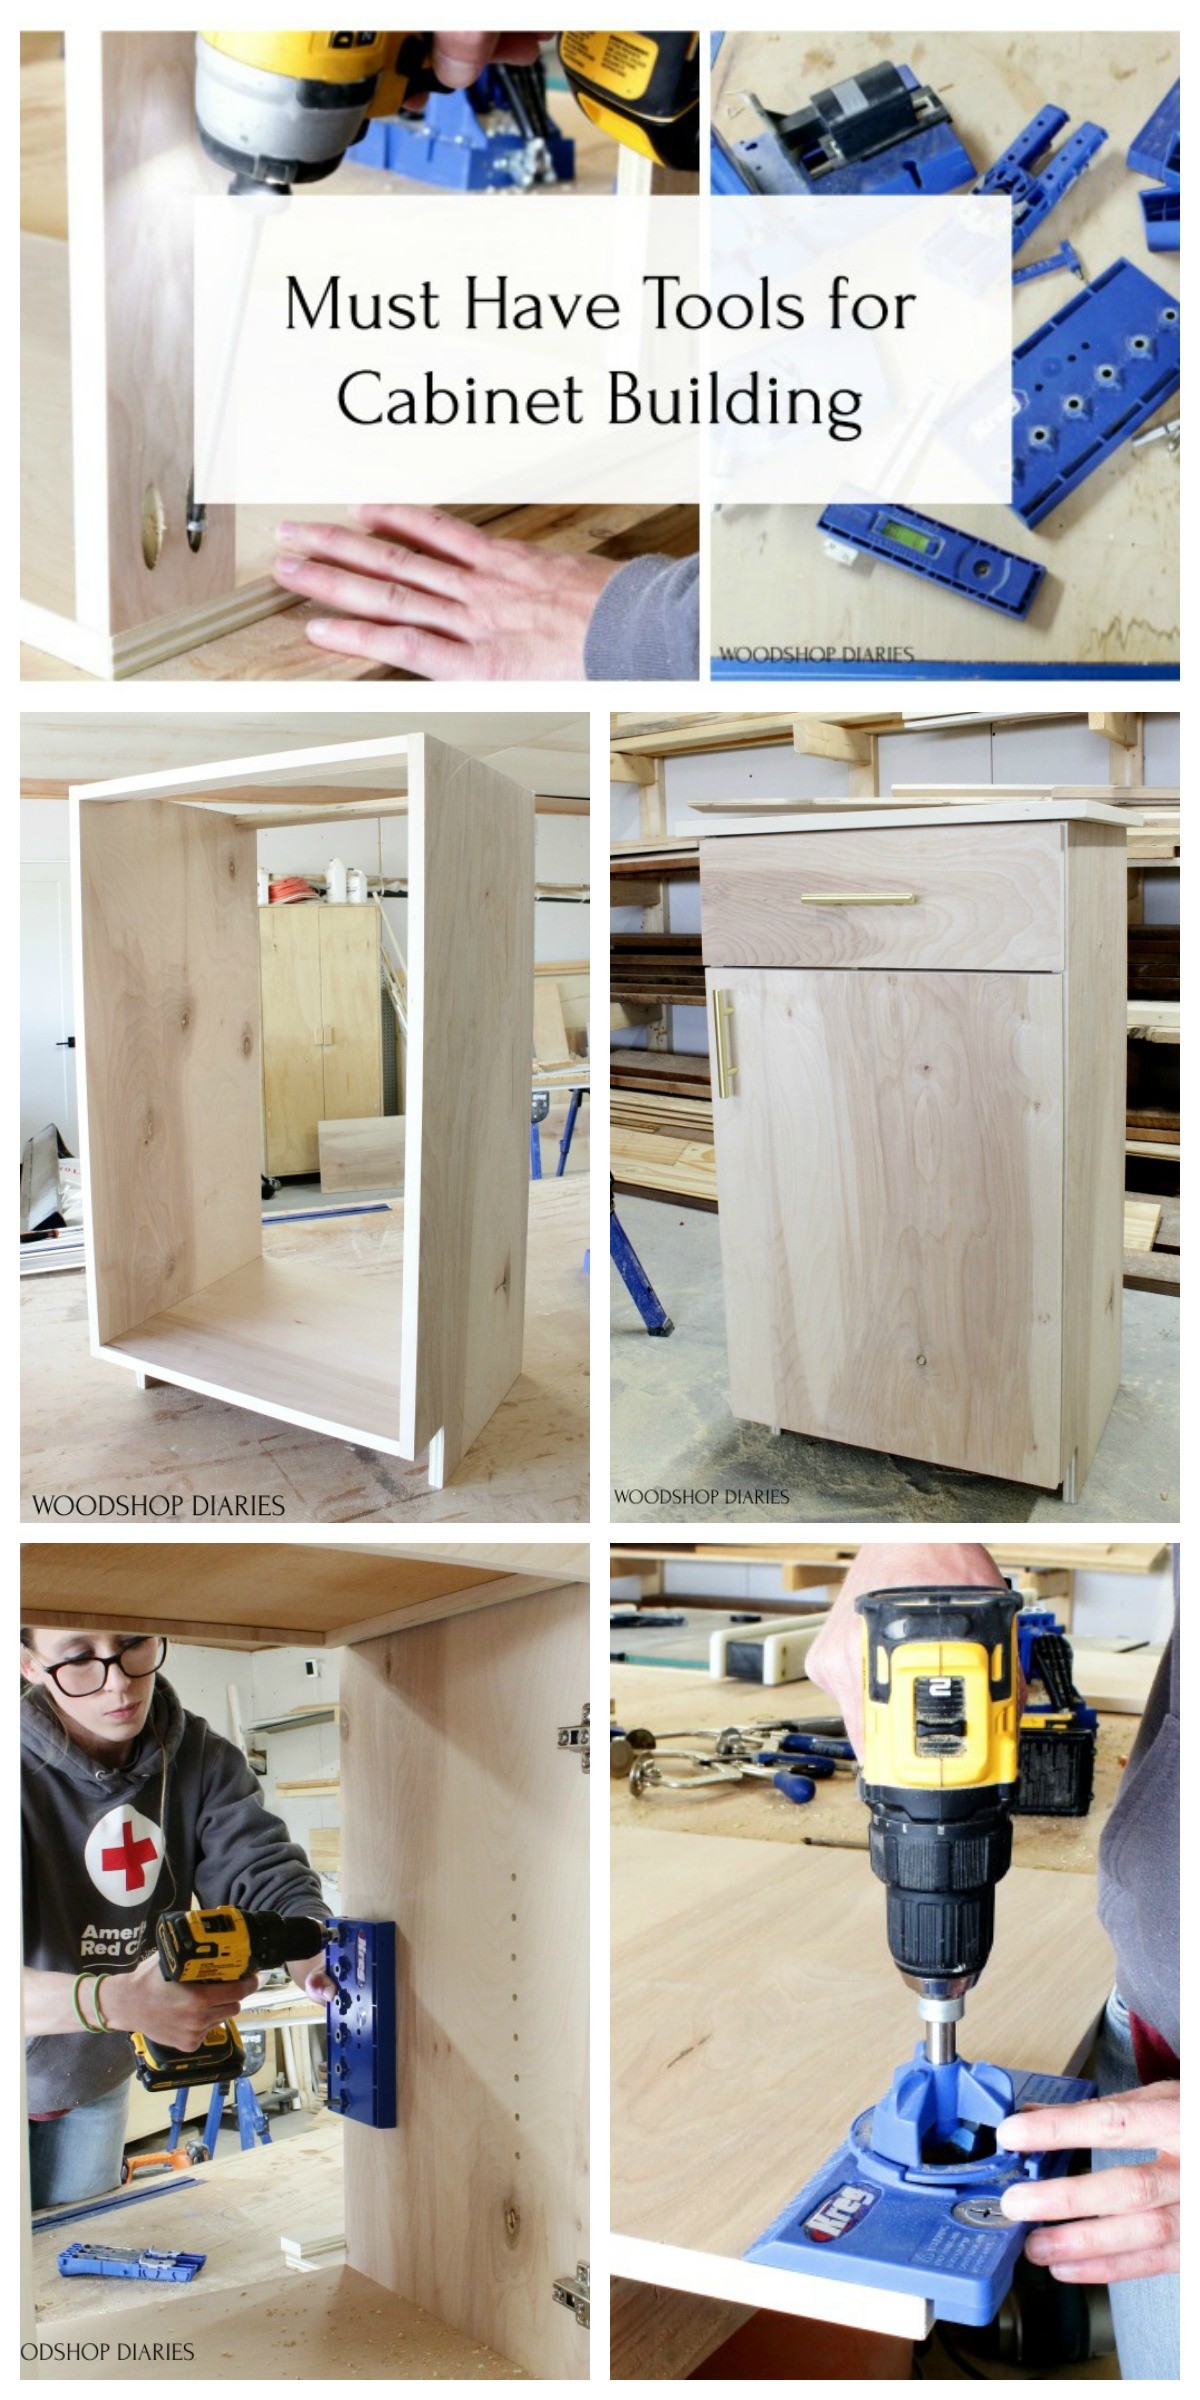
You do not need every tool in the catalog to succeed. Start with these core items to cut, join, and assemble your cabinets efficiently.
Must-Have Cutting Tools
- Circular saw + straight edge guide: Breaks down large 4×8 sheets accurately
- Table saw: Rips panels to width with clean, straight edges
- Miter saw: Cuts face frame parts quickly and uniformly
- Jigsaw: Cuts notches or curves when a band saw is unavailable
Joinery and Assembly Tools
- Drill/driver: Drives screws and pocket hole fasteners
- Pocket hole jig: Creates strong, hidden joints for face frames and drawers
- Brad nailer: Tacks parts together during assembly
- Clamps: Holds joints tight while glue dries or screws are driven
- Router + bits: Cuts grooves, rabbets, and shelf pin holes
Helpful Jigs and Accessories
- Shelf pin jig: Ensures perfect alignment for adjustable shelves
- Drawer slide jig: Positions slides flawlessly every time
- Hinge drilling jig: Drills precise 35mm cup holes for Euro hinges
- Spacers: Scrap wood cut to ¼” or 1/8″ helps maintain consistent gaps
A centipede work holder makes handling sheet goods easier and prevents scratching during cuts.
Cut Parts Efficiently and Accurately
Smart cutting strategies save material and reduce errors significantly during the build process.
Optimize Cuts with a Cut List
Use SketchUp plugins like Cut List to generate an efficient cutting diagram from a single 4×8 sheet. This minimizes waste and helps you determine exactly how many sheets of plywood to buy.
Remove Factory Edges First
Factory-cut edges on plywood are often slightly curved or uneven. Cut side panels slightly oversized, then rip them on a table saw to final width. This ensures both sides are perfectly straight and parallel.
Batch Cut Identical Parts
Cut multiple face frame rails or stretchers at once using a stop block on your miter saw. This guarantees all pieces are the same length without constant measuring.
For drawer boxes, stack several sides and cut them together. You do not need perfect precision if they are all off by the same amount.
Apply Edge Banding Last If Needed
If using iron-on edge banding, cut parts to final size first, apply the banding, then rip down the edge to make it flush. This avoids chipping and gives a clean finish.
Build the Cabinet Carcass Structure
The carcass is the main box structure. How you build it depends on whether you choose a face frame or frameless style.
Face Frame vs. Frameless Styles
- Face Frame: Traditional look that adds strength and hides imperfect edges
- Frameless: Modern style that maximizes interior space and is faster to build
Beginners often find face frame construction easier because it forgives small alignment errors during assembly.
Skip the Glue for Wall Cabinets
For wall-mounted kitchen or bathroom cabinets, glue adds little strength. Once screwed together and anchored to the wall, the structure relies on fasteners and adjacent units.
Use 1¾-inch Spax screws or system screws that pre-drill as they drive. Place two screws at each end of stretchers and one every 6–8 inches along joints. Save glue for freestanding cabinets or units with heavy loads.
Install the Toe Kick the Easy Way
Forget notching side panels, which is difficult and wastes material. Instead, rip 4-inch strips from ¾-inch plywood and cut front and back stretchers to cabinet width minus 1.5 inches. Assemble a separate toe kick frame with pocket screws and attach it to the bottom of the cabinet.
Alternatively, use adjustable leveling feet screwed into the cabinet bottom. Set the cabinet on a ledger board 4.5 inches above the floor, level it, then add a clip-on toe kick.
Cut Grooves and Dadoes Before Assembly
Use a router to cut a ¾-inch wide bottom groove positioned just above the toe kick line. Cut a ¼-inch wide back groove along the rear edge of side, top, and bottom panels. Drill shelf pin holes while panels are flat using a shelf pin jig for consistency.
Cut these features before assembling the box to ensure accuracy.
Assemble the Box Step by Step
- Insert the bottom panel into the groove
- Clamp side panels to the bottom securely
- Tack with brad nails, then drive screws
- Install back stretchers using a ¼-inch spacer to ensure the back panel sits flush
- Add drawer dividers using spacers equal to the divider thickness
- Slide in the ¼-inch back panel or nail a ½-inch panel directly to the back
For runs of cabinets, screw adjacent units together through shared sides to create a rigid block.
Construct and Attach the Face Frame
The face frame reinforces the cabinet and provides a clean front appearance for your project.
Cut and Prepare Frame Parts
Use 1x3s ripped to 1.25 inches wide for standard stiles and rails. Center stiles between cabinets are often 2 inches wide to provide ample mounting surface.
Cut all parts to length with a miter saw or crosscut sled for precision.
Join with Pocket Screws
Drill pocket holes on the back of rails. Apply glue, clamp, and screw into stiles securely. Wax screws when using hard maple to prevent stripping during installation.
Sand the frame with 120-grit, then 180-grit for a smooth finish before attaching.
Attach to the Carcass
Apply glue to the front edges of the cabinet box. Clamp the face frame on, ensuring a ¼-inch overhang on all sides for a professional look.
Check for square by measuring diagonals. If the diagonal measurements are equal, the frame is square.
For painted cabinets, use brad nails to supplement glue. For natural finishes, avoid nails to prevent visible holes.
Build and Install Drawers Properly
:max_bytes(150000):strip_icc()/Pic1-eab6e03c5cfb4cc7ac08251c52748029.png)
Drawers make cabinets functional, so build them strong and ensure they slide smoothly.
Cut Drawer Boxes from Baltic Birch
Use 5/8-inch Baltic Birch for shop or pantry drawers due to its strength. Standard ¾-inch cabinet-grade plywood works for lighter use applications.
Dimensions should be:
* Width: Cabinet opening minus 1 inch for slide clearance
* Height: Opening height minus 1 inch
* Depth: Slightly longer than the drawer slide
Join with Dadoes or Back Slot Method
- Dado method: Cut a ¼-inch groove on the inside bottom edge of all four sides. Slide in the ¼-inch plywood bottom.
- Back slot method: Make the back piece taller so the bottom slides in from behind, which is easier for beginners.
Assemble with pocket screws on front and back pieces while sides have no holes.
Add Drawer Fronts with Consistent Reveals
Cut drawer fronts ½ inch smaller than the opening on all sides to create a ⅛-inch reveal or gap.
To install:
1. Place ⅛-inch spacers above and beside the drawer
2. Align the front carefully
3. Temporarily screw through pull holes
4. Open drawer, drill from back, insert pull, and secure
This ensures perfect alignment every single time.
Install Drawer Slides with a Jig
Use full-extension side-mount slides for full access to contents.
With a drawer slide jig:
1. Remove the inner slide
2. Align outer slide with cabinet front
3. Use a plywood scrap as a height guide
4. Screw in place securely
5. Use a ¼-inch spacer at the front to prevent face frame interference
Repeat on the other side and for each drawer level.
Make Shaker-Style Doors Easily
Shaker doors are simple, timeless, and perfect for beginners learning how to build cabinets for beginners.
Use Frame-and-Panel Design
Materials needed include 1×3 Hard Maple or Select Pine for the frame and ½-inch plywood for the panel. Frame parts are typically 2 inches wide for a balanced look.
Cut Grooves and Tenons
- Groove: Use a router to cut a ¼-inch groove on the inside edge of all frame pieces
- Tenon: Cut tenons on rail ends to fit into stile grooves using a table saw tenoning jig
- Panel: Cut to size and rabbet all edges ¼-inch so it fits into the groove
Assemble Without Gluing the Panel
Glue only the tenons, not the panel itself. Wood moves with humidity, so the panel must float in the groove to prevent cracking.
Clamp the frame, wipe off excess glue, and let dry. Sand to 180-grit for a smooth finish.
Install Hardware and Finish Up
Final touches make the difference between a DIY project and a professional installation.
Mount Euro Hinges Correctly
- Use a 35mm hinge drilling jig to bore the cup hole in the door
- Pre-drill pilot holes in the face frame with a self-centering bit
- Place bottom hinge 1–2 inches from the door bottom for adjustment room
- Use a scrap spacer taped to the face frame to set door height before screwing
Euro hinges allow vertical, horizontal, and depth adjustments later for perfect alignment.
Align Drawer Pulls Perfectly
Use a True Position drill guide to ensure pulls are centered and aligned across all drawers. Mark pull locations or use adjustable stops for consistency.
Level and Secure the Cabinets
- Place cabinets on leveling feet or a toe kick base
- Use shims under the cabinet to level front-to-back and side-to-side
- Screw into wall studs through the back stretchers
- Screw adjacent cabinets together through shared sides
This creates a solid, unified block that will not shift over time.
Add Final Details
Install wheels on shop cabinets for mobility if needed. Allow glue 24 hours to cure before heavy use. Attach temporary skids when moving to protect bottom edges from damage.
Frequently Asked Questions About Building Cabinets
What is the easiest cabinet style for beginners?
Face frame construction is the easiest style because it hides imperfect edges and forgives minor alignment errors during assembly. It also provides a traditional look that many homeowners prefer for kitchens and bathrooms.
Do I really need expensive tools to build cabinets?
No, you do not need expensive tools. A circular saw with a straight edge, a drill, and a pocket hole jig are sufficient for most beginner projects. Specialized jigs help with accuracy but are not strictly mandatory if you measure carefully.
How thick should plywood be for cabinet boxes?
Use ¾-inch cabinet-grade plywood for the main box structure to ensure durability. Use ¼-inch plywood for back panels and ½-inch plywood for door panels in frame-and-panel designs.
Can I build cabinets without using wood glue?
Yes, for wall-mounted cabinets, you can rely on screws and wall anchoring instead of glue. This method allows for easier adjustments and has proven reliable over years of use in many installations.
How do I ensure my drawer fronts are aligned perfectly?
Use ⅛-inch spacers between drawer fronts and the cabinet frame to create consistent reveals. Temporarily screw the front in place through the pull holes to check alignment before permanent installation.
What wood is best for painted cabinet faces?
Poplar is the best wood for painted cabinet faces because it sands very smooth and takes paint evenly. Hard Maple is better if you plan to use a natural stain finish due to its attractive grain.
Key Takeaways for Building Your First Cabinets
Building cabinets is a rewarding project that adds value and storage to your home. Remember that planning your layout and choosing the right materials are the most critical steps for success. Focus on using jigs for accuracy, keeping your designs simple, and relying on screws rather than glue for wall units.
Start with a small project like a single base cabinet to build your confidence before tackling a full kitchen. With patience and the right approach, you can create custom storage that looks professional and lasts for decades.