
Your kitchen feels dated because the cabinet doors are worn out or simply the wrong style. Learning how to build doors for cabinets lets you create custom, professional-grade replacements that fit your space perfectly.
This guide details three distinct construction methods ranging from simple slab cuts to advanced raised panel joinery. You will discover precise sizing formulas, essential tool lists, and hardware installation tips to ensure your new doors hang straight and last for years.
Constructing Simple Slab Doors for Modern Spaces
Slab doors offer a minimalist aesthetic perfect for contemporary kitchens or utility areas like garages. This method is the most forgiving for beginners since it involves cutting a single flat panel without complex joinery.
Cutting Panels to Exact Dimensions
You must use sheet goods like MDF or plywood because solid wood will warp quickly in this application. Measure your cabinet opening and subtract 1/8 inch from each side for inset doors or match the face width for overlay styles. Use a track saw or a circular saw with a guide and an 80-tooth blade to prevent chipping on the cut edges. Secure your guide firmly with double-sided tape to ensure the cut remains perfectly straight.
Finishing Plywood Edges Properly
Plywood edges require banding to hide the internal layers and create a paintable surface.
* Cut the iron-on edge banding slightly longer than the door edge.
* Apply medium heat with an iron and press the banding firmly onto the wood.
* Trim the excess ends flush using a flush trim router bit.
* Shave off long curls with a quad trimmer for a clean look.
* Sand the edges smooth with a detail sander or sanding block.
Pro Tip: Pre-finish MDF doors before installation since their edges absorb paint unevenly if sanded after the initial coat.
Building Shaker Style Frame and Panel Doors
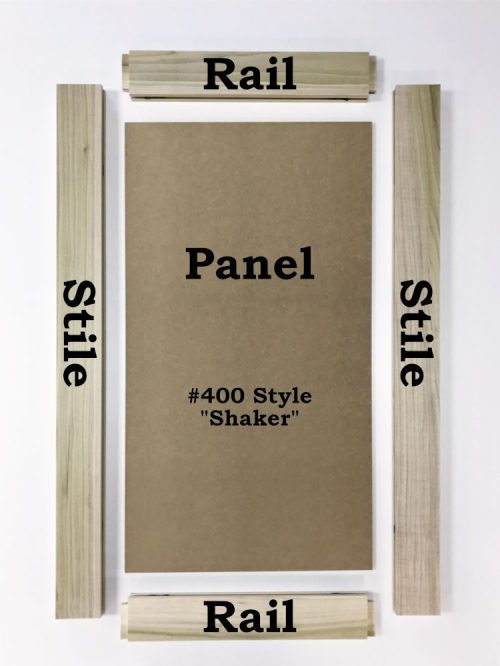
Shaker doors provide timeless appeal with a sturdy frame surrounding a floating center panel. This intermediate project requires precision but can be completed using only a table saw and basic clamps.
Calculating and Cutting Stiles and Rails
The vertical pieces are stiles and the horizontal pieces are rails. Cut stiles to the full height of your desired door size. Calculate rail length using this formula: Door Width minus twice the stile width plus twice the tenon length. For a 17.5 inch wide door with 2.5 inch stiles and 3/8 inch tenons, your rails should be 13.25 inches long. Cut all pieces slightly long and trim them to exact size after jointing for the best fit.
Cutting Grooves for the Floating Panel
Set your table saw blade height to 3/8 inch and position the fence to cut the center of your 3/4 inch stock. Run all stiles and rails through the saw to create the groove that will hold the panel. If the groove is too narrow for your 1/4 inch panel, make a second light pass to widen it slightly. Always run a scrap piece first to verify the groove width before cutting your final frame parts.
Forming Tenons on Rail Ends
Use a miter gauge and a stop block to cut 3/8 inch tenons on both ends of each rail. Mark the tenon length from the rail end and align the blade just inside your line. Make the shoulder cuts first, then nibble away the waste material to form the tenon cheeks. Flip the rail and repeat the process on the opposite side, adjusting the blade height if the fit is too tight or moving the fence if it is too loose.
Assembling the Frame Without Gluing the Panel
Dry fit all parts and check for square by measuring diagonals, ensuring the difference is no more than 1/16 inch. Apply glue only to the tenons and never to the panel itself. Insert the panel into the grooves after gluing the first two joints, then glue the remaining joints and clamp with bar clamps. Wipe away excess glue immediately to prevent finish issues later.
Why Float the Panel: Wood expands across the grain, so a floating panel prevents warping and cracking as humidity changes.
Crafting Advanced Raised Panel Doors
Raised panel doors add elegance with profiled center panels and chamfered frames. This advanced method requires a router table and careful setup to achieve professional results.
Cutting Tongues and Matching Grooves
Mark two parallel lines 1/4 inch apart on the panel ends to guide your tongue cuts. Use a coping bit to cut outside these lines, leaving a 1/4 inch tongue, and back up the cut with MDF to prevent tear-out. Switch to a matching groove bit for the frame parts and use the tongue to set the bit height for a snug fit. Run all stiles and rails through the router table to create matching grooves.
Shaping the Raised Panel Profile
Use a large raised panel bit with a 1/4 to 1/2 inch profile to shape the center. Remove bulk material with light cuts in the first pass, then set the final depth for the second pass. Perform a final skim pass to eliminate any burn marks and ensure a smooth surface. Always feed the panel with the grain to avoid tear-out and never take the full depth in one pass.
Safety First: Keep your hands behind push sticks and use a backup block at the end of every cut to prevent accidents.
Pre-Finishing Before Final Assembly
Stain or seal the panel before gluing the frame together. Once assembled, the frame will hide the edges, and seasonal movement could expose raw wood if you finish it later. This step ensures a professional look even when the wood expands and contracts.
Assembling with Expansion Room
Apply glue only at the top and bottom center of the joints or insert rubber space balls into the grooves. Clamp lightly because excessive pressure can distort the frame and ruin the fit. Gluing the entire panel traps expansion forces, which leads to cracked frames and failed doors.
Mastering Cabinet Door Sizing Math
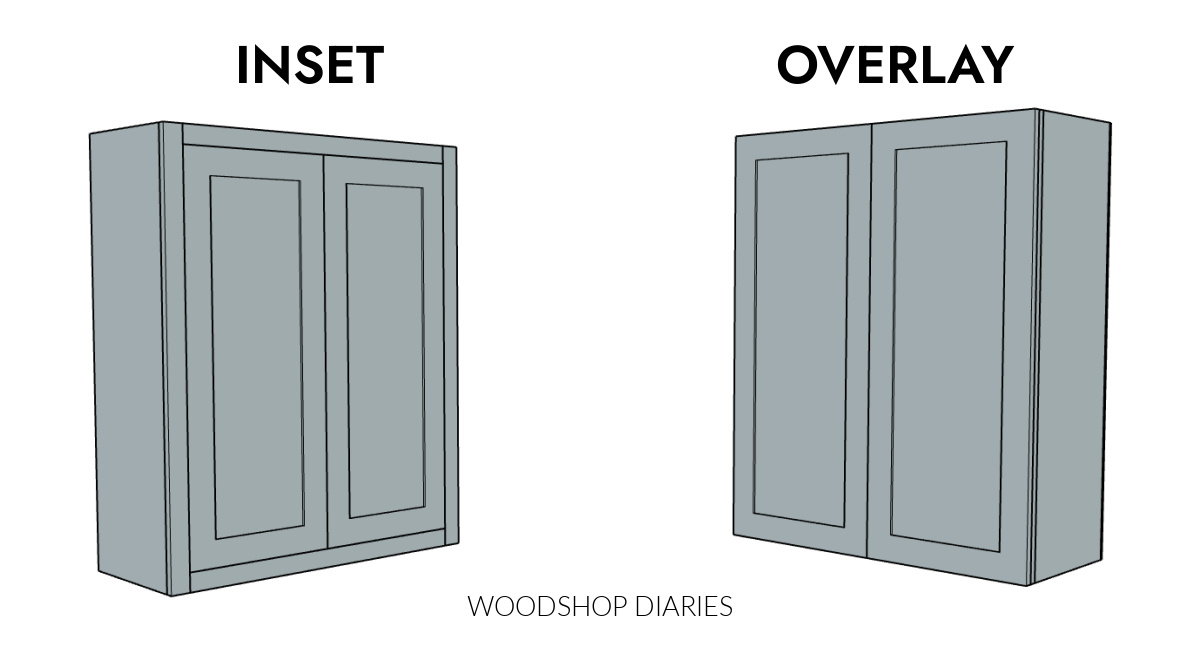
Accurate math prevents gaps, misalignment, and costly rework during your build. Understanding the difference between inset and overlay styles is critical for calculating how to build doors for cabinets correctly.
Inset vs Overlay Door Calculations
Inset doors fit inside the cabinet opening, so you must subtract 1/8 inch from the opening size on all sides for the reveal. Full overlay doors cover the entire cabinet face, meaning the door size equals the face frame width and height. Partial overlay doors typically overlap by 1 inch per side, requiring specific measurements for your hinge type.
Determining Panel Size for Frames
Calculate panel width by measuring the distance between groove bottoms, adding twice the groove depth, and subtracting clearance. For solid wood panels, subtract 1/4 inch total to allow for expansion. For MDF panels, subtract only 1/8 inch total since the material does not expand significantly. Leave a 1/16 inch gap at the back of the panel to prevent rattling and add stiffness.
Installing European Hinges for Perfect Alignment
Euro hinges offer a seamless look and 3D adjustability for up, down, left, right, and in/out movement. Proper installation ensures your doors hang straight and close smoothly.
Marking and Drilling Cup Holes
Place hinges 4 inches from the top and bottom of the stiles, adding a third hinge in the center for tall doors over 30 inches. Use a 35mm Forstner bit and a hinge jig to drill cup holes to the correct depth, usually 13/16 inch. Clamp the jig to the door edge and drill straight in without angling the bit.
Pro Tip: Drill all hinge holes before finishing the door, as paint or stain can clog the hole or cause inaccurate depth.
Mounting the Cabinet Plate
Use a door positioner jig to align the mounting plate on the cabinet face. Clamp the jig to the cabinet, set the height so the door bottom aligns, and place the door on the jig ledge. Align the hinge arm with the plate holes, drill pilot holes, and screw the plate into place.
Adjusting for a Perfect Fit
Use the three adjustment screws on the hinge to fine-tune the door position. Adjust vertically to align with adjacent doors, horizontally to set the overlay gap, and in depth to make the door flush with the face frame. Open and close the door repeatedly while adjusting until the closure is smooth and the gap is even.
Avoiding Common Build Mistakes
Even skilled builders make preventable errors, but knowing what to watch for saves time and materials.
Preventing Tear-Out and Burn Marks
Always cut with the grain when routing to prevent tear-out on the wood surface. Use backer boards when sawing or routing ends to support the fibers. Make three passes with router bits to avoid burn marks, feeding the wood slowly but steadily without hesitation.
Eliminating Kickback and Squareness Issues
Use a stop block 2 to 3 inches behind the blade to prevent kickback when cutting tenons. Never free-hand tenons and always use a miter gauge for safety. If your door is out of square, loosen clamps slightly and tap corners with a mallet until diagonals match within acceptable tolerance.
Acceptable Tolerance: Aim for 1/32 inch variance for slab doors and up to 1/16 inch for frame doors.
Essential Materials and Tools Checklist
Gathering the right materials and tools before you start ensures a smooth workflow.
Materials by Door Type
- Slab Doors: MDF or plywood with iron-on edge banding.
- Shaker Doors: Solid wood like poplar or pine for the frame with 1/4 inch solid wood or 1/2 inch MDF panels.
- Raised Panel Doors: 3/4 inch solid wood for both frame and panel.
Required Tool List
- Table saw with an 80-tooth crosscut blade
- Router table with coping and raised panel bits
- 35mm Forstner bit and hinge jig
- Bar or pipe clamps for assembly
- Miter gauge with an auxiliary fence
- Flush trim router bit and sanding blocks
- Tape measure, speed square, and calipers
Budget Hack: Convert a circular saw into a track saw with a DIY straight edge and double-sided tape if you lack a table saw.
Final Tips for Long-Lasting Cabinet Doors
Building custom doors is a rewarding skill that improves with every project you complete. Start with a simple slab door to master cutting and finishing techniques before moving to complex joinery.
- Pre-finish all parts before assembly, especially for raised panels.
- Drill hinge holes before applying any stain or paint.
- Store doors flat after building to prevent warping during curing.
- Allow wood to acclimate in the installation room for 48 hours.
- Use space balls or minimal glue points to accommodate wood movement.
A floating panel design ensures your doors survive seasonal humidity swings without cracking. Practice these techniques on scrap wood first, then tackle your first full door with confidence.
Frequently Asked Questions About Building Cabinet Doors
What is the best wood for beginner cabinet doors?
Poplar and pine are excellent choices for beginners because they are affordable and easy to work with. These solid woods hold paint well and are forgiving during the cutting and sanding process.
How much clearance does a solid wood panel need?
Solid wood panels require a 1/4 inch total clearance, which is 1/8 inch per side, to allow for seasonal expansion. Failing to provide this space can cause the panel to crack or the frame to split.
Can I use a circular saw instead of a table saw?
Yes, you can use a circular saw with a straight edge guide and an 80-tooth blade for cutting slab doors. However, a table saw is highly recommended for cutting precise grooves and tenons for frame and panel doors.
Why do my router cuts have burn marks?
Burn marks usually happen when you take too deep of a cut or feed the wood too slowly. Use a three-pass method with your router bit to remove material gradually and eliminate burning.
How do I ensure my cabinet door is square?
Measure diagonals from corner to corner during assembly; the measurements should be equal within 1/16 inch. If they differ, loosen your clamps slightly and tap the corners with a mallet until they match.
Key Takeaways for How to Build Doors for Cabinets
Building your own cabinet doors allows you to customize style and save money while learning valuable woodworking skills. Whether you choose simple slab construction, classic Shaker frames, or elegant raised panels, precise math and proper tool setup are essential for success.
Focus on accurate sizing calculations, allow room for wood movement in your panels, and install high-quality European hinges for the best results. Start with a small project to build confidence, then expand your skills to create custom doors for your entire home.


