

Building your own kitchen cabinet doors can save money, add custom style, and give your space a personalized touch. Whether you’re remodeling, upgrading old doors, or starting from scratch, knowing how to make kitchen cabinet doors opens up endless design possibilities. From simple slab doors to elegant raised panels, the right technique depends on your tools, skill level, and desired finish. This guide walks you through every step—from choosing materials and styles to cutting, assembling, and finishing—so you can create professional-quality cabinet doors that match your kitchen perfectly.
You don’t need a full woodworking shop to get started. With basic tools like a table saw, router, and clamps, you can build durable, attractive doors that rival store-bought options. We’ll cover common door types, material choices, precise measuring tips, and expert assembly methods. Plus, you’ll learn how to avoid common mistakes and achieve clean, gap-free results every time.
Choose Your Door Style
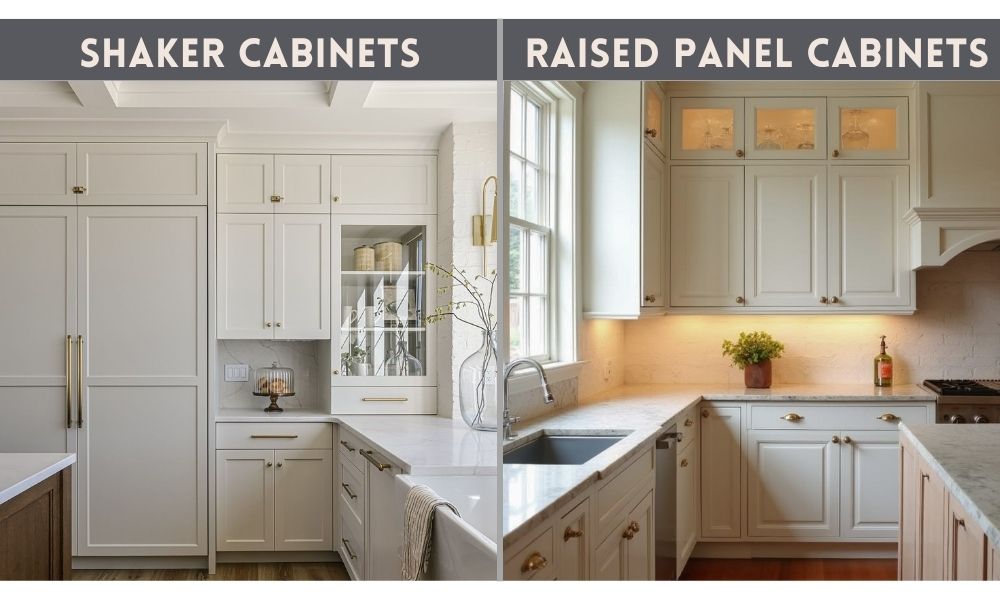
Slab Doors for Modern Kitchens
Slab doors are flat, minimalist panels ideal for contemporary or modern kitchens. Made from plywood, MDF, or solid wood, they offer a sleek, seamless look. These are the easiest to build—just cut your material to size and finish. Use pre-finished plywood or paint MDF for a smooth, clean appearance.
Best for: Handleless designs, painted finishes, and simple aesthetics.
Pro tip: Add a decorative edge banding to plywood for a solid wood look without the cost.
Shaker-Style Frame and Panel
Shaker doors feature a five-piece construction: two stiles (vertical), two rails (horizontal), and a center panel. This classic design is timeless, durable, and perfect for DIYers. Use hardwood like maple or poplar for the frame and a flat panel made from plywood or solid wood.
Why it works: The frame adds strength and prevents warping, while the panel can expand and contract with humidity.
Visual cue: Look for clean lines and square joints—any misalignment will be obvious.
Raised Panel Elegance
Raised panel doors use a router or CNC to shape the inner edge of the frame, creating a 3D effect where the panel appears elevated. This traditional style adds depth and luxury but requires advanced tools like a stile-and-rail bit set.
Difficulty level: Intermediate to advanced.
Common mistake: Uneven routing depth—always test on scrap wood first.
Select the Right Materials
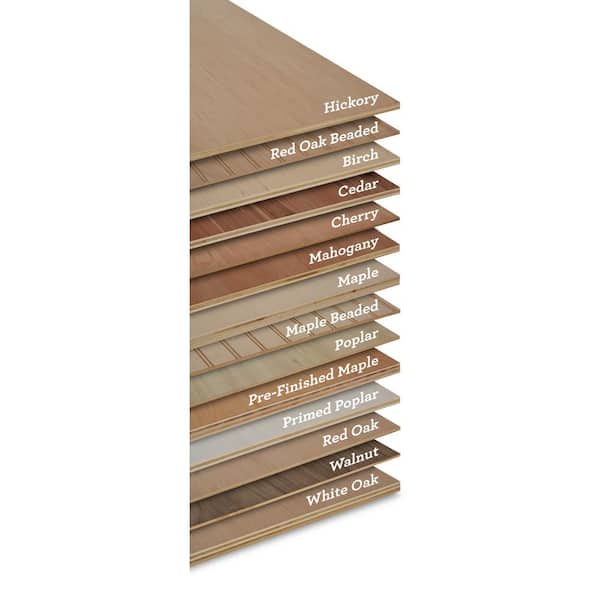
Solid Wood: Beautiful but Tricky
Solid wood offers unmatched grain and finish quality. Popular choices include maple, oak, cherry, and poplar. However, wood expands and contracts with humidity, so proper construction is crucial.
Best use: Shaker and raised panel doors where frame joints protect against warping.
Avoid: Large slab doors in humid environments unless well-sealed.
Plywood: Stable and Affordable
Plywood resists warping and is ideal for slab or frame-and-panel doors. Use hardwood plywood (like birch or maple) for visible surfaces. For a solid wood edge, apply iron-on veneer tape or glue on solid wood edging.
Pro tip: Choose “A-grade” face veneer for fewer knots and a smoother finish.
MDF: Perfect for Painting
Medium-density fiberboard (MDF) is dense, flat, and paint-ready—ideal for painted slab doors. It doesn’t warp or split, but it’s heavy and swells if exposed to moisture.
Best for: High-gloss painted kitchens.
Warning: Always seal all edges and surfaces to prevent moisture damage.
Measure Accurately for Perfect Fit
Standard Cabinet Door Sizes
Most base cabinets are 12″ to 36″ wide, with doors typically 1/8″ to 1/4″ smaller than the opening to allow for gaps. Wall cabinets range from 9″ to 36″. Measure each cabinet individually—old kitchens often have inconsistencies.
Rule of thumb: Subtract 1″ total (1/2″ per side) from the opening width for overlay doors.
Example: A 18″ wide cabinet opening needs a 17″ wide door for full overlay.
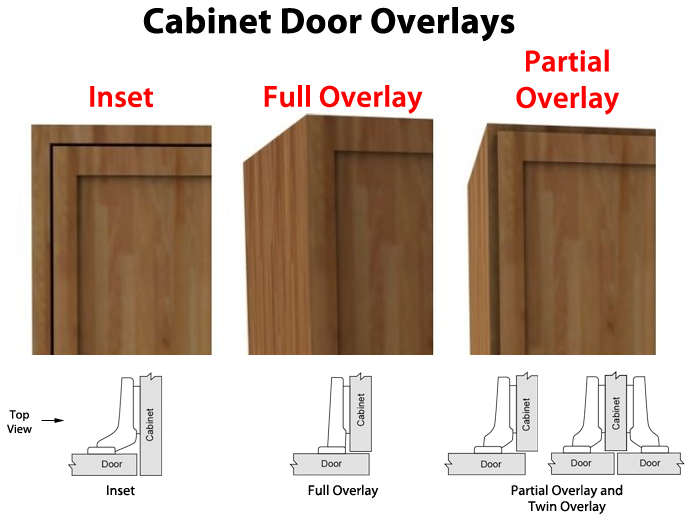
Account for Overlay Type
- Full overlay: Door covers entire front frame (1/4″ gap between doors)
- Standard overlay: Covers most of the frame, leaves a 1.5″ stile visible
- Inset: Door sits inside the cabinet frame—requires precise 1/32″ tolerance
Pro tip: Label each door with its cabinet location to avoid mix-ups during installation.
Cut and Prepare Door Components
Use a Table Saw for Straight Cuts
Break down large sheets of wood or plywood using a table saw with a sharp carbide-tipped blade. Set the fence accurately and use a push stick for safety.
For slab doors: Cut to final dimensions, then sand edges smooth.
For frame-and-panel: Cut stiles and rails to length first.
Mill Wood to Consistent Thickness
If using solid wood, joint one face and plane to uniform thickness (usually 3/4″). This ensures flat, warp-free doors.
Ideal thickness: 3/4″ for durability and hinge support.
Visual check: Place two boards face-to-face—any gaps indicate warping.
Assemble Frame-and-Panel Doors
Cut Mortise and Tenon Joints
Traditional Shaker doors use mortise and tenon joints. Cut a tenon on the rail ends and a matching mortise in the stile. This creates a strong, long-lasting connection.
Tools needed: Table saw or router for tenons, chisels or mortiser for mortises.
Fit test: The tenon should slide into the mortise with hand pressure—no gaps or wobble.
Use Pocket Screws for Simpler Builds
For beginners, pocket screws offer a fast, strong alternative. Drill angled holes in the stiles, then screw into the rails. Hide the screws with wood plugs or filler.
Time saved: Up to 50% faster than mortise and tenon.
Warning: Don’t over-tighten—can split the wood.
Glue and Clamp the Frame
Apply wood glue to joints, assemble the frame, and clamp in a square. Use a carpenter’s square to check alignment.
Clamping tip: Place cauls (straight wood strips) across clamps to prevent denting.
Drying time: 2–4 hours for initial set; 24 hours for full cure.
Insert the Center Panel
The panel should “float” inside the frame to allow for expansion. Cut it 1/4″ smaller than the frame’s inner opening.
For slab panels: Sand smooth and insert with no glue.
For raised panels: Shape edges with a router before assembly.
Finish for Durability and Beauty
Sand All Surfaces Smooth
Start with 120-grit sandpaper, then move to 180- and 220-grit for a glass-like finish. Sand with the grain to avoid scratches.
Critical areas: Edges and corners—these catch light and show imperfections.
Pro tip: Wipe down with a tack cloth after sanding to remove dust.
Choose the Right Finish
- Paint: Best for MDF and plywood. Use a high-quality primer and semi-gloss paint for wipeable surfaces.
- Stain and Polyurethane: Ideal for solid wood. Enhances grain and adds protection.
- Pre-Catalyzed Lacquer: Professional-grade, durable finish—requires spray equipment.
Number of coats: 2–3 for paint, 3–4 for clear finishes.
Drying between coats: Light sand with 320-grit.
Apply Edge Banding (For Plywood)
Cover exposed plywood edges with iron-on wood veneer tape. Trim excess with a utility knife and sand smooth.
Seal edges: Especially important if using paint or in humid areas.
Install Hinges and Hardware
Mark Hinge Locations Precisely
Standard overlay hinges are typically placed 2.5″ from the top and bottom. Use a hinge jig for consistent, clean holes.
For inset doors: Position hinges flush with the cabinet frame.
Pro tip: Dry-fit doors first to check alignment before final mounting.
Drill Pilot Holes to Prevent Splitting
Use a drill bit slightly smaller than your screws. This prevents wood from cracking, especially near door edges.
For MDF: Use coarse-thread screws designed for dense materials.
Adjust for Perfect Alignment
Most cabinet hinges are adjustable—fine-tune side-to-side, up-down, and depth after installation.
Final check: Open and close doors to ensure smooth operation and even gaps.
Fix Common Mistakes
Doors Won’t Close Properly
Cause: Misaligned hinges or uneven cabinet frames.
Fix: Adjust hinge screws or shim the cabinet to level.
Prevention: Use a level during cabinet installation.
Gaps Between Doors Are Uneven
Cause: Inconsistent door sizes or poor hinge placement.
Fix: Remill or sand doors slightly, or reposition hinges.
Pro tip: Use a spacer block when installing to keep uniform gaps.
Warped or Twisted Doors
Cause: Poor wood selection or improper drying.
Fix: Replace or flatten with clamps and moisture (limited success).
Prevention: Use stable materials like plywood or properly acclimated solid wood.
Maintain Your Cabinet Doors
Clean With Mild Soap and Water
Avoid harsh chemicals that can strip finishes. Use a soft cloth and dry immediately.
For grease buildup: Use a 50/50 vinegar-water mix.
Re-Tighten Hinges Periodically
Doors sag over time. Check screws every 6–12 months.
Pro tip: Apply a drop of thread locker to prevent loosening.
Refinish When Needed
After years of use, doors may look dull. Light sanding and a new topcoat can restore shine without full replacement.
Time to refinish: When finish feels rough or looks faded.
Frequently Asked Questions About Making Kitchen Cabinet Doors
What is the easiest cabinet door style to make?
Slab doors are the simplest. You only need to cut a flat panel to size and finish it. No joinery or complex routing is required, making them perfect for beginners.
How much smaller should cabinet doors be than the opening?
For overlay doors, subtract 1″ total from the opening width (1/2″ per side). Inset doors need a precise 1/32″ tolerance for a clean fit.
Can I make cabinet doors without a table saw?
Yes. You can use a circular saw with a straight edge guide, a track saw, or have lumber yard cuts done for you. A router with a straight bit also works for trimming edges.
What wood is best for painted cabinet doors?
MDF is the top choice for painted doors. It’s flat, smooth, and takes paint beautifully. For a more durable option, poplar hardwood is an excellent alternative.
How long does it take to make a set of cabinet doors?
A basic set of 10 slab doors can take a weekend. Shaker or raised panel doors take longer, typically 3–5 days including glue drying and finishing time.
Do I need special hinges for inset cabinet doors?
Yes. Inset doors require hinges that mount flush with the cabinet frame, such as butt hinges or specialized inset cabinet hinges. Standard overlay hinges won’t work.
Key Takeaways for Making Kitchen Cabinet Doors
Building your own cabinet doors is a rewarding project that combines craftsmanship and creativity. You can save significant money while getting exactly the style you want. Start with a simple slab or Shaker design if you’re new to woodworking, then progress to more complex styles as your skills grow.
The three pillars of success are accurate measuring, proper material selection, and precise assembly. Take your time with each step, especially cutting and clamping. A square, well-glued frame makes everything easier from installation to final adjustment.
Your next step is to measure your cabinets and pick a style. Gather your materials, set up your workspace, and build one test door first. Once you master the process, you’ll have the confidence to tackle the entire set and transform your kitchen with custom, handmade doors.


