

You’ve decided to reconfigure your kitchen layout, upgrade your storage, or tackle a full remodel—and now you’re wondering if you can move a kitchen cabinet. The short answer is yes. Most kitchen cabinets can be relocated, raised, or repositioned with the right tools, preparation, and technique. But moving a cabinet isn’t as simple as unscrewing and shifting—it involves assessing attachment methods, dealing with plumbing or countertops, and ensuring safe reinstallation. Whether you’re relocating a wall cabinet, shifting a base unit, or reconfiguring an entire run, this guide walks you through every step. You’ll learn how cabinets are secured, what tools you need, how to handle tricky middle cabinets, and when to call in a pro. By the end, you’ll know exactly how to move a kitchen cabinet safely and effectively—without damaging your kitchen or risking injury.
Confirm Cabinet Attachment Method
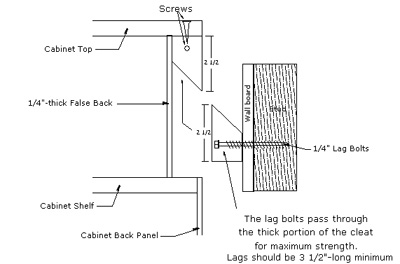
Before lifting a screwdriver, identify how your cabinet is secured. This determines your removal strategy and effort level.
Check for Wall-Mounted Screws
Most cabinets are screwed to wall studs using a cleat—a horizontal wooden strip beneath the top edge. Look inside the cabinet:
- Inspect the back upper corners
- Remove shelves to reveal hidden screws
- Feel along the top inner edge for screw heads
These screws are typically 2.5 to 3 inches long and penetrate directly into wall studs. Use a stud finder to confirm stud locations during reinstallation.
Inspect for Floor Nailing
Some cabinets are toe-nailed to the floor—nails driven at an angle through the toe-kick into the subfloor. This is more common in older installations.
- Shine a flashlight under the cabinet
- Look for nail heads or filled holes along the base
- Gently pry the toe-kick trim if access is limited
If nails are present, you’ll need to cut or pull them—possibly requiring bottom panel modification.
Identify Inter-Cabinet Connections
In continuous runs, cabinets are often screwed to adjacent units.
- Look at the sides where cabinets meet
- Check inside both cabinets for screws along the face frame
- End cabinets are easier to remove; middle units may require disassembly
Removing one cabinet in the middle often means removing or modifying neighboring units first.
Prepare for Cabinet Removal
Proper prep prevents damage, injury, and frustration. Skipping steps can lead to stuck cabinets or plumbing mishaps.
Empty and Clear the Area
Remove all contents from the cabinet and surrounding countertops.
- Take out dishes, cookware, and small appliances
- Clear space in front and around the cabinet
- Protect floors with drop cloths or cardboard
A lighter cabinet is safer to handle and less likely to shift unexpectedly.
Gather Essential Tools
You’ll need:
- Screwdrivers (Phillips and flathead)
- Pry bar or crowbar
- Utility knife
- Hammer
- Drill with screwdriver bits
- Level and stud finder
- Safety glasses and work gloves
- Cabinet jack or temporary support (for wall units)
For sink cabinets, add a bucket and towels for water drainage.
Enlist a Helper
Moving cabinets is a two-person job. Wall cabinets are top-heavy; base cabinets are bulky. A partner helps stabilize, guide, and lift safely—reducing risk of back strain or dropped units.
Disconnect Plumbing (If Applicable)
If you’re moving a sink cabinet, plumbing must be disconnected first—before any screws are removed.
Shut Off Water Supply
Locate the shut-off valves under the sink.
- Turn both hot and cold valves clockwise to close
- Open the faucet to drain residual water
- Place a bucket under connections to catch drips
Old or corroded valves may require professional replacement before disconnection.
Disconnect Supply Lines and Drain
Use an adjustable wrench to:
- Loosen supply line connections
- Disconnect the P-trap (drain pipe)
- Remove garbage disposal wiring if present
Take photos before disconnecting—this helps during reinstallation and troubleshooting.
Assess Valve Accessibility
If shut-offs are inaccessible, rusted, or outdated:
- Consider upgrading to accessible quarter-turn valves
- Hire a plumber to avoid leaks or pipe damage
- Budget for potential repairs or code updates
Never attempt to move a sink cabinet with connected plumbing.
Remove Countertop (When Necessary)
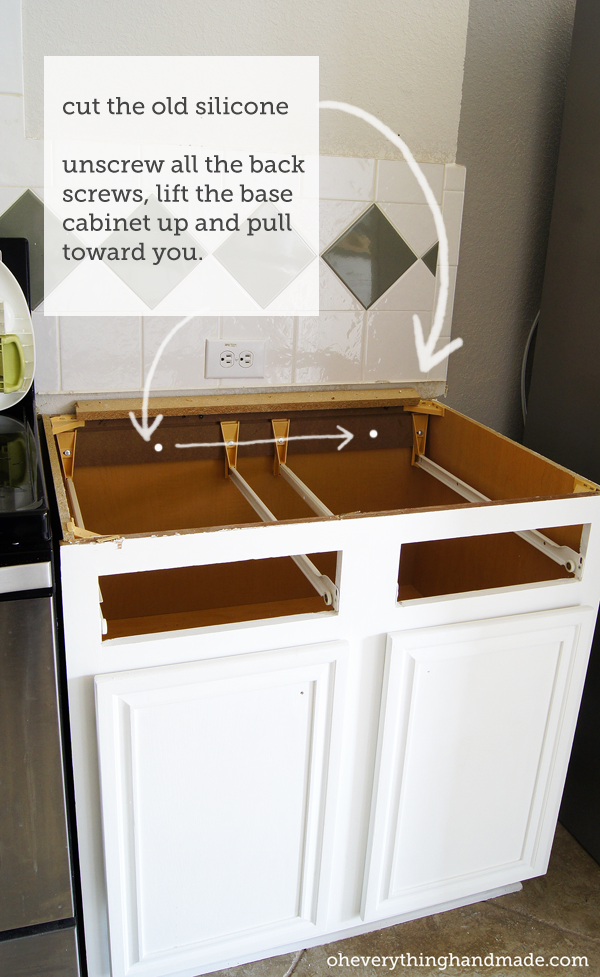
For base cabinets—especially in the middle of a run—the countertop often blocks removal.
Break the Seal Safely
Countertops are typically attached with adhesive, screws, or both.
- Use a utility knife to cut through caulk or silicone along the back edge
- Work slowly to avoid chipping tile or damaging the backsplash
- If screwed down, locate and remove screws from underneath
For stone or solid surface countertops, avoid prying—this can crack the material.
Support the Countertop During Removal
Use temporary supports or have a helper hold the section.
- Work in small sections if removing only part of the counter
- Label edges if reinstalling to ensure proper fit
- Store flat to prevent warping
Reattaching may require new adhesive or professional help.
Remove Wall Cabinets Safely
Wall cabinets are lighter but more dangerous due to height and mounting.
Support Before Unscrewing
Use a cabinet jack or have a helper hold the unit.
- Prevent sudden drops when the last screw is removed
- Maintain control during lowering
Never rely on drywall anchors—cabinets should be mounted to studs.
Unscrew from Wall and Adjacent Units
Remove all fasteners:
- Wall screws (usually 2–4 per cabinet)
- Screws connecting to neighboring cabinets
- Any top or side braces
Work methodically—remove one screw at a time while maintaining support.
Lower Carefully
Guide the cabinet down slowly.
- Protect walls and flooring
- Set on a soft surface to avoid finish damage
- Label doors and hinges for reinstallation
Handle Middle-of-Run Base Cabinets
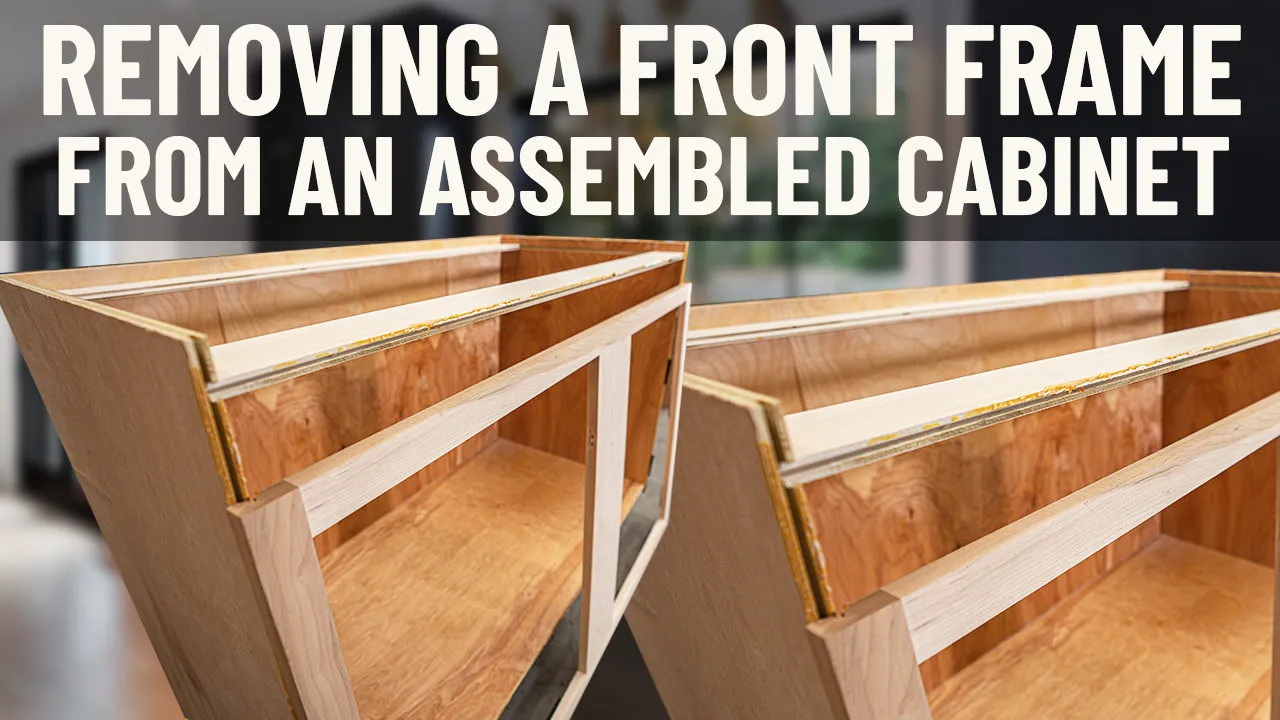
Cabinets in the middle of a continuous run are the toughest to remove due to hidden fasteners.
Can You Access the Sides?
If adjacent cabinets block access:
- You may not be able to reach inter-cabinet screws
- Removing neighboring units might be necessary
- Consider disassembly instead
Disassemble In Place (Expert Method)
Professional carpenters often remove the face frame first.
- Unscrew face frame from the cabinet box
- Remove it in one piece (preserves alignment)
- Detach sides and bottom from wall or floor
- Rebuild interior if damaged
- Reattach face frame after repositioning
This avoids damaging surrounding cabinets.
Cut the Bottom if Needed
If the cabinet is nailed down and can’t be lifted:
- Cut the bottom panel with a reciprocating saw
- Remove the main box
- Reattach or replace the bottom later
This is a last resort but effective for stubborn units.
Relocate Wall Cabinets Higher
Raising wall cabinets creates more visual space or accommodates new appliances.
Standard Height Is 18 Inches
The industry standard is 18 inches from countertop to bottom of wall cabinet.
- Measure your current setup
- Mark new height with painter’s tape
- Use a level to ensure even alignment
Raising beyond 20 inches can reduce accessibility.
Reattach to Wall Studs
Never mount cabinets into drywall alone.
- Use a stud finder to locate framing
- Pre-drill holes to prevent splitting
- Use 3-inch wood screws for secure hold
Ensure screws hit the stud center for maximum strength.
Consider Accessibility Trade-Offs
Higher cabinets:
- Are harder to reach, especially for children or those with mobility issues
- May discourage use, leading to wasted storage
- Can hurt resale value if too high
Buyers prefer functional, accessible storage.
Add Cabinets on Top (Easier Alternative)
Instead of moving existing wall cabinets up, add new ones above.
Use Dead Space Above Cabinets
Most kitchens have 18–24 inches between top cabinets and ceiling.
- Install new upper cabinets in this space
- Store rarely used items (holiday dishes, mixers, etc.)
- Access with a step stool
This adds storage without altering existing layout.
Choose Functional or Decorative Units
Options include:
- Full-depth cabinets for storage
- Glass-front display cabinets
- Units with built-in lighting
Preserves existing cabinet height while boosting utility.
No Negative Impact on Resale
Adding top cabinets does not hurt home value.
- Increases storage in unused space
- Seen as a smart upgrade
- Step-stool use is a minor trade-off
Unlike raising cabinets, this improves functionality.
Reinstall and Secure Properly

Proper reinstallation ensures safety, stability, and long-term durability.
Mount to Studs Only
Always anchor cabinets into wall studs.
- Use 2.5–3 inch screws
- Space fasteners every 16 inches (standard stud spacing)
- Check with a level during installation
Cabinets mounted only to drywall can pull loose over time.
Level and Align Cabinet Faces
Use shims behind the cabinet to adjust height.
- Check front-to-back and side-to-side level
- Align face frames flush with adjacent units
- Test door and drawer operation after securing
Misaligned cabinets look unprofessional and can cause hardware wear.
Reconnect to Adjacent Cabinets
Screw cabinets together through the face frames.
- Ensures a seamless look
- Distributes weight and stress
- Prevents gaps or shifting
Use finish screws and plug holes for a clean appearance.
Avoid Common Mistakes
Even experienced DIYers make errors that lead to damage or rework.
Forgetting Hidden Fasteners
Screws can be hidden:
- Behind filler strips
- Under trim or molding
- Inside drawer openings
Always inspect thoroughly before forcing a cabinet loose.
Not Labeling Parts
Remove doors, drawers, and hardware? Label everything.
- Use masking tape and a marker
- Note which cabinet and side each part belongs to
- Store screws in labeled bags
Saves hours during reassembly.
Rushing the Process
Take your time.
- Moving cabinets is not a weekend sprint
- Unexpected issues (old nails, bad plumbing) are common
- Patience prevents costly mistakes
If stuck, stop and consult a pro.
When to Hire a Professional
Some tasks exceed DIY safety or skill levels.
Plumbing Disconnection and Reconnection
If shut-off valves are old, corroded, or inaccessible:
- A licensed plumber ensures leak-free work
- Avoids water damage or code violations
- May upgrade to modern, accessible valves
Worth the investment for long-term reliability.
Structural or Electrical Work
Moving cabinets may involve:
- Removing load-bearing walls
- Relocating outlets or switches
- Updating wiring for new appliance placements
These require licensed electricians or contractors.
Full Kitchen Reconfiguration
If you’re reusing cabinets in a new layout:
- A carpenter ensures proper alignment and support
- Helps with countertop modifications
- Manages complex disassembly and reassembly
Saves time and protects your investment.
Final Tips for Success
Follow these best practices for a smooth, damage-free move.
Take Photos Before Disassembly
Document:
- Screw locations
- Plumbing setup
- Cabinet alignment
- Electrical connections
Helps during reinstallation and troubleshooting.
Organize Hardware
Use a magnetic tray or labeled containers for screws, nails, and brackets.
- Prevents loss
- Speeds up reassembly
- Reduces frustration
Plan for the Unexpected
No installer plans for future removal.
- Fasteners may be in odd places
- Adhesives or caulk may bind the cabinet
- Damage may require repair or replacement
Stay flexible and prepared.
Frequently Asked Questions About Moving a Kitchen Cabinet
Can I move a cabinet that’s nailed to the floor?
Yes, it can be moved, but it may be difficult. Nails may need to be cut or pried out. Access may be restricted by adjacent cabinets, and in some cases, cutting the bottom of the cabinet is necessary.
How do I find the screws holding my cabinets to the wall?
Look for a cleat under the top of the cabinet. Screws are typically located on this cleat and behind shelves. Remove all shelves and inspect the upper interior of the cabinet thoroughly.
What’s the standard height for wall cabinets?
The standard distance is 18 inches from the countertop to the bottom of the wall cabinets. If your cabinets appear lower, excessive countertop clutter or a tall backsplash may be creating that visual effect.
Should I move my cabinets up or add cabinets on top?
Adding cabinets on top is much easier and doesn’t negatively impact home value. Moving existing cabinets up is more work and can make contents harder to reach, potentially hurting resale value.
Do I need to remove the countertop to move a cabinet?
Normally, yes. The countertop is typically removed first when pulling out a cabinet, especially for cabinets in the middle of a run. Countertops may be attached with adhesive, screws, or both.
How do I remove a sink cabinet?
First, shut off the water supply and unhook the plumbing. Then locate and remove all screws (wall, floor, and inter-cabinet). Remove the countertop if necessary, then carefully pull the cabinet out.
Key Takeaways for Moving Your Kitchen Cabinet
Moving a kitchen cabinet requires careful planning, the right tools, and a clear understanding of how your specific cabinet is attached. Start by identifying whether your cabinet is screwed to the wall, nailed to the floor, or connected to adjacent units—this determines your entire removal strategy.
Remember these critical points:
- Plumbing must be disconnected before moving any sink cabinet
- Countertops typically need removal for base cabinet extraction
- Middle-of-run cabinets may require in-place disassembly
- Adding cabinets on top is often smarter than raising existing ones
- Professional help is recommended for plumbing, electrical, and structural work
Your next step is to assess your specific situation. Take photos of your cabinet attachments, check for floor nails, and evaluate whether plumbing is involved. With proper preparation and a helper by your side, you can successfully move your kitchen cabinet and transform your space without a full remodel.


