
Building cabinets with MDF (Medium-Density Fiberboard) can deliver that smooth, paint-perfect finish you see in high-end kitchens and bathrooms. The material offers clean lines and flawless surfaces that solid wood struggles to match. But MDF isn’t like solid wood. It’s strong in compression yet weak in tension, absorbs moisture like a sponge, and demands precise handling throughout every step.
This guide shows you how to make an MDF cabinet that actually lasts. You’ll learn which parts of a cabinet should never be made from MDF, how to seal every edge properly, and how to reinforce weak points before they become failures. Whether you’re building kitchen base cabinets, bathroom vanities, or painted wall storage, these proven methods from experienced woodworkers will help you avoid the common pitfalls that ruin MDF projects.
Choose the Right MDF Type for Cabinet Construction
Not all MDF is created equal. Standard MDF is risky for cabinet building, especially in humid areas like kitchens and bathrooms. Upgrade your material selection from the start.
Use Moisture-Resistant MDF
Opt for MR MDF (Moisture-Resistant) or branded equivalents like Medex or Plumaply. These engineered panels resist swelling and hold screws much better than standard versions. They cost more per sheet, but the reduced risk of long-term failure makes them worth every extra dollar.
Consider Lightweight MDF Options
Products like TruPan or Ultralight MDF are easier to handle and less prone to sagging. These work particularly well for large cabinet doors or tall wall cabinets where weight becomes a structural concern. Lighter panels also reduce stress on hinges and mounting hardware.
Avoid Standard MDF in Wet Zones
Never use regular MDF near sinks, dishwashers, or showers. Even brief exposure to splashes can cause irreversible swelling and edge damage. Kevin Jenness specifically highlighted that Medex and Plumaply are water-resistant alternatives that require less edge priming than standard MDF.
Pro Tip: Label each sheet at purchase. Write “MR” for moisture-resistant, “Standard,” or “Edge Banding Only” on the face of every panel to avoid mix-ups during assembly.
Design Your Cabinet Around MDF’s Structural Limits
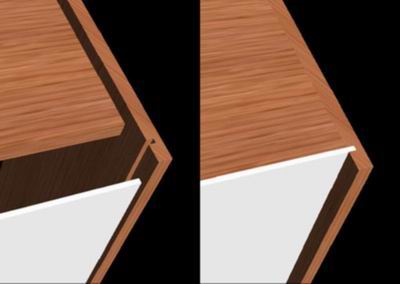
MDF lacks the screw-holding strength and tensile resistance of plywood or solid wood. Successful cabinet design works with these limitations rather than against them.
Use MDF Only for Non-Structural Parts
Limit MDF to components that don’t bear significant loads:
– Cabinet sides (only if properly reinforced)
– Cabinet backs (if thin and glued in place)
– Doors and drawer fronts (this is MDF’s best use)
– Fixed panels like toe-kicks and filler strips
Avoid MDF for Frames and Supports
Do not use MDF for:
– Face frames
– Shelf supports such as cleats or dados
– Hinge mounting zones (unless reinforced with wood blocks)
– Long-span shelves that must hold weight
Brian Peters strongly advised against using MDF for frames, recommending stronger substrates like birch cabinet-grade plywood or solid wood instead.
Reinforce Critical Joints
Where MDF must bear load, add reinforcement:
– Embed wood blocks or plywood cleats inside corners
– Use corner brackets with #8 screws driven into solid wood inserts
– Pre-drill all holes and use coarse-thread wood screws rather than drywall screws
Common Mistake: Building full cabinets from MDF without reinforcement leads to sagging shelves and loose hinges within months. Art Mann documented MDF cabinets from 1989 that showed significant warping, sagging shelves, and loose hinges due to this exact oversight.
Cut MDF Panels with Precision
MDF cuts cleanly, but only with the right tools and proper setup. Poor cutting leads to chipped edges that compromise the entire project.
Use a Sharp Carbide-Tipped Blade
A fine-tooth blade with 80 teeth minimizes chipping and tear-out. Replace dull blades immediately, as they cause fuzzy edges and ragged cuts that are difficult to repair.
Support Large Sheets Fully
Use roller stands or a table saw with complete outfeed support. Sagging during cuts causes binding and produces inaccurate edges that throw off your entire cabinet assembly.
Cut Doors and Fronts Last
Cut door and drawer front panels after the carcass assembly. This allows you to make final sizing adjustments for perfect alignment, rather than fighting pre-cut pieces that don’t quite fit.
Visual Cue: Fresh-cut MDF should have crisp, square edges with no fuzz or crumbling. If edges look ragged, your blade is dull or your feed rate is too fast. Fix these issues before continuing.
Seal All Cut Edges Immediately
Unsealed MDF swells when exposed to humidity, even from the moisture in your breath during sanding. Edge sealing is not optional.
Apply Edge Sealer Before Assembly
Use a water-based MDF edge sealer or diluted white glue (PVA). Brush on one coat, let it dry completely, then sand lightly with fine grit paper.
Use Solid Wood Edge Banding for Exposed Edges
For visible edges like shelves and door edges, apply 1/16 inch solid wood veneer tape or real wood strips. Sam Murdoch specifically recommended this method over heat tape for better durability and appearance. Here’s how:
- Iron on veneer tape with a clothes iron set to low heat with no steam
- Trim the excess with a flush-trim router bit
- Sand smooth with 120-grit paper
Why It Matters: Veneer edge banding lasts longer than filler and looks professional when painted. Brian Peters emphasized edge banding over filling for this exact reason.
Avoid Paint-Only Edge Protection
Latex or primer alone won’t stop moisture penetration. Always seal or band edges before painting, never rely on paint as your primary edge protection.
Assemble the Cabinet Carcass with Reinforcements
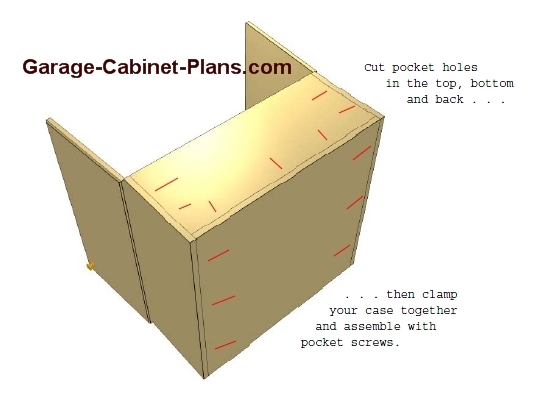
Build a rigid box using MDF for sides and back, but reinforce every stress point during assembly.
Use Pocket Screws with Glue
For face-frameless cabinets:
– Drill pocket holes on interior faces only so hardware stays hidden
– Clamp panels together and apply water-resistant wood glue
– Drive screws and wipe excess glue immediately before it dries
Warning: Over-tightening strips MDF threads. Use a clutch-setting drill to prevent this common failure.
Add Plywood Cleats for Shelves
Attach 1/2 inch birch plywood cleats along cabinet sides to support shelves properly:
- Cut cleats 1 inch shorter than the cabinet width
- Screw into side panels with two #8 screws per cleat
- Glue the shelf into the cleat for extra rigidity
Install a Solid Back Panel
Use 1/4 inch plywood instead of MDF for the cabinet back. Plywood offers:
– Lighter weight that’s easier to handle
– Better screw grip for wall mounting
– Superior resistance to bowing over time
Build MDF Cabinet Doors with Care
This is where MDF truly shines. Flat, paint-ready doors with no grain bleed look professional and modern.
Cut Doors Slightly Oversized
Leave an extra 1/8 inch on width and height. Trim flush after hanging using shims for proper alignment.
Use European Cup Hinges
These hinges distribute stress over a wider area than surface-mounted options. Jim Dwight attributed the success of his 15-year-old MDF doors to European cup hinges reducing stress on the material. Install them properly:
- Drill hinge cups with a 35mm Forstner bit
- Set drilling depth to 11 to 12mm
- Use reinforcement blocks behind hinge areas if your MDF is thin
Prime Both Sides Before Hanging
Painting only one side causes uneven moisture absorption and warping. Always:
– Prime front, back, and all edges
– Sand lightly between coats
– Allow full cure before installation
Expert Note: Jim Dwight’s 15-year-old MDF doors lasted because cup hinges reduced localized stress. Use them, not surface-mounted hinges, for any MDF door project.
Finish MDF with Multiple Primer Coats
MDF is extremely thirsty and absorbs finish poorly. Jim Dwight noted this characteristic and recommended multiple coats of primer with sanding between each coat.
Use High-Build Primer
Apply 2 to 3 coats of high-build acrylic or oil-based primer:
- First coat: Thin slightly with water for acrylic or mineral spirits for oil-based products
- Sand with 180-grit paper after each coat
- Fill pinholes with spot putty, then re-prime those areas
Finish with Durable Topcoat
Use semi-gloss or gloss waterborne polyurethane enamel for the final finish. This provides:
– Resistance to moisture and scrubbing
– A hard, non-yellowing surface
– Ideal performance for kitchens and bathrooms
Pro Tip: Spray application using HVLP or airless equipment gives the smoothest finish. Rollers leave texture that shows on flat MDF surfaces.
Prevent Moisture Damage in Kitchens and Bathrooms
Even sealed MDF can fail in high-humidity areas. Peter Quinn warned that MDF is too weak to support its own weight over spans, especially in humid climates.
Install Away from Water Sources
Keep MDF cabinets at least 6 inches from sinks, showers, and dishwashers. Art Mann advised avoiding MDF in high-moisture areas entirely, noting that even premium MDF can degrade when exposed to water.
Use Proper Ventilation
Run an exhaust fan during and after cooking or showering. Humidity above 60 percent risks swelling and eventual structural failure.
Apply Caulk at All Joints
Seal gaps between cabinet and wall or floor with paintable silicone caulk. This blocks moisture entry at the most vulnerable points.
Real-World Failure: Art Mann documented MDF cabinets from 1989 that warped and sagged due to kitchen humidity. Bob Grier observed similar failures even after 25 years in a well-maintained home. Don’t repeat these mistakes.
Address Health Risks When Cutting MDF
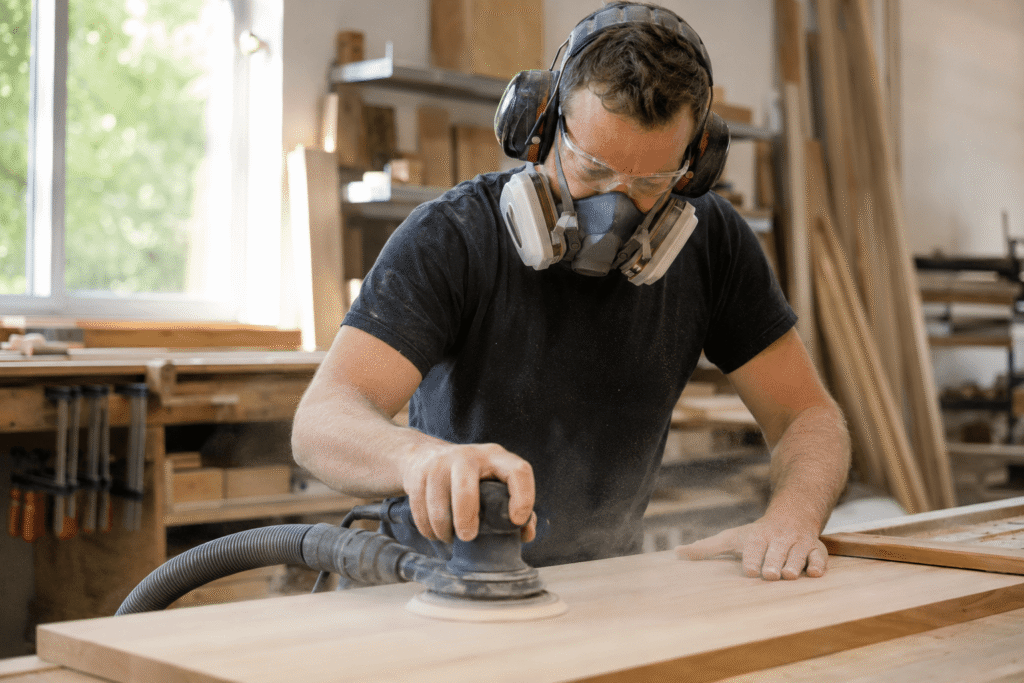
MDF dust contains fine particles and trace formaldehyde. Robert Engel strongly warned about these dangers, noting the fine dust can clog filters and spread through HVAC systems.
Wear Full Personal Protective Equipment
Always use:
– NIOSH-approved respirator rated N95 or better
– Safety goggles to protect your eyes
– Disposable coveralls to keep dust off your clothing
Work in a Sealed Area
Cut MDF in a detached workshop or garage with doors closed. Never cut indoors near HVAC intakes where dust can spread throughout your home.
Use Dust Collection
Connect your saw to a HEPA-filter shop vac or dust extractor. Clean up residue with a damp cloth, never dry sweep which puts particles back into the air.
Expert View: Brian Peters noted that modern MDF from reputable suppliers often has low formaldehyde levels. Health risks from a single small project are minimal, but dust control remains non-negotiable. Choose formaldehyde-free MDF if health concerns persist.
Consider Better Alternatives for Cabinet Frames
For structural parts, MDF is a poor choice. Upgrade to stronger materials for long-term durability.
Use Birch Plywood for Cabinet Carcasses
Birch plywood offers:
– Better screw and glue holding power
– Superior resistance to warping
– Good paint results when properly sealed
Use Solid Wood for Face Frames
Solid wood face frames provide:
– Added rigidity to the cabinet structure
– Better handling of hinge stress
– Easy repair if damaged
Try Plumaply for Hybrid Builds
This veneer-core panel with MDF skin gives you the best of both worlds:
– Strength of a plywood core
– Smoothness of an MDF face
– Better moisture resistance than standard MDF
In Humid Climates: Kevin Jenness and Sam Murdoch recommend Plumaply or pine doors over MDF for better longevity in tropical environments like Thailand.
Final Assembly and Installation Tips
Once all parts are built and finished, assemble on-site with care to protect your work.
Re-Prime Cut Edges After Installation
If you trim or drill during installation, re-seal those spots immediately. Every exposed edge is a potential moisture entry point.
Shim for Perfect Leveling
Use plastic shims behind base cabinets. Check with a 4-foot level before screwing anything to the wall.
Secure to Wall Studs
Anchor every 16 inches into wood studs or toggle bolts. MDF cabinets can pull away from drywall anchors over time due to their weight.
Maintenance Tips for Long MDF Cabinet Life
Even well-built MDF cabinets need regular care to perform well.
Wipe Spills Immediately
Use a dry or slightly damp cloth. Never let water sit on edges or joints where it can penetrate the material.
Avoid Harsh Cleaners
Skip ammonia-based or abrasive cleaners. Use mild soap and water for routine cleaning.
Re-Tighten Hinges Annually
Check door alignment and tighten mounting screws every 12 months. Loose hinges create stress points that can crack MDF over time.
Frequently Asked Questions About Making MDF Cabinets
Can MDF be used for kitchen cabinet doors?
Yes, MDF works well for slab or flat-panel cabinet doors when properly finished and edge-banded. Jim Dwight’s 15-year-old MDF doors held up well under normal use with only minor paint chips. However, Howard Pollack reported paint chipping and MDF damage that required repair, so results vary based on finish quality and moisture exposure.
Is MDF strong enough for cabinet frames?
No, experienced woodworkers consistently advise against MDF for cabinet frames. Brian Peters recommends birch cabinet-grade plywood or solid wood instead. Art Mann documented MDF cabinets from 1989 with significant warping, sagging shelves, and loose hinges, demonstrating the material’s long-term structural failure.
How do you seal MDF edges before painting?
Apply a water-based MDF edge sealer or diluted white glue as a base coat. For visible edges, use 1/16 inch solid wood veneer edge banding applied with a clothes iron. Sam Murdoch recommends this method over heat tape for better durability and appearance.
What is the best primer for MDF cabinets?
Use a high-build acrylic or oil-based primer applied in 2 to 3 coats with sanding between each coat. Jim Dwight recommends multiple primer coats because MDF absorbs finish poorly. Thin the first coat slightly to improve penetration.
Is MDF dust dangerous?
MDF dust contains fine particles and trace formaldehyde. Robert Engel strongly warns about respiratory risks and recommends full PPE including a NIOSH-approved respirator, safety goggles, and proper dust collection. Brian Peters notes that modern MDF has lower formaldehyde levels but dust control remains essential.
What is better than MDF for painted cabinets?
Pine or other inexpensive solid woods paint well and offer better durability than MDF. Plumaply, a veneer-core panel with MDF skin, provides the smoothness of MDF with the strength of plywood. Birch plywood also works well for cabinet carcasses when properly sealed.
Key Takeaways for Building Your MDF Cabinet
You can make an MDF cabinet that lasts by following these essential rules:
- Use MDF only for doors, panels, and non-structural parts
- Never use MDF for frames, shelves, or hinge zones without reinforcement
- Seal every edge with banding, not just paint
- Choose moisture-resistant options like Medex or Plumaply
- Wear full PPE and control dust when cutting
- Prime both sides of doors to prevent warping
- Install in dry areas with good ventilation
While Howard Pollack’s paint-chipped MDF doors show the risks, Jim Dwight’s 15-year survivors prove it can work with the right methods. The difference comes down to proper material selection, thorough edge sealing, and appropriate reinforcement.
For the best results, use MDF for doors but build the cabinet box from birch plywood or solid wood. This approach gives you the flawless painted look you want without sacrificing structural strength. With proper design, sealing, and installation, your MDF cabinet will look great and perform well for years to come.
Final Note: MDF is a tool, not a complete solution. Use it where its strengths shine and manage its weaknesses carefully. Your reward is a beautiful, paint-ready cabinet that stands the test of time.


