
Sliding cabinet doors offer a sleek, space-saving solution for kitchens, closets, and storage units. Unlike traditional hinged doors that swing outward, sliding doors move laterally on a track system, making them ideal for tight spaces or modern minimalist designs. Whether you’re remodeling your kitchen or building custom storage, learning how to make sliding cabinet doors can elevate your project with professional results. This guide walks you through every step, from measuring and material selection to installation and finishing touches, so you can build smooth-gliding, durable doors that enhance both function and style.
You don’t need advanced woodworking skills to create sliding cabinet doors, but attention to detail is crucial. Precision in measurement, squareness, and hardware alignment ensures smooth operation and long-term durability. We’ll cover the essential tools, best materials, types of sliding hardware, and common mistakes to avoid. By the end, you’ll know exactly how to build and install sliding cabinet doors that look custom-made and operate flawlessly.
Choose the Right Door Material

Solid Wood vs. Plywood
Solid wood offers a premium look and is ideal for staining or natural finishes. Hardwoods like oak, maple, or birch provide durability and can be sanded and refinished over time. However, solid wood is prone to warping with humidity changes, so proper acclimation and sealing are essential.
Plywood with a veneer overlay is more dimensionally stable and less expensive. For painted finishes, use furniture-grade or birch plywood to minimize grain telegraphing. Always seal the edges to prevent moisture absorption and ensure longevity.
Glass and Composite Options
Tempered glass panels add elegance and are perfect for display cabinets. Frameless glass inserts require precise measurements and reinforced tracks. Use frosted or textured glass for privacy in bathroom or bedroom cabinets.
Composite materials like MDF (medium-density fiberboard) are excellent for painted doors due to their smooth surface. However, MDF swells if exposed to moisture, so it’s best suited for dry indoor environments.
Measure Cabinet Opening Accurately
Standard Size Guidelines
For sliding doors, the door width should be 1 inch wider than the cabinet opening on each side to ensure full coverage when closed. For example, a 24-inch wide opening requires a 26-inch wide door. Height should extend from the top of the cabinet to just above the floor or base, typically 30 to 36 inches for base cabinets.
Always measure the actual cabinet frame, not the space between shelves. Account for baseboards or flooring variations that may affect height.
Clearance and Overlap Rules
Allow a 1/4-inch gap between the door and cabinet frame to prevent rubbing. The door should overlap the opening by at least 1 inch on the pull side to hide the interior when closed. If using double sliding doors, each door should be half the opening width plus 1 inch for overlap.
Use a level to check if the cabinet is plumb. An unlevel cabinet causes binding and uneven wear on the track.
Select Sliding Door Hardware
Top-Hung vs. Bypass Systems
Top-hung systems support the door from above using rollers mounted on a top track. These are quieter and more durable, handling heavier doors up to 200 pounds. A bottom guide keeps the door aligned without bearing weight.
Bypass systems use two doors on a single track, sliding past each other. Common in wardrobes and large pantries, they save space but limit access to only half the opening at once.
Soft-Close and Floor-Mount Options
Soft-close mechanisms provide a gentle, automatic closing action, reducing noise and wear. These are ideal for high-end kitchens and homes with children.
Floor-mounted tracks are simpler to install but can collect dust and debris. They’re better suited for lighter doors or temporary installations. Top-hung systems are preferred for permanent, high-use applications.
Cut and Prepare Door Panels
Use a Circular Saw or Table Saw
Set up a straightedge guide or fence to ensure clean, square cuts. Clamp the guide securely and score the cut line with a utility knife to prevent splintering, especially on veneered plywood.
Cut slightly oversized by 1/8 inch, then sand down to final dimensions. Sand edges with 120-grit followed by 220-grit paper for a smooth finish.
Edge Banding for Plywood or MDF
Apply iron-on edge banding to conceal raw edges. Trim excess with a utility knife and smooth with a scraper or fine sandpaper. For a seamless look, match the banding to the door’s wood grain or paint it after application.
For a premium finish, use solid wood edge banding glued with wood glue and clamped until dry.
Finish the Doors Before Installation
Sanding and Sealing Steps
Begin with 120-grit sandpaper, progressing to 180 and 220-grit for a glass-smooth surface. Wipe away dust with a tack cloth before applying any finish.
Seal all surfaces, including edges and back, to prevent moisture imbalance that leads to warping. Use sanding sealer for paint or pre-stain conditioner for wood.
Painting or Staining Tips
For paint, apply a high-adhesion primer first, then two coats of semi-gloss or satin finish for durability. Sand lightly between coats with 320-grit paper.
For staining, use a pre-stain conditioner on softwoods like pine to avoid blotchiness. Apply stain with a cloth or brush, wipe off excess, and seal with polyurethane. Choose water-based polyurethane for light colors and oil-based for warmth.
Install the Top Track System
Mount the Header Board
Cut a header board (1×2 or 1×3) to fit across the top of the cabinet opening. This provides a solid mounting surface for the track. Secure it with screws into the cabinet top and studs if possible.
Ensure the header is level. Even a slight slope will cause the door to drift or bind.
Attach the Roller Track
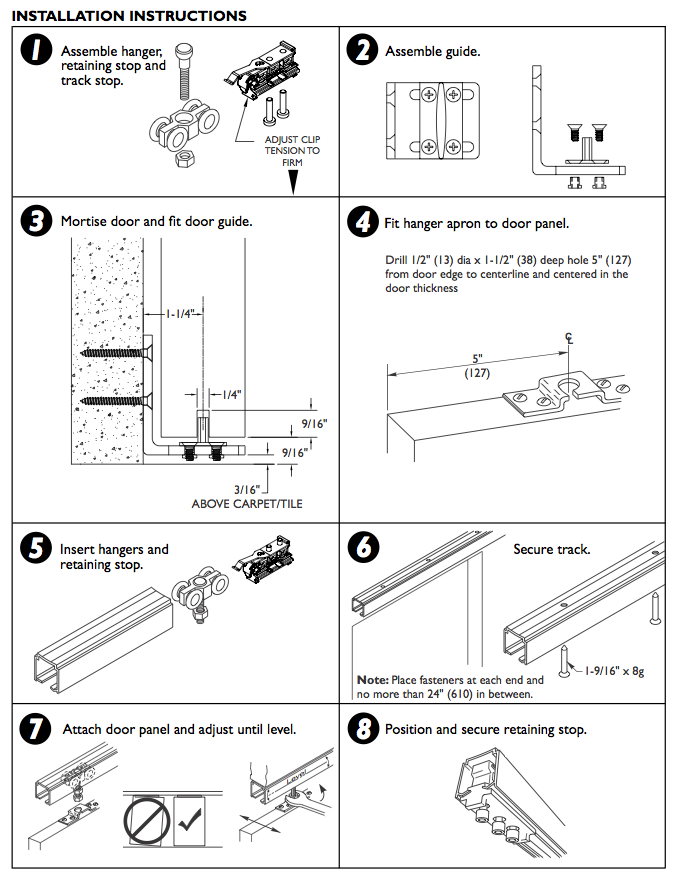
Position the track centered on the header board. Use the manufacturer’s template or mark drill points with a pencil. Pre-drill holes to prevent splitting, then secure with screws.
For double doors, install the track so rollers are staggered to prevent collision.
Hang the Sliding Doors
Mount Rollers on the Door
Attach the roller brackets to the top of the door according to the hardware instructions. Typically, two rollers per door are needed, one at each end.
Adjust the height screws on the rollers to set the door position before hanging. Doors should hang 1/4 inch above the floor or base.
Slide Doors onto the Track
Tilt the door at a 45-degree angle and lift the rollers into the track. Slowly lower the door until it rests on the track. Repeat for the second door if using a bypass setup.
Test movement. Doors should glide smoothly with minimal resistance.
Add the Bottom Guide
Install Floor Guide or Wall Guide
For floor guides, mark the position on the floor directly below the track. Screw in the guide pin or channel. The door’s bottom wheel or hole should align with the pin.
If using a wall guide for carpet or uneven floors, mount a small U-shaped guide on the adjacent wall to keep the door from swinging.
Adjust for Smooth Operation
Open and close the door several times. If it drags, raise the rollers slightly using the adjustment screws. If it wobbles, tighten the roller brackets or check track alignment.
Ensure the gap between doors, if double, is even. Typically 1/4 inch.
Final Touch-Ups and Maintenance
Trim Excess and Clean Up
If the door rubs against the frame, mark the high spot and sand or plane it down. Check alignment from a distance and make micro-adjustments.
Wipe down the door and track with a dry cloth to remove dust and debris.
Preventative Maintenance Tips
Clean the track monthly with a brush or vacuum to remove lint and dust. Lubricate rollers sparingly with silicone spray once a year. Avoid oil-based lubes that attract grime.
Inspect rollers and guides annually for wear or looseness. Tighten screws and replace damaged parts promptly.
Frequently Asked Questions About Making Sliding Cabinet Doors
What is the best material for sliding cabinet doors?
Plywood with a veneer overlay offers the best balance of stability and cost. For painted finishes, use furniture-grade birch plywood. Solid wood works well for stained doors but requires proper sealing to prevent warping.
How much wider should sliding doors be than the opening?
Each door should be 1 inch wider than the cabinet opening on each side. For a 24-inch opening, use a 26-inch door. Double doors should each be half the opening width plus 1 inch for overlap.
Can I install sliding doors on existing cabinets?
Yes, you can retrofit sliding doors onto existing cabinets. You’ll need to install a header board at the top for the track and ensure the cabinet is level. Floor guides may require minor adjustments.
How do I prevent sliding doors from wobbling?
Ensure the track is level and the rollers are properly adjusted. Tighten roller brackets and verify the bottom guide is aligned. If wobbling persists, check that the door panels are square and not warped.
What is the difference between top-hung and bypass sliding systems?
Top-hung systems support each door on its own track from above, allowing full access to the opening. Bypass systems use two doors on a single track that slide past each other, saving space but limiting access to half the opening at once.
How do I maintain sliding cabinet doors?
Clean the track monthly to remove dust and debris. Lubricate rollers with silicone spray once a year. Inspect hardware annually and tighten any loose screws or replace worn parts.
Key Takeaways for Building Sliding Cabinet Doors
Building sliding cabinet doors requires precision in measurement, quality materials, and proper hardware selection. Accurate sizing prevents binding and gaps, while top-hung systems offer the smoothest operation for permanent installations. Finishing doors before installation protects them from moisture and ensures a professional appearance.
Proper installation of the track, rollers, and bottom guide determines how well your doors function. Test movement and make adjustments before finalizing. Regular maintenance keeps the system running smoothly for years.
Your next step is to gather materials and measure your cabinet opening. Start with a simple single-door project to build confidence, then expand to more complex bypass systems. With the techniques covered here, you can create custom sliding doors that add both style and functionality to any space.


