

Installing cabinet pulls is one of the most satisfying final touches in a kitchen or bathroom renovation. It marks the transition from construction to personality, turning plain cabinetry into a curated space that reflects your style. If you’re wondering how to mount cabinet pulls correctly, this guide walks you through every step, from placement decisions to precise drilling and installation.
Whether you’re working with framed or slab cabinets, small knobs or long bar pulls, accurate mounting ensures a clean, professional look. A single misaligned hole can throw off an entire cabinet row, so taking time to plan and measure pays off. You’ll learn standard placement rules, size guidelines, tools needed, and pro tips to avoid common mistakes.
Choose the Right Pull Size
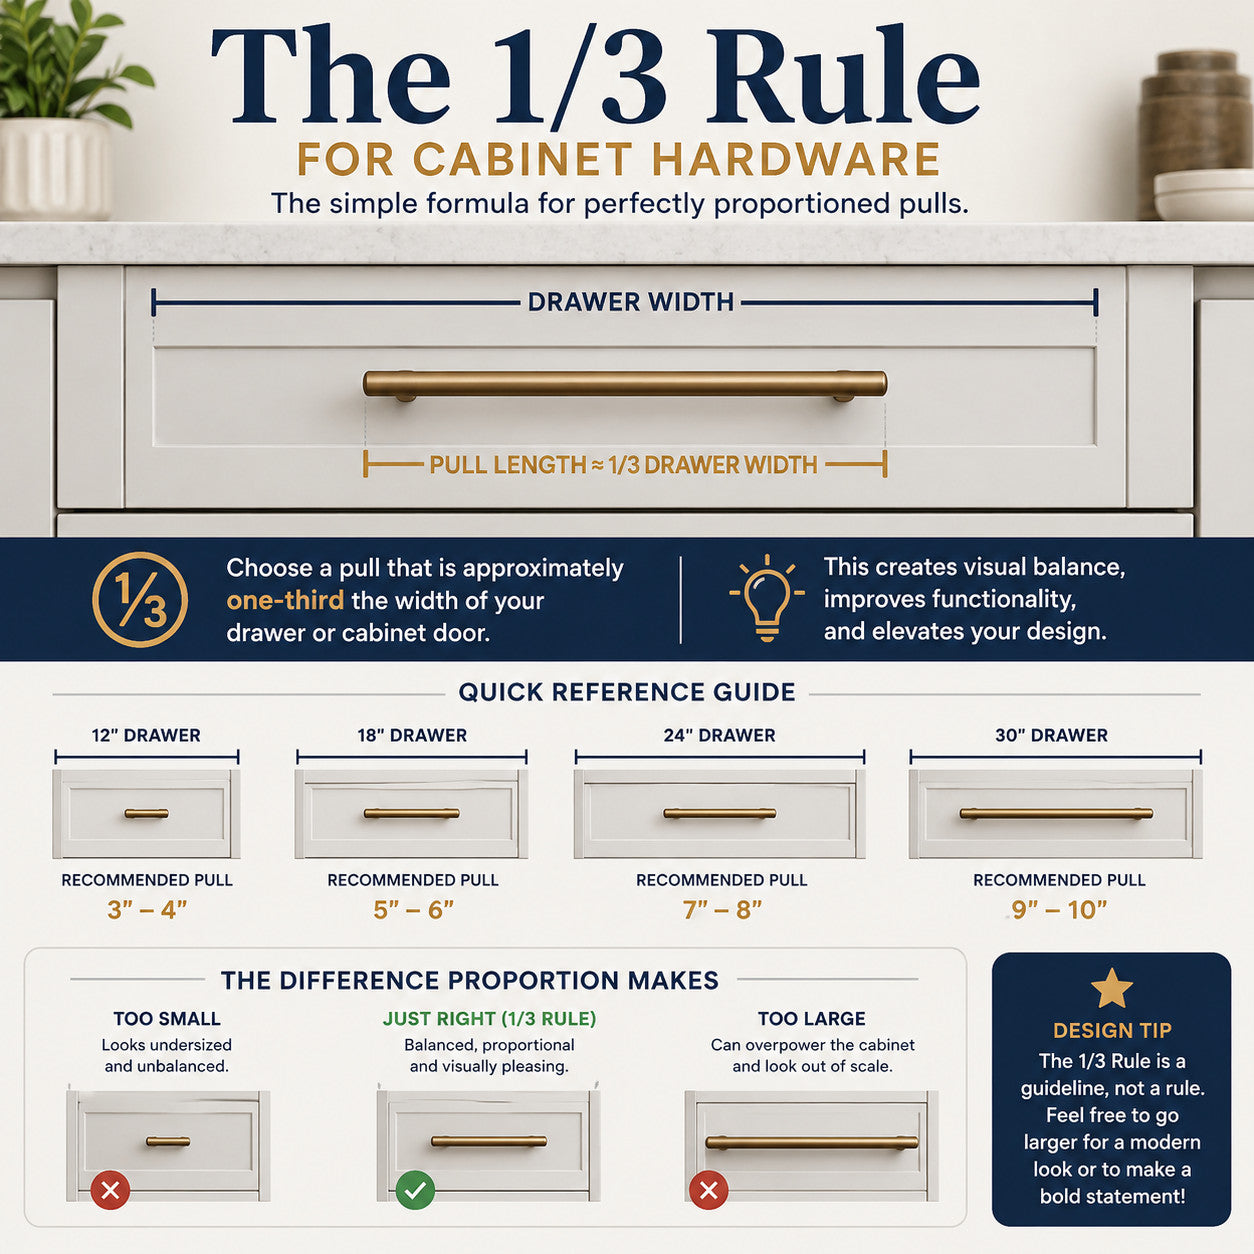
Match Pull Length to Drawer Width
The visual balance between your drawer and pull depends on proportion. A general rule is the 1:3 ratio, which means choosing a pull about one-third as wide as the drawer face. For example:
- 9″ drawer → 3″ pull
- 12″ drawer → 4″ pull
- 18″ drawer → 6″ pull
This creates harmony and avoids a cluttered or sparse look. When in doubt, follow this ratio for a balanced appearance.
Use Two Pulls on Wide Drawers
When your drawer exceeds 18 inches, or if your favorite pull maxes out at 5 inches, install two pulls instead of one. Divide the drawer width into thirds and center each pull on the outer third lines. For a 30-inch drawer:
- Divide 30 inches by 3 to get 10-inch segments
- Place the first pull centered at the 10-inch mark
- Place the second pull centered at the 20-inch mark
This maintains symmetry and enhances grip across large surfaces.
Consider Oversized Pulls for Modern Style
In contemporary designs, oversized pulls that span two-thirds or more of the drawer create a bold, linear statement. These are ideal for minimalist kitchens with slab doors and handleless aesthetics. Long horizontal pulls emphasize horizontal lines, while vertical pulls highlight height. Choose this option when you want to accentuate the sleek characteristics of a modern design.
Decide on Pull Placement Style
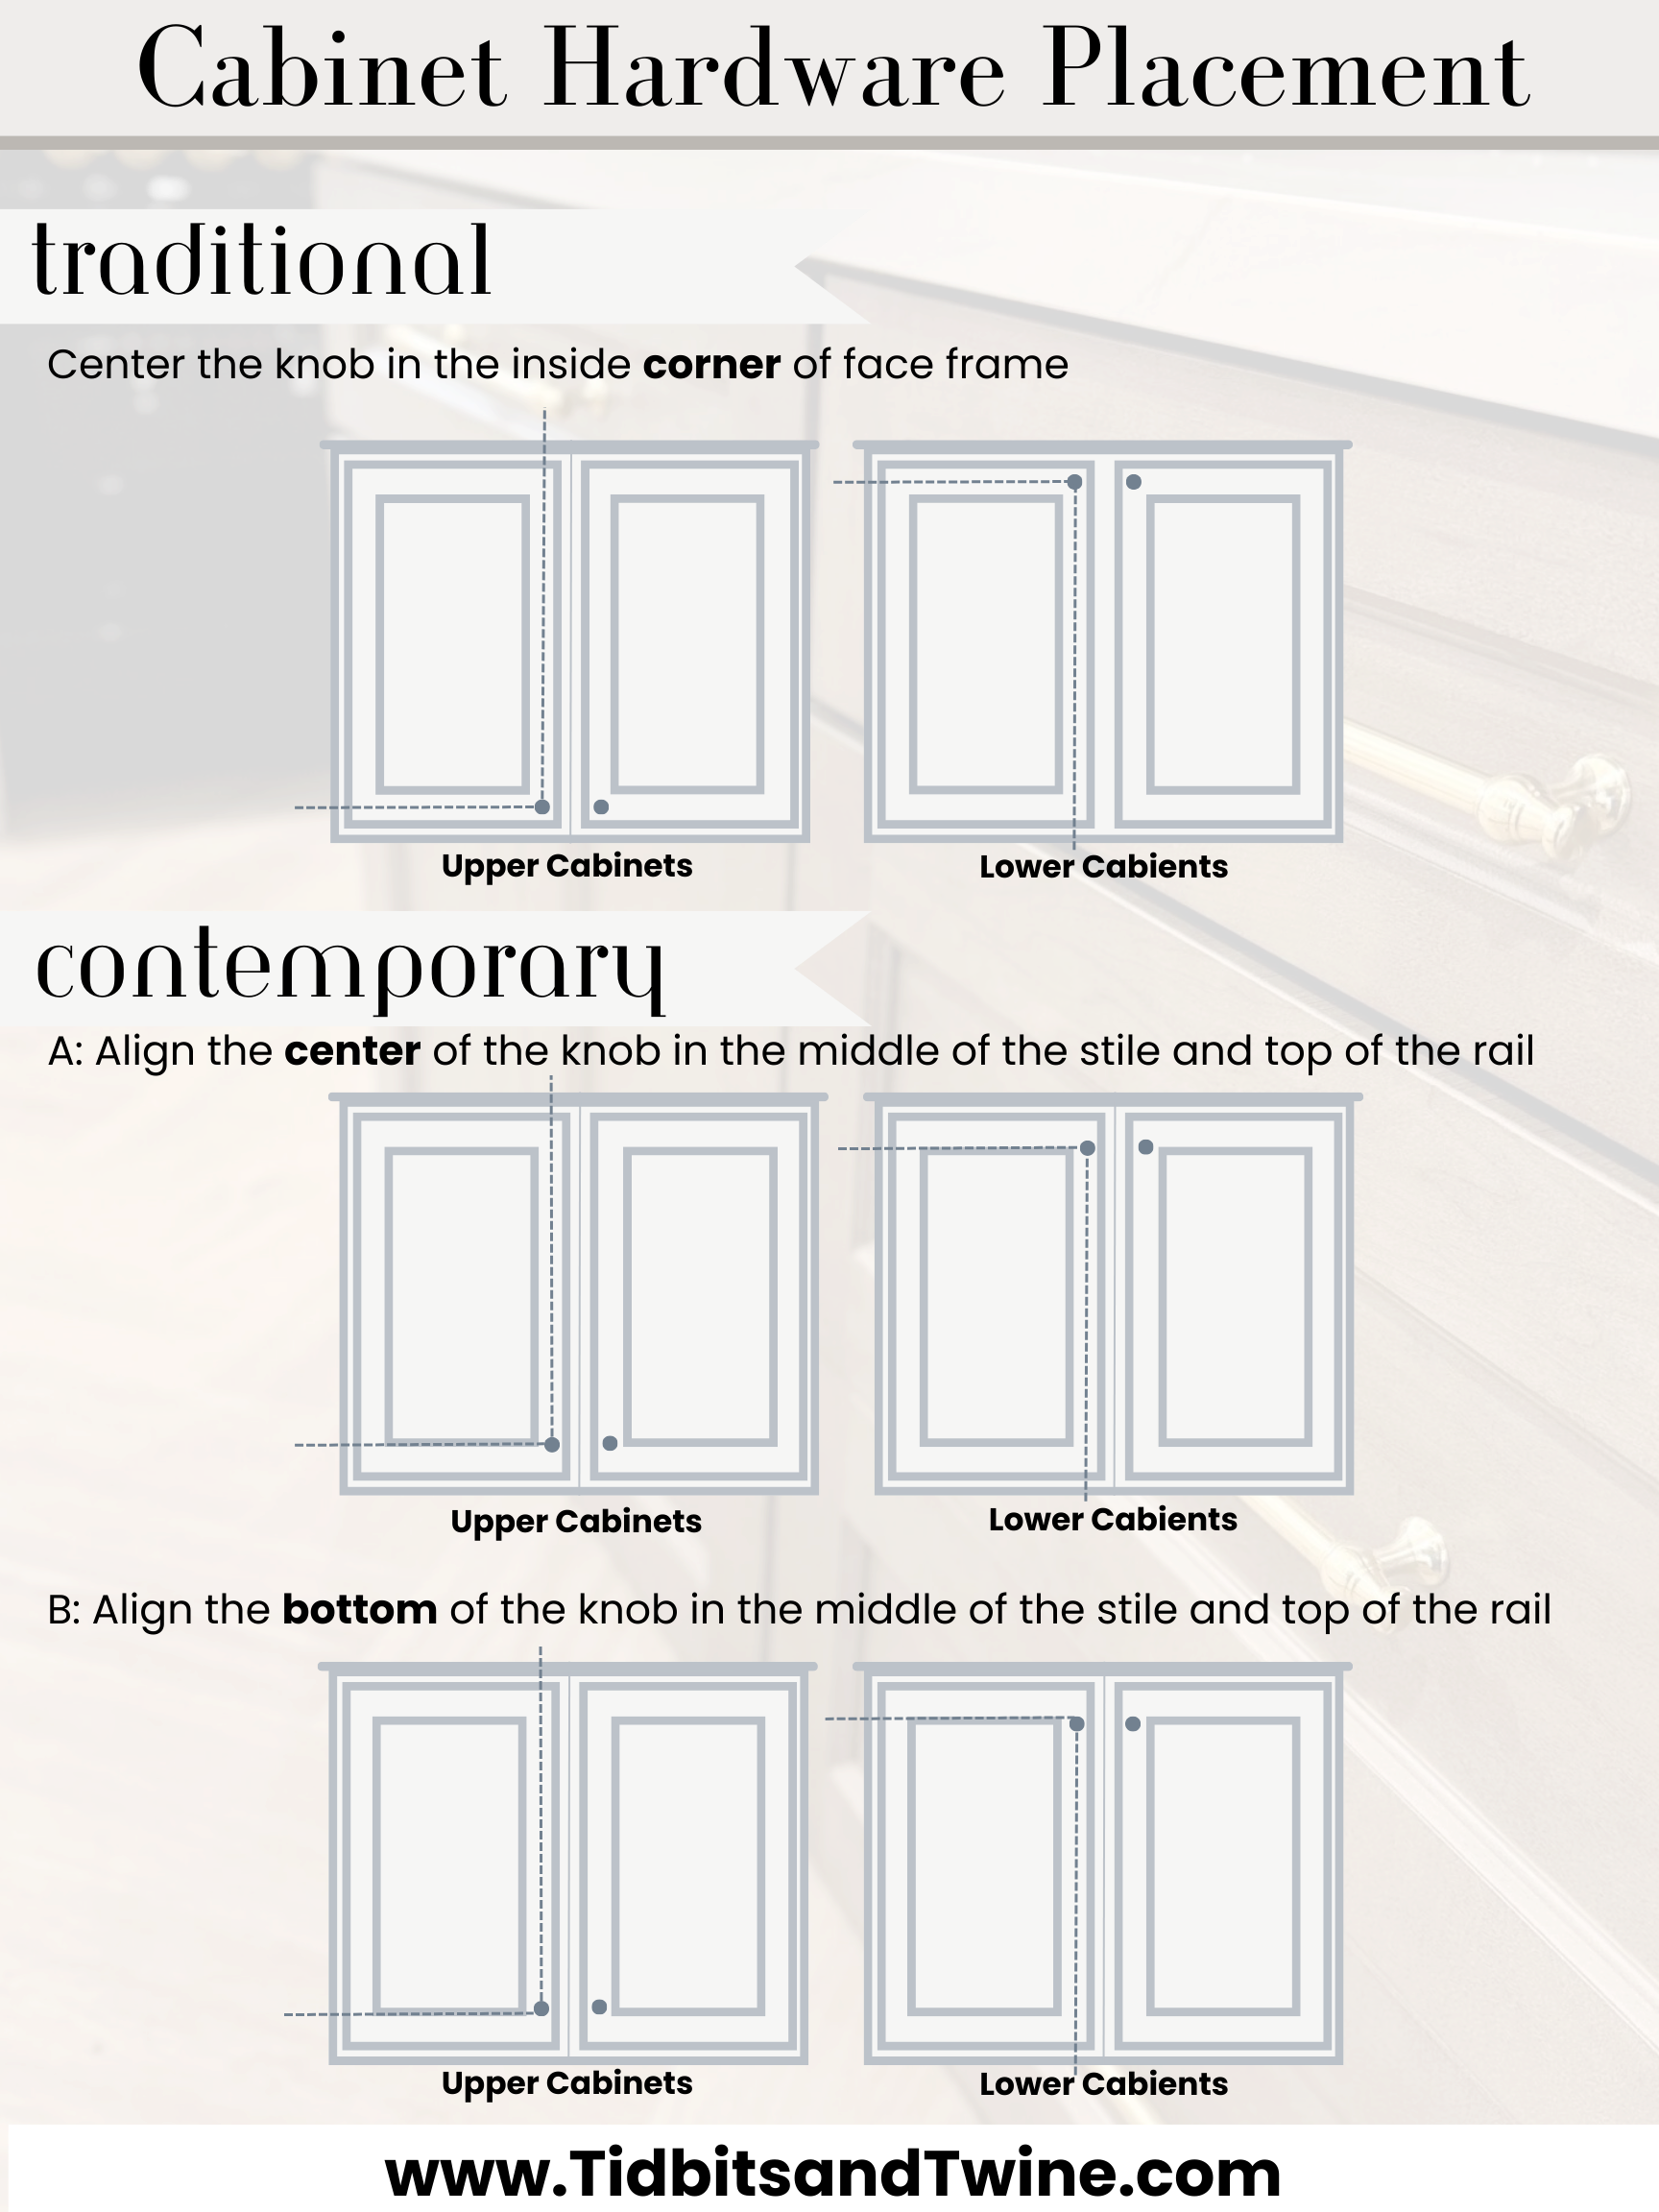
Traditional vs. Modern Positioning
Your design style determines where to mount cabinet pulls. Two main approaches dominate: traditional and modern.
- Traditional placement centers pulls at the intersection of stiles and rails, which are the vertical and horizontal frame edges.
- Modern placement shifts the pull higher or lower for a sleeker, asymmetrical look.
Align your choice with the overall kitchen aesthetic to ensure a cohesive result.
Position for Framed Cabinets
Framed cabinets have visible edges (stiles and rails) surrounding the door or drawer. For a traditional look:
- Find the middle of the door’s vertical stile and horizontal rail
- Install the knob or end of the pull where those two lines intersect
- Center hardware on the center panel for all drawers
For a more updated appearance:
- Center the hardware on the vertical stile
- Position it even with the edge of the frame rail
- Install the knob or pull centered on the top rail of the drawer
This subtle shift gives a more current, intentional appearance.
Position for Slab Cabinets
Slab cabinets lack frames, offering a smooth, flat surface typical in modern kitchens. Follow these placement guidelines:
- Install the knob or end of a pull 2 to 3 inches from both edges of the door or drawer
- Maintain consistent distance across all cabinets for visual cohesion
- For tall doors, consider vertical placement near the corner for easier access
This creates clean lines and avoids a floating or off-center look.
Gather Tools and Materials
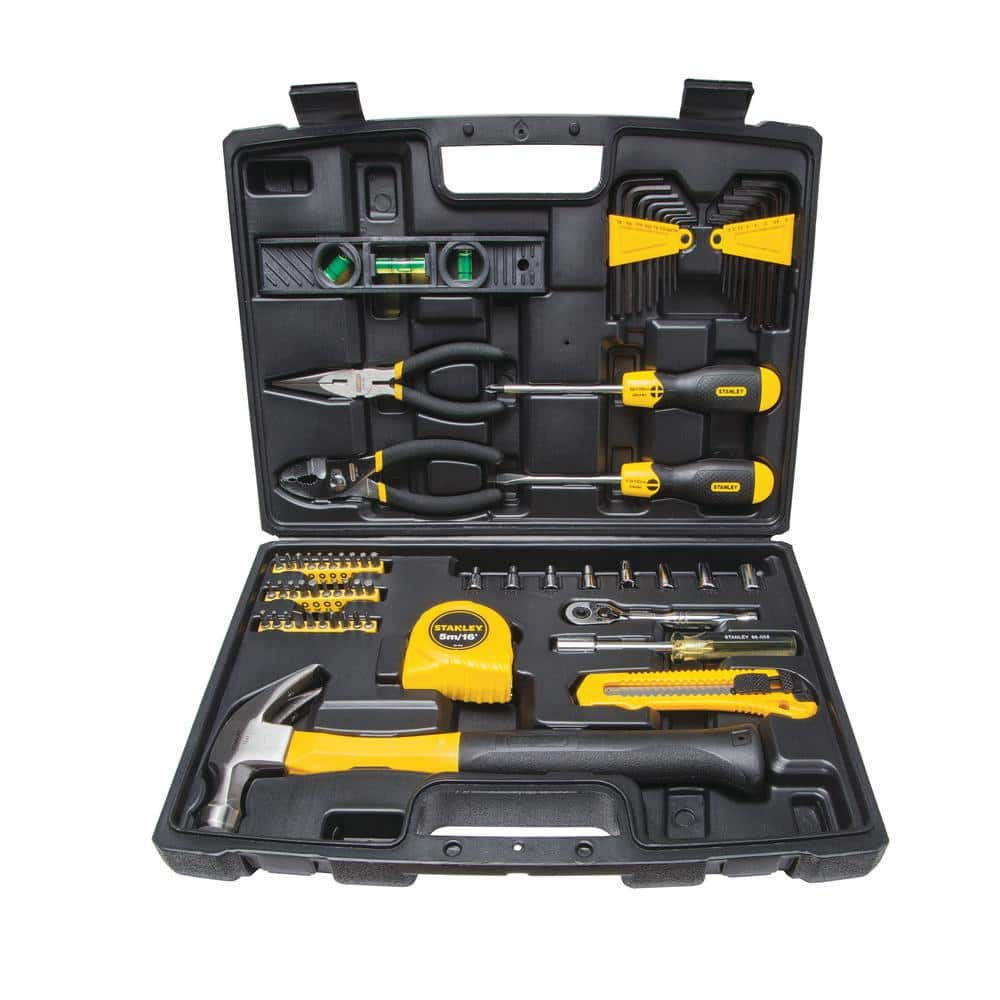
Required Installation Tools
To mount cabinet pulls accurately, you’ll need:
- Tape measure or ruler
- Pencil or marking knife
- Painter’s tape or masking tape
- Drill with 1/8 inch or 3/16 inch bit (check pull specifications)
- Drill guide (optional but helpful)
- Screwdriver or hex key for attaching the pull
Using a drill guide prevents bit slippage and ensures straight holes.
Use Tape to Prevent Splintering
Drilling into wood or MDF can cause the surface to splinter. Prevent damage by following these steps:
- Place painter’s tape over the drilling area
- Mark hole positions on the tape
- Drill slowly through the tape
The tape supports the material fibers and results in clean, sharp holes.
Check Pull Specifications
Not all pulls use the same backset, which is the distance between screw holes. Before drilling:
- Measure the center-to-center distance of the mounting screws
- Confirm hole diameter requirements, usually 1/8 inch or 3/16 inch
- Note whether the pull uses through-bolts or concealed screws
Having this information prevents mismatched holes and rework.
Mark Pull Locations Accurately
Create a Template for Consistency
To ensure every pull is aligned, make a paper or cardboard template:
- Cut a strip the width of your pull
- Mark center-to-center screw positions
- Label it for drawer or door use
Use the template on each cabinet to transfer marks quickly and uniformly.
Use a Jig for Multiple Cabinets
If installing pulls on many cabinets, a drilling jig saves time and improves accuracy. These tools:
- Hold the drill bit at a perfect 90-degree angle
- Align with pre-marked positions
- Work especially well for slab doors
Even a DIY jig made from scrap wood with pre-drilled holes can standardize results.
Double-Check Measurements
Before drilling, take these precautions:
- Re-measure at least twice
- Verify vertical and horizontal alignment with adjacent cabinets
- Use a level or laser guide for long runs
A single misaligned pull stands out. Taking 30 seconds to check can save hours of correction.
Drill Holes with Precision
Start with a Pilot Hole
Always begin with a pilot hole using a smaller bit, typically 1/8 inch for most pulls. This approach:
- Prevents wood splitting
- Guides the larger bit if needed
- Ensures screws seat properly
Drill straight through. Angled holes can cause misalignment.
Drill Perpendicular to Surface
Hold the drill at a 90-degree angle to the cabinet face. Tilted holes make it hard to attach pulls flush and may weaken the screw hold. If freehand accuracy is a concern, use a drill guide block. These small tools keep the bit perfectly perpendicular.
Clear the Backside if Needed
On thick doors or deep drawers, ensure the bolt or screw doesn’t protrude into interior space. If necessary:
- Place a backing board behind the drilling area
- Drill only deep enough for the bolt to seat
- Trim excess bolt length with wire cutters if it extends too far
This avoids snagging items inside the cabinet.
Install Pulls Correctly
Insert Screws from the Front
Most pulls use through-bolts. Follow this sequence:
- Insert the bolt from the front of the pull
- Pass it through the hole
- Secure with a nut from the inside
Tighten with a screwdriver and wrench or hex key. Avoid over-tightening, as this can strip wood or crack finishes.
Use Threadlocker on Loose Screws
If screws feel loose or vibrate out over time, apply a small drop of threadlocker to the threads before tightening. Choose blue, not red, for removable adhesion. This keeps pulls secure without permanent bonding.
Check Alignment After Installation
Once mounted, step back and evaluate:
- View pulls from a distance
- Confirm they’re level and evenly spaced
- Test operation to ensure fingers clear the cabinet edge
Adjust any that appear crooked or awkward to use.
Avoid Common Installation Mistakes
Misaligned Holes Ruin Symmetry
Even a 1/8-inch error can be visible across multiple cabinets. Prevent this by:
- Using consistent measurement points, such as always from the top edge
- Measuring from the same reference edge on all units
- Installing pulls in sequence rather than randomly
A misaligned row draws the eye and undermines a high-end look.
Mixing Knobs and Pulls Without a Plan
While mixing knobs and pulls adds visual interest, do it intentionally:
- Use pulls on drawers and knobs on doors for a classic combo
- Stick to the same finish and style for cohesion
- Avoid placing pulls at different heights on similar cabinets
Random mixing looks haphazard. Thoughtful variation looks designed.
Ignoring Ergonomics
Mount pulls where they’re easy to use, not just where they look good. Consider:
- Hand clearance, ensuring fingers won’t hit the countertop or adjacent cabinet
- Reach for tall or wall-mounted cabinets
- Accessibility for children or users with limited grip strength
A pull that’s hard to use will frustrate daily.
Maintain a Consistent Look
Uniform Height Across Cabinets
Keep pull height consistent across all cabinets at the same level. Even if drawer sizes vary, align pulls along an imaginary horizontal line. For example, on base cabinets, install all pulls 2.5 inches from the top edge regardless of drawer height. This creates continuity and order.
Match Hardware Within a Collection
Use pulls from the same product line for a unified appearance. Even slight differences in finish, shape, or size are noticeable up close. If you run out of stock, order extra early. Hardware collections are frequently discontinued.
Clean After Installation
Wipe down pulls with a soft, dry cloth after installation. Fingerprints, dust, and drilling residue can dull the finish. For stainless steel or brass, use a manufacturer-recommended cleaner to preserve luster.
Frequently Asked Questions About Mounting Cabinet Pulls
What is the standard height for cabinet pulls?
For framed cabinets, traditional placement centers the pull at the intersection of the vertical stile and horizontal rail. For a more updated look, center the hardware on the vertical stile and align it with the edge of the frame rail. On drawers, install hardware centered on the top rail for a modern appearance.
How far from the edge should cabinet pulls be on slab doors?
Install the knob or end of a pull 2 to 3 inches from both edges of a slab door or drawer. This distance creates clean lines and prevents a floating or off-center appearance.
Should I use knobs or pulls on my cabinets?
This is mostly a matter of preference. Knobs are simpler to install and less expensive but can be difficult to grasp for people with larger hands or disabilities. Pulls are typically three or four times larger, allow one-finger or full-hand use, and have two mounting points that hold up better on heavy drawers.
How do I choose the right pull size for my drawers?
Follow the 1:3 ratio, choosing a pull about one-third as wide as the drawer face. A 4-inch pull works well on a 12-inch drawer. For wider drawers where the largest pull maxes out, install two pulls by dividing the drawer width into thirds and centering each pull on those lines.
Can I use oversized pulls on my cabinets?
Yes. Oversized pulls spanning two-thirds or more of the drawer can accentuate the linear characteristics of a sleek, modern design. This works especially well on slab doors and drawers in contemporary kitchens.
What tools do I need to install cabinet pulls?
You’ll need a tape measure, pencil, painter’s tape, drill with an appropriate bit size (usually 1/8 inch or 3/16 inch), a drill guide for accuracy, and a screwdriver or hex key. A paper template or drilling jig helps ensure consistent placement across multiple cabinets.
Key Takeaways for Mounting Cabinet Pulls
Mounting cabinet pulls correctly transforms your kitchen’s look and function. By choosing the right size, placing them with precision, and installing them straight and secure, you achieve a professional result that lasts.
- Follow the 1:3 ratio for pull size, and use two pulls on wide drawers
- Choose traditional or modern placement based on your cabinet style
- Use templates and drill guides to ensure consistent, accurate holes
- Measure twice and check alignment before drilling
Take time to measure, use templates, and double-check alignment. Your attention to detail will show. Whether you’re going for traditional charm or modern minimalism, well-mounted pulls elevate your space from DIY to designer.


