

Painting the inside of your cabinets is one of the most satisfying upgrades you can tackle in a weekend. If your cabinet interiors are dark, splotchy, or covered in burnt orange paint from decades past, a fresh coat of white or light paint can transform how your kitchen feels every time you open a door. Better visibility, a cleaner look, and a cohesive finish that matches your painted doors are just a few of the rewards.
This guide walks you through the complete process of painting inside cabinets, from evaluating whether it’s worth the effort to choosing the right paint and finish. You’ll learn the exact steps for preparation, priming, painting, and reassembly, along with expert tips to avoid common mistakes and ensure your new finish lasts for years.
Evaluate Whether Painting Inside Cabinets Is Worth It
Before you invest time and money, take a honest look at your cabinet interiors and decide if painting them will deliver real value. Not every situation calls for a refresh, but many do.
Signs Your Interiors Need Attention
Consider painting if you notice any of these issues:
- Dark, dated colors like burnt orange or mustard yellow that make it hard to see items
- Splotchy or chipped paint that looks worn and unkempt
- Bare wood interiors that clash with your already painted cabinet doors
- Grease buildup or stains that won’t wipe clean with regular cleaning
When Painting Makes the Most Sense
Painting inside cabinets delivers the biggest payoff when:
- You open your cabinets daily and want brighter, more visible contents
- Your cabinet doors are already painted and the interiors look unfinished by comparison
- You’re preparing to sell your home and want a quick visual upgrade
- The interior finish is damaged or peeling and needs restoration anyway
If your cabinet interiors are rarely seen, in excellent condition, and you prefer a natural wood look, painting may not be necessary. Trust your judgment about what will actually improve your space.
Prepare Your Space Before You Start

Proper preparation prevents problems down the line. Taking time to clear out your cabinets and protect your kitchen will make the painting process smoother and cleaner.
Empty and Remove Everything
Follow these steps to clear your cabinets:
- Remove all items from inside each cabinet
- Take out adjustable shelves and any fixed shelving that can be removed
- Label each shelf with its cabinet location using tape and a marker
- Store screws, clips, and hardware in labeled bags so nothing gets lost
Protect Your Kitchen Surfaces
- Lay drop cloths or plastic sheeting across countertops and floors
- Cover nearby appliances or fixtures with plastic if they’re close to your work area
- Use painter’s tape to protect edges of countertops or adjacent walls
Ensure Proper Ventilation
Open windows and set up a fan to keep air moving. Good airflow helps paint dry faster and reduces fumes, which matters especially in enclosed spaces like kitchens. You’ll be grateful for the fresh air while you work.
Clean Interior Surfaces Thoroughly
Dirt and grease are the enemies of paint adhesion. Skipping this step leads to peeling, uneven coverage, and a finish that won’t last. A clean surface is the foundation of a professional-looking result.
Wipe Down Every Surface
Use a damp cloth with mild soapy water or a degreaser to clean:
- Back panels and side walls
- Top and bottom interior surfaces
- Edges, corners, and seams
- Areas near handles and hinges where hands leave oils
Pay special attention to spots that collect grease and grime. These are the areas where paint is most likely to fail if not cleaned properly.
Dry Completely Before Painting
Let the interiors air dry for at least one to two hours. Painting over a damp surface traps moisture, which weakens the bond between paint and wood and may cause bubbling later.
Pro Tip: Use a dry microfiber cloth to speed up drying and remove any leftover residue. The surface should feel completely dry to the touch before you move on.
Sand for Better Paint Adhesion
Even if the interior looks smooth, a light sanding helps paint stick properly. This step is especially important over glossy surfaces or old finishes that might repel new paint.
Use 220-Grit Sandpaper
- Lightly sand all interior surfaces with 220-grit sandpaper
- Focus on glossy spots and areas with old finish
- Keep sanding gentle, just enough to rough up the surface so paint can grip
Remove Dust After Sanding
Wipe down every surface with a tack cloth or slightly damp rag to remove fine dust. Any particles left behind will show through the paint and create a rough texture.
Visual Cue: After sanding, the surface should feel uniformly matte. If you see shiny patches, sand those areas again until the entire surface has an even, dull texture.
Apply Primer for Full Coverage
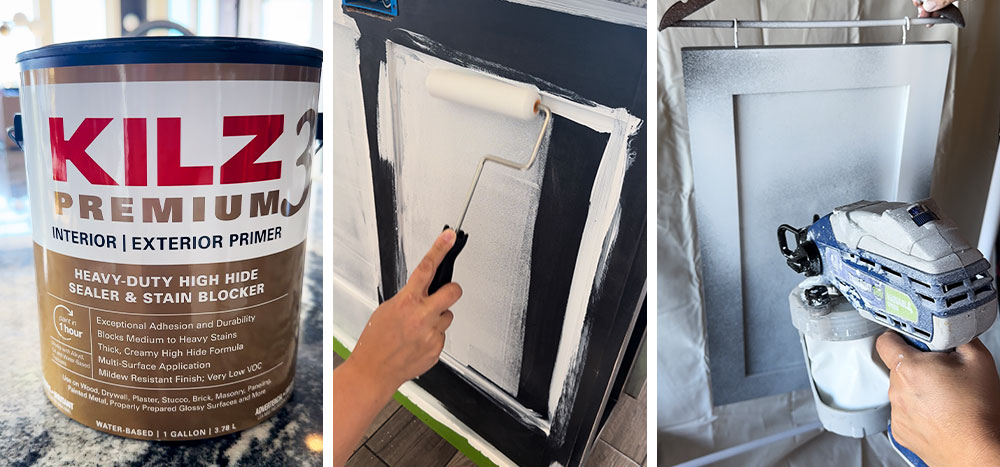
Primer is not always required, but it becomes essential when you’re making a dramatic color change or covering difficult surfaces. Skipping primer when you need it is one of the most common mistakes DIYers make.
When Primer Is Essential
Use primer when:
- You’re covering dark or bold colors like burnt orange or deep brown
- You’re painting over stained or varnished wood
- You’re sealing bare wood to prevent uneven paint absorption
- You’ve repaired chips or patches that need a uniform base
Choose the Right Primer
- Kilz Hide-All is a proven choice for blocking dark tones from bleeding through
- Water-based primers dry faster and produce less odor than oil-based options
- Apply with a small brush or foam roller for even coverage
Let Primer Dry Fully
Wait two to four hours, or follow the manufacturer’s instructions, before painting. Rushing this step can cause the paint to lift or wrinkle as it dries.
Paint With the Right Tools and Technique
Now comes the rewarding part. Using the correct tools and method makes the difference between a smooth, durable finish and one that shows brush marks and drips.
Select the Best Paint Finish
| Finish | Characteristics | Best For |
|---|---|---|
| Matte | Low reflectivity, hides imperfections | Aesthetic-focused applications |
| Satin | Moderate sheen, good durability | Balanced appearance and cleanability |
| Semi-gloss | Higher reflectivity, excellent durability | High-traffic areas, easy cleaning |
Recommendation: Choose semi-gloss for kitchen cabinet interiors. It resists grease, wipes clean easily, and stands up to frequent use.
Use Quality Application Tools
- Small foam roller (4 inches or smaller) for large, flat areas
- Angled sash brush (2 inches) for corners, edges, and tight spaces
- Avoid cheap brushes that shed bristles into your paint
Apply Two Thin Coats
- First coat: Apply evenly, working from top to bottom
- Let dry for four to six hours, following the manufacturer’s instructions
- Second coat: Apply for full coverage and richer color
Never apply thick coats. Thick paint leads to drips, bubbles, and extended drying times. Thin, even coats dry faster and create a smoother finish.
Fix Common Painting Problems
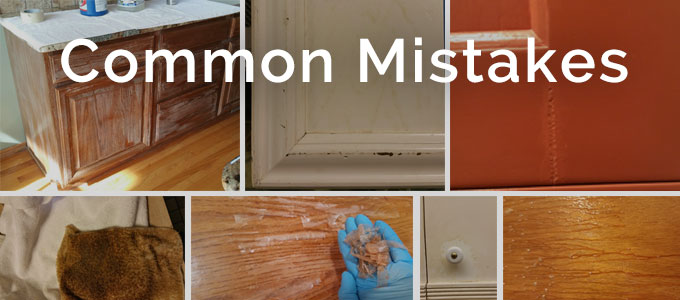
Even with careful preparation, issues can arise. Here’s how to handle the most frequent problems.
Dark Color Shows Through
- Cause: Insufficient priming or too few paint coats
- Fix: Apply another coat of primer like Kilz or BIN shellac-based primer, then repaint with light colors
Patchy or Uneven Finish
- Cause: Inconsistent application or dirty surface
- Fix: Lightly sand with 320-grit paper, clean the area, and apply another thin coat
Paint Peels After Drying
- Cause: Poor adhesion due to grease, moisture, or skipped sanding
- Fix: Strip loose paint, clean thoroughly, sand, prime, and repaint
Let Paint Cure Before Reassembly
Patience at the end of the project ensures your hard work lasts. Rushing to put shelves back can damage the finish.
Wait 24 Hours Minimum
Paint may feel dry to the touch in a few hours, but full curing takes about 24 hours. Avoid touching the surfaces or placing items inside during this time.
Reinstall Shelves and Hardware
- Reattach shelves using your labeled positions
- Reinstall door hardware and hinges
- Check alignment and ensure doors open and close properly
Pro Tip: Wipe interiors with a dry cloth after reassembly to remove any dust or fingerprints that settled during the process.
Maintain Painted Cabinet Interiors
A well-painted interior can last for years with proper care. Regular maintenance keeps your cabinets looking fresh.
Clean Gently
- Use a dry or slightly damp cloth for regular dusting
- Avoid abrasive cleaners that can scratch the finish
- For smudges, use a mild cleaner and wipe immediately
Inspect for Wear
Check high-touch areas like spots near handles and shelf edges every few months. Touch up chips early to prevent peeling from spreading.
Plan for Touch-Ups
Keep leftover paint in a sealed container labeled with the date and cabinet location. This makes future repairs quick and easy.
Choose Paint Based on Use and Style
Not all paints perform the same in cabinet interiors. Match your choice to your kitchen’s demands for the best results.
Best Paint Types for Cabinet Interiors
- Acrylic latex: Easy cleanup, low odor, dries quickly
- Alkyd (oil-based): More durable but slower drying with stronger fumes
- Hybrid enamel: Combines durability with water-based ease
Sheen Trade-Offs
- Matte: Hides flaws but harder to clean
- Satin: Great middle ground for appearance and maintenance
- Semi-gloss: Most durable but shows brushstrokes and dings more easily
For kitchens, satin or semi-gloss delivers the best balance between looks and practicality.
Avoid Common Mistakes
Even experienced DIYers make missteps. Steer clear of these pitfalls for a smooth project.
Skipping Surface Preparation
Cleaning and sanding are not optional. Without them, paint won’t adhere properly and will peel prematurely.
Using Wall Paint
Standard wall paint lacks the durability needed for cabinet interiors. Always use cabinet-rated or trim paint for best results.
Rushing Between Coats
Applying a second coat too soon causes bubbling and uneven texture. Follow the drying times on your paint can exactly.
Ignoring Ventilation
Poor airflow extends drying time and increases fume concentration. Keep fans running and windows open throughout the project.
Frequently Asked Questions About Painting Inside Cabinets
Is it worth painting the interior of cabinets?
Yes, painting cabinet interiors provides significant visual improvement and increased functionality, especially when converting from dark to light colors for better visibility. The change is most noticeable in cabinets you open frequently.
Will painting the inside of cabinets make a noticeable difference?
Absolutely, especially when changing from dark, unappealing colors to bright, clean finishes. The difference is most pronounced in cabinets that are frequently opened or have exposed interiors.
What type of paint should I use for cabinet interiors?
Use high-quality interior paint specifically suitable for cabinets. Semi-gloss is often preferred for high-traffic areas due to its durability and easy cleaning, while satin offers a good middle ground.
Should I seal the paint on cabinet interiors?
Sealing is not universally required but may be beneficial in high-traffic areas depending on paint quality and expected wear. Assess your specific usage patterns to decide if a clear topcoat is worth the extra time and cost.
How long should I wait before putting shelves back?
Allow the paint to cure for a full 24 hours before reinstalling shelves and hardware. This ensures the finish is fully hardened and won’t be damaged by contact.
Can I paint over dark existing paint without primer?
You can, but it’s not recommended. Using a high-quality primer like Kilz Hide-All prevents dark colors from bleeding through and ensures your light paint achieves full coverage with fewer coats.
Key Takeaways for Painting Inside Cabinets
- Preparation is 80% of the job: Thorough cleaning and light sanding ensure paint adheres properly
- Primer is essential for color changes: It blocks bleed-through from dark finishes
- Two thin coats beat one thick coat: Thin, even applications dry faster and look smoother
- Wait 24 hours before reassembly: Full curing prevents damage to your new finish
- Choose semi-gloss or satin: These finishes offer the best durability for high-traffic areas
- Use the right tools: Foam rollers and quality angled brushes produce professional results
- Maintain with gentle cleaning: Regular dusting and prompt touch-ups extend the life of your paint
Painting inside cabinets is a low-cost, high-impact project that pays off in both aesthetics and everyday usability. With proper preparation, quality materials, and a little patience, you’ll enjoy brighter, cleaner storage spaces that make your kitchen feel brand new. Start with one cabinet to build confidence, then work through the rest at your own pace.


