

Painting RV cabinets white or gray is one of the most impactful updates you can make to refresh your rig’s interior. Whether you’re aiming for a bright, modern farmhouse look with crisp white or a sleek, contemporary vibe with soft gray, the transformation is dramatic, but only if done right. The key to a flawless, long-lasting finish isn’t the paint color, it’s the prep work. Skipping steps leads to peeling, bubbling, or an uneven finish that shows every flaw.
This guide walks you through the exact process used by experienced DIYers, from removing hardware and cleaning surfaces to sanding, priming, and choosing the best paint for a smooth, durable result. You’ll learn how to avoid common mistakes, select the right tools, and apply paint like a pro, whether spraying or rolling. By the end, you’ll have everything you need to confidently paint your RV cabinets without regrets.
Remove All Cabinet Components
Take Off Doors and Drawers
Start by removing every cabinet door, drawer, and face frame component. This ensures full access to all surfaces and prevents uneven paint lines from hinges or tracks. Label each piece with painter’s tape and a marker, noting which hinge side, drawer slot, or cabinet it belongs to. Take photos before disassembly as a backup reference. Removing parts also reduces the risk of overspray on countertops, walls, or fixtures.
Remove and Label Hardware
Unscrew all knobs, pulls, and hinges. Place them in labeled zip-top bags or a hardware organizer. If reusing, clean them with warm soapy water or replace with new hardware for a complete refresh. Keeping hardware organized prevents loss and saves time during reassembly.
Clean Surfaces Thoroughly
Degrease with Mineral Spirits
Wipe down all cabinet surfaces with mineral spirits using a lint-free cloth or old cotton T-shirt. This cuts through grease, grime, and silicone buildup from cooking or cleaning products, which are common in RV kitchens. Pay extra attention to door edges, drawer fronts, and areas near the stove. Let the surface dry completely before moving to the next step.
Follow With Detergent Wash
After degreasing, wash all parts with a mild detergent cleaner like Fantastic or a TSP substitute. This removes any remaining residue and ensures a clean bonding surface. Rinse with a damp cloth and let dry fully. Skipping this two-step cleaning process is a leading cause of paint failure.
Sand for Maximum Adhesion
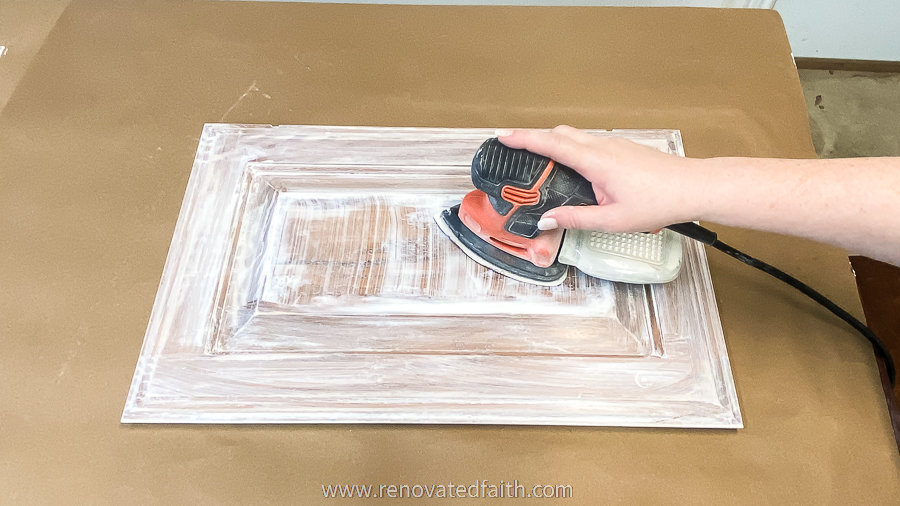
Lightly Sand With 220 Grit
Sand all surfaces with 220-grit sandpaper to de-gloss and create tooth for paint adhesion. Focus on smooth laminate or thermofoil finishes, which resist paint without proper abrasion. Use a sanding block or orbital sander for even pressure and avoid gouging edges. Wipe away dust with a microfiber cloth after sanding.
Sand Between Coats With Finer Grit
After each coat of primer and paint, lightly sand with 320-grit, then progress to 400-600 grit, and finish with 1000-grit for ultra-smooth results. This eliminates brush marks, dust nibs, and orange peel texture. Always wipe with a tack cloth or damp rag before applying the next coat.
Prime for a Durable Base

Use Bonding Primer on Laminates
Apply a high-adhesion bonding primer like Zinsser BIN or Kilz Adhesion. These seal porous areas and grip slick surfaces like thermofoil or melamine, which are common in RV cabinets. Use a small foam roller or sprayer for even coverage. Let dry according to manufacturer instructions, usually 1 to 2 hours.
Apply Two Primer Coats
Plan for at least two primer coats. The first fills pores and evens out the surface, while the second ensures full coverage and blocks stains. Sand lightly with 320-grit between coats. A solid primed base prevents tannin bleed and improves paint durability in high-use areas.
Choose the Right Paint
Use Cabinet-Grade Alkyd Paint
Opt for a high-quality, low-odor alkyd paint like Benjamin Moore Advance. This waterborne alkyd self-levels for a smooth, brush-mark-free finish and hardens into a tough, washable surface, which is perfect for RVs with constant movement and humidity. It’s low-VOC and cleans up with soap and water.
Stick to Satin or Semi-Gloss
Choose satin or semi-gloss sheen for durability and easy cleaning. Flat finishes show every fingerprint and wear quickly in kitchens. White and gray cabinet paints in these finishes resist moisture and stand up to daily use.
Apply Paint Smoothly
Spray for a Factory Finish
Use an airless sprayer like Graco or Wagner for the smoothest, professional result. Spray in a clean, dust-free area, ideally indoors with doors closed and fans off. Apply thin, even coats to prevent runs. Hold the sprayer 12 inches from the surface and overlap each pass slightly. Two thin coats are better than one thick one.
Roll for Precision and Control
If spraying isn’t an option, use a high-density 4-inch foam roller for flat surfaces and an angled brush for edges and frames. Roll in one direction for consistency. Benjamin Moore Advance works well with rollers and levels out beautifully. Allow 16 to 24 hours between coats for proper curing.
Reassemble With Care
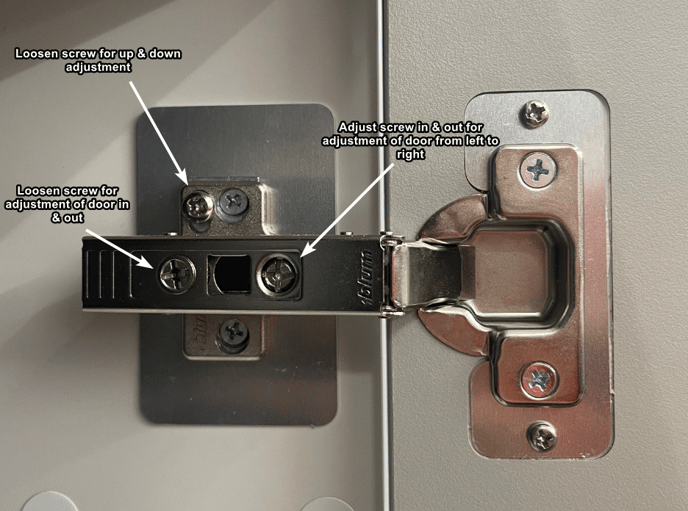
Reinstall Doors and Drawers
Once paint is fully cured, wait at least 72 hours before beginning reassembly. Use your labeled photos and notes to match doors and drawers to their original locations. Hang doors first, then adjust hinges for even gaps. Slide drawers back into tracks and test smooth operation.
Attach New or Cleaned Hardware
Install cleaned or new knobs and pulls. Consider upgrading to modern finishes like brushed nickel or matte black for a cohesive look. Double-check alignment and tighten screws securely, but not so tight that they strip the holes.
Protect Your Work Long-Term
Avoid Heavy Use for 7 Days
Even though paint may feel dry, alkyd paints take up to 7 days to fully cure. Avoid slamming doors, overloading drawers, or wiping surfaces aggressively during this time. Gentle use only.
Clean With Mild Soap and Water
Maintain painted cabinets by wiping with a soft, damp cloth and mild dish soap. Avoid abrasive cleaners, ammonia-based products, or paper towels that can scratch the finish. A little care goes a long way in preserving the look.
Frequently Asked Questions About Painting RV Cabinets
How long does it take to paint RV cabinets?
Expect to spend several weeks if working evenings and weekends. One DIYer reported taking about six weeks to complete roughly 20 doors and a dozen drawers. The process involves multiple coats of primer and paint with sanding between each, so patience is essential.
Can I paint over laminate RV cabinets?
Yes, but you must use a high-adhesion bonding primer and sand thoroughly with 220-grit paper first. Laminate and thermofoil finishes are slick and resist paint without proper preparation. Skipping this step leads to peeling and bubbling.
What is the best paint for RV cabinets?
Benjamin Moore Advance is a top choice among DIYers. This waterborne alkyd paint self-levels for a smooth finish and hardens into a durable, washable surface. It’s low-VOC and cleans up with soap and water, making it ideal for RV interiors.
Should I spray or roll cabinet paint?
Both methods work well. Spraying with an airless sprayer gives the smoothest, most professional finish, but requires a clean, dust-free area. Rolling with a high-density foam roller and angled brush offers more control and is easier for beginners. Either approach works with quality paint.
How many coats of primer and paint do I need?
Plan for at least two coats of each. Two primer coats ensure full coverage and block stains, while two paint coats provide durability and even color. Sand lightly between all coats with progressively finer grits, ending around 1000-grit for a smooth finish.
How long should I wait before using the cabinets?
Wait at least 72 hours before reassembling hardware and doors, but avoid heavy use for a full 7 days. Alkyd paints continue curing during this period, and aggressive handling can mar the finish. Clean gently with mild soap and water afterward.
Key Takeaways for Painting RV Cabinets White or Gray
Painting RV cabinets white or gray is a labor-intensive but rewarding project that can completely transform your space. Success comes down to meticulous prep: remove, clean, sand, prime, and paint with patience. Use high-adhesion primer and cabinet-grade alkyd paint like Benjamin Moore Advance for lasting results. Whether you spray or roll, thin coats and sanding between layers deliver a smooth, professional finish.
Once reassembled, your cabinets will look brand new and stand up to RV life for years. Take your time, as this isn’t a job you want to redo. With the right approach, your painted RV cabinets will be a highlight, not a regret. Start with the prep work today, and you’ll be enjoying your refreshed interior in no time.


