

Bathroom vanities that sit too low can cause back strain, especially for taller users. If your bathroom cabinet feels like it’s forcing you into an uncomfortable hunch, you’re not alone. Many homes come with standard 32-inch vanities, but modern comfort height models now sit at 35 inches. The good news is you don’t need to replace the entire unit to gain those extra inches. Raising bathroom cabinets is a common DIY question, and the answer lies in smart, structural adjustments that preserve your vanity while improving ergonomics.
Raising a bathroom cabinet isn’t just about cutting wood and lifting. It’s about choosing the right method for your cabinet type, plumbing setup, and skill level. Whether you have a veneer-faced prefab unit or a solid wood custom vanity, there’s a solution that fits. The key is understanding the trade-offs between aesthetics, cost, and complexity. Most methods avoid major plumbing changes by lifting the entire unit, cabinet, countertop, and all, keeping your sink and faucet in place. This guide walks you through the safest, most effective approaches so you can stand taller at your sink, literally.
Build a Support Platform

The support platform method is the most practical and widely recommended way to raise bathroom cabinets. It works for nearly all vanity types and requires only basic tools and carpentry skills. By constructing a sturdy base that sits directly on the floor, you elevate the entire cabinet assembly without altering its structure.
Use 2x4s for a Sturdy Base
Construct the platform using 2×4 lumber cut to match the exact footprint of your vanity. This creates a solid, level foundation that supports the full weight of the cabinet, countertop, and sink. Pressure-treated wood is ideal for bathrooms due to its moisture resistance.
Steps:
1. Measure the vanity’s width and depth
2. Cut two 2x4s for the front and back, and two for the sides
3. Assemble into a rectangular frame using wood glue and screws
4. Reinforce corners with corner braces or additional wood blocks
5. Ensure the top surface is perfectly level before installation
Place the frame on the floor where the vanity will sit. Use a spirit level to confirm it’s flat. Any unevenness can cause stress on the countertop or misalignment of doors and drawers.
Secure and Finish the Platform
Once the platform is in place, carefully lift the vanity and set it on top. Screw the cabinet to the platform from underneath using wood screws. This prevents movement and adds stability. Drill pilot holes to avoid splitting the wood.
After securing the unit:
– Fill any visible gaps with wood filler
– Sand the platform surface smooth
– Paint or stain to match the existing cabinet or bathroom decor
– Apply a waterproof sealant, especially in high-moisture zones
Pro Tip: If your vanity has a toe kick, extend the platform to match so the base appears continuous. This hides the lift and maintains a clean look.
Extend the Toe Kick
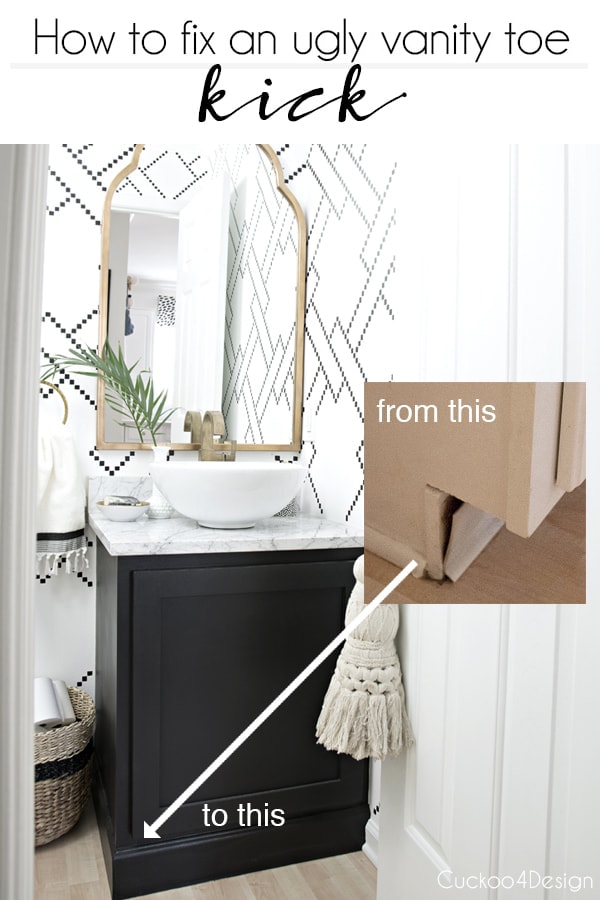
For cabinets with visible toe kicks, the toe kick extension method is a clever, low-risk solution. It’s especially effective for veneer-faced or particleboard units where cutting or modifying the cabinet body could damage delicate surfaces.
Cut and Attach New Panels
Measure the height increase needed, typically 2 to 3 inches, and cut new toe kick panels to that dimension. Use plywood or MDF, ensuring the thickness matches the original kick.
Steps:
1. Remove the existing toe kick if present
2. Apply wood glue to the bottom edge of the cabinet
3. Position the new panel and clamp it in place
4. Reinforce with screws from the inside of the cabinet
5. Sand seams smooth and fill gaps with wood filler
This method raises the entire cabinet uniformly, including drawers and countertops, without altering the visible cabinet doors or sides.
Match Finish and Conceal Seams
Paint or stain the new panel to blend with the cabinet. Use the same sheen and color for a seamless look. To further hide the joint, consider adding a thin piece of decorative molding along the top edge of the extension.
Expert Note: Since the toe kick is recessed and often shadowed, minor imperfections in finish or alignment are rarely noticeable. This makes it ideal for DIYers.
Install Adjustable Cabinet Legs
If your vanity has or can support legs, adding adjustable feet is a clean, reversible way to gain height. This method works best for floating or semi-floating vanities with exposed bases.
Choose Strong, Leveling Legs
Select heavy-duty furniture legs rated for bathroom use and capable of supporting the vanity’s total weight. Look for models with threaded height adjusters. These allow fine-tuning after installation.
Steps:
1. Safely support the vanity with sawhorses or helpers
2. Attach mounting plates to the cabinet’s bottom corners
3. Screw legs into the plates and adjust to desired height
4. Use a level to ensure evenness across all points
5. Secure the cabinet to wall studs for added safety
Add Skirt for a Finished Look
Exposed legs may leave gaps that expose plumbing or floor unevenness. Install a decorative skirt or panel between the legs to hide the underside and create a more polished appearance. Use moisture-resistant materials like PVC trim or sealed wood.
Warning: Avoid lifting the cabinet alone, especially if it has a heavy countertop. Always use assistance or mechanical support.
Replace the Countertop for More Height
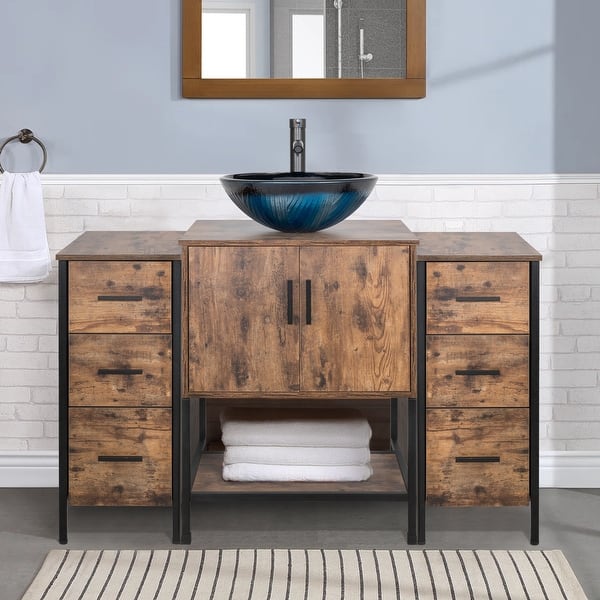
When the countertop is separate from the cabinet, replacing it with a thicker or raised-profile version can achieve the same ergonomic benefit without modifying the cabinet at all.
Install a Vessel Sink Setup
A vessel sink sits on top of the counter, adding 4 to 6 inches of usable height. Pair it with a taller faucet to maintain clearance. This approach bypasses cabinet modification entirely.
Steps:
1. Carefully remove the old countertop. It may be silicone-sealed
2. Install a new solid surface, quartz, or wood counter with increased thickness
3. Set the vessel sink on top using silicone adhesive
4. Connect plumbing to accommodate the new height
Expert Advice: Instead of raising the vanity, consider removing the integrated sink and countertop. Install a new counter, set bowl sinks on top with taller faucets.
Check Structural Support
Ensure the cabinet can handle the added weight of thicker stone or solid surface countertops. Reinforce the cabinet frame if needed with internal bracing or plywood backing.
Reframe the Cabinet Frame
:max_bytes(150000):strip_icc()/102102149-56e2d9793af54aee9c9babcd0d97abf7.jpg)
For solid wood or custom-built vanities, reframing the cabinet offers a seamless, built-in look. This high-skill method involves extending the vertical sides and top frame to increase height.
Extend Sides with Matching Wood
Cut solid wood pieces to the desired height increase and attach them to the bottom of the cabinet’s side panels. Use dowels, biscuits, or pocket screws for strong, invisible joints.
Steps:
1. Disassemble or remove drawers and doors
2. Attach extension pieces with wood glue and clamps
3. Fill and sand all seams
4. Reassemble and refinish to match
This method maintains the cabinet’s original proportions and can be nearly undetectable when done well.
Refinish for a Seamless Look
Matching the stain or paint is critical. Test finishes on scrap wood first. Use grain filler for smooth transitions on visible joints. This method is best left to experienced woodworkers or professionals.
Handle Plumbing and Electrical Carefully
Raising the cabinet affects utility connections. Even a 2 to 3 inch lift can strain pipes and restrict access to outlets.
Adjust Water Supply and Drain Lines
If the lift exceeds 1 to 2 inches, plumbing may need extension. Flexible supply lines can often accommodate small changes, but rigid copper or PEX may require splicing. Drains may also need repositioning.
Critical: Always consult a licensed plumber before modifying plumbing. DIY mistakes can lead to leaks or code violations.
Check Outlet and Wiring Access
Ensure GFCI outlets remain accessible and that cords aren’t stretched. If outlets sit behind the cabinet, you may need to:
– Raise the outlet box, which requires an electrician
– Install a surface-mounted extension
– Use a cord extender for temporary setups
Ensure Stability and Safety
A raised cabinet must remain stable and safe, especially with users leaning on it.
Anchor to Wall Studs
Regardless of method, secure the cabinet to wall studs using lag screws. This prevents tipping, especially on platforms or legs. Use a stud finder to locate framing behind the wall.
Distribute Weight Evenly
Avoid point loads, especially with leg systems. Ensure the support structure spreads weight across the entire footprint. Platforms made from 2x4s naturally provide this. Legs should be placed at all corners and under drawer supports.
Match Aesthetics and Finish
A poorly finished modification can ruin an otherwise great upgrade.
Paint or Stain to Blend
Use bathroom-grade paint or moisture-resistant stain to finish any added wood. Apply primer first for better adhesion. Multiple thin coats yield a smoother result than one thick layer.
Hide Transitions with Trim
Add decorative molding or a toe kick cap to conceal seams between the cabinet and the new base. This makes the lift look intentional rather than improvised.
Choose the Right Method for Your Cabinet
Not all methods work for every cabinet. Use this quick guide to decide:
| Cabinet Type | Best Method |
|---|---|
| Veneer or particleboard | Toe kick extension |
| Solid wood or custom | Reframing or platform |
| Floating or wall-hung | Support platform or legs |
| Integrated countertop | Platform or full replacement |
| Prefab with drawers | Support platform |
Avoid Common Mistakes
Even simple projects can go wrong without planning.
Don’t Skip Leveling
An unlevel platform causes doors to sag and drawers to stick. Use shims under the platform if the floor isn’t perfectly flat.
Don’t Ignore Moisture Protection
All wood surfaces must be sealed against bathroom humidity. Use waterproof paint, polyurethane, or marine-grade sealant, especially on bottom edges.
Don’t Overlook Countertop Height
Measure from floor to top of countertop after the lift. A 3-inch platform on a 32-inch cabinet creates a 35-inch comfort height, ideal for most adults.
When to Call a Professional
Some situations demand expert help:
– Major plumbing rerouting
– Electrical modifications
– High-end or antique cabinets
– Structural concerns
– Lack of tools or confidence
A contractor or cabinetmaker can ensure a flawless, code-compliant result.
Final Note: Raising your bathroom cabinet doesn’t require a full remodel. The platform method is the safest, most DIY-friendly option, offering stability, low cost, and easy customization. For veneer cabinets, toe kick extensions provide a hidden fix. If you’re replacing the countertop anyway, vessel sinks offer a stylish alternative. Plan carefully, seal against moisture, and anchor securely. With the right approach, you can gain comfort without sacrificing style or safety.


