

Stuck trying to remove a cabinet drawer that won’t budge? You’re not alone. Whether it’s a kitchen drawer jammed from years of use or a bathroom cabinet drawer that seems glued in place, knowing how to remove a cabinet drawer properly can save time, prevent damage, and make repairs or upgrades much easier. The good news: most cabinet drawers use standard slide mechanisms that follow predictable designs. With the right technique, you can remove nearly any drawer in minutes, no tools required in many cases.
In this guide, you’ll learn step-by-step methods for removing different types of cabinet drawers, including side-mount, under-mount, and center-mount glides. We’ll cover visual cues to identify your drawer’s mechanism, common mistakes to avoid, and pro tips for smooth reinstallation. Whether you’re replacing hardware, cleaning deep inside the cabinet, or upgrading your kitchen, this guide gives you everything you need to get the job done safely and efficiently.
Identify the Drawer Slide Type

Before forcing a drawer out, determine what kind of slide system it uses. This dictates how you’ll remove it. Most cabinets use one of three common types: side-mounted, under-mounted, or center-mounted glides. Each has unique release mechanisms.
Side-Mount Slides Are Most Common
These metal tracks run along the outer sides of the drawer and cabinet interior. Found in most stock cabinets, they often have a simple lever or tab to release the drawer. Look for a small plastic or metal arm on the inner edge of the slide. This is the release lever.
When both sides are visible, check if the levers face up or down. If they face up, push them down to disengage. If they face inward, squeeze both at once while pulling the drawer out slightly. Many side-mount slides allow full drawer removal once released.
Under-Mount Slides Hide Beneath the Drawer
These are mounted underneath the drawer box and attach to the cabinet frame. They’re common in higher-end kitchens and offer a clean look. To remove a drawer with under-mount slides, open it fully, then lift upward firmly while pulling forward.
Some models require you to first locate a small recessed button or tab near the back of the slide. Press both sides simultaneously while lifting. If nothing moves, don’t force it. Check for hidden latches or locking pins before applying more pressure.
Center-Mount Slides Use a Single Rail
Less common today, center-mount glides use a single metal track down the middle bottom of the drawer. These often have a push-button release at the front or back of the rail. Open the drawer fully, press the button, and pull straight out.
If no button is visible, look for a sliding lock or catch that needs to be shifted sideways before removal. Some older models require lifting the back of the drawer slightly as you pull forward to disengage the rear hook.
Release Mechanisms by Brand
Drawer glide manufacturers often use proprietary designs. Knowing the brand can help you apply the correct removal method quickly.
Blum MotionLoc Slides Auto-Lock
Blum under-mount slides are popular in modern cabinets. They feature automatic locking that holds the drawer securely when closed. To remove: open fully, then lift the front of the drawer upward about 1 inch. This disengages the locking mechanism. Pull forward smoothly.
To reinstall, align the drawer with the mounting brackets, push it straight in until it clicks, then lower the front gently. No levers or buttons needed, just precise motion.
Hafele and Grass Systems
Hafele and Grass side-mount slides usually have a small black plastic lever on the inside of each glide. With the drawer open all the way, press both levers down simultaneously and pull the drawer straight out.
For under-mount versions, press inward on the release tab located at the end of each glide while lifting the drawer front. These systems often require even pressure on both sides to release properly.
Generic OEM Slides in Budget Cabinets
Many prefab cabinets use unbranded side-mount slides with basic tab releases. Look for a small upward-facing tab near the front of the cabinet-mounted track. Push it down while pulling the drawer out.
If no tab is visible, try squeezing both inner edges of the glide together while pulling forward. Some models release when the drawer is pulled past its normal stop point. Listen for a click.
Step-by-Step Removal Process
Follow this universal sequence to safely remove any cabinet drawer, regardless of type.
Empty and Inspect the Drawer
Remove all contents to reduce weight and prevent spills. Inspect both sides of the drawer and inside the cabinet for visible release mechanisms. Use a flashlight to see into shadowed areas.
Look for levers, buttons, tabs, or notches. Note their position and direction of movement. If nothing is obvious, proceed to test common release methods based on glide type.
Open Fully and Locate Release Points
Pull the drawer open all the way. On most slides, the release mechanism only becomes active when fully extended.
For side-mount: check for plastic arms or metal tabs on the inner edge of the glide. For under-mount: look for small recessed buttons near the back. For center-mount: examine the single rail for buttons or sliding locks.
Engage Release and Remove Drawer
Apply the appropriate release action:
- Side-mount: Press down or squeeze levers, then pull drawer straight out.
- Under-mount: Lift front of drawer upward while pulling forward (Blum), or press tabs and lift.
- Center-mount: Press button and pull straight out, or lift back slightly as you pull.
Keep movements slow and even. If resistance occurs, stop and recheck the mechanism. Never force it.
Common Mistakes to Avoid
Even simple drawer removal can go wrong without caution.
Forcing the Drawer Causes Damage
Many people yank the drawer when it resists, damaging the glide or cabinet. Always identify the correct release method first. If it doesn’t slide out smoothly, something is still engaged.
Ignoring Asymmetrical Release Levers
Some drawers have different release actions on each side. For example, one lever pushes down while the other pulls up. Check both sides carefully before applying force.
Removing Only One Side’s Mechanism
On certain glides, releasing one side doesn’t free the drawer. You must disengage both simultaneously. Use both hands to press or pull release points at the same time.
Reinstalling the Drawer Correctly
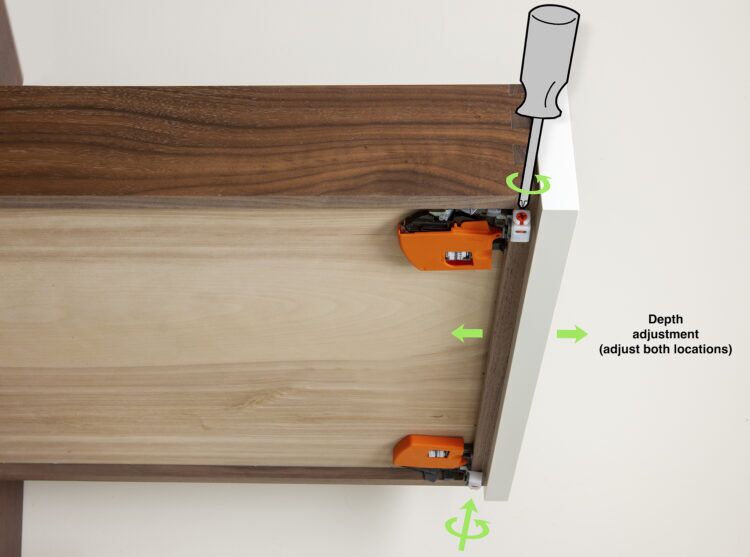
Putting the drawer back wrong can lead to misalignment or poor closure.
Align Glides Before Inserting
Hold the drawer in front of the cabinet and align the glide arms with the tracks. For under-mount, ensure the front lip hooks into place before pushing in.
For side-mount, make sure both tracks are level and not twisted. Misaligned glides cause binding and premature wear.
Push Straight In Until It Clicks
Insert the drawer fully with even pressure. Most modern glides click or snap into place when properly seated. Test by opening and closing. Motion should be smooth and quiet.
If the drawer won’t close all the way, pull it out and realign. Check for obstructions or misrouted glides.
Maintenance Tips After Removal
Use this opportunity to clean and inspect the system.
Clean Tracks and Rollers
Wipe down glide tracks with a dry cloth. Remove dust, grease, or debris with a soft brush or cotton swab. Avoid lubricants unless rollers are stiff. Then use silicone spray sparingly.
Check for Wear or Damage
Look for bent metal, chipped plastic, or wobbly joints. Replace damaged glides to prevent future issues. Worn rollers cause uneven movement and noise.
Tighten Mounting Screws
Over time, screws loosen. Use a screwdriver to secure glide attachments to both drawer and cabinet. This ensures stability and smooth operation.
When to Call a Professional
Some situations require expert help.
Built-In Drawers With Hidden Fasteners
Integrated appliances or custom cabinetry may have concealed brackets or permanent mounts. If you can’t find release points after careful inspection, consult the manufacturer or installer.
Damaged or Broken Glides
If the slide is bent, cracked, or missing parts, replacement may be necessary. A professional can match the model and install it correctly.
Soft-Close Mechanisms That Won’t Reset
If a soft-close drawer fails to latch after reinstallation, the damper may need resetting or replacing. These systems are sensitive and often require specific procedures.
Frequently Asked Questions About Removing Cabinet Drawers
Do I need tools to remove a cabinet drawer?
Most modern drawers release without tools. You only need your hands to press levers, tabs, or lift the drawer. A flashlight helps you see release points clearly.
Why won’t my drawer come out even after pressing the release?
The release may be on both sides, and you might have only disengaged one. Check for hidden latches or locking pins. Some drawers require simultaneous action on both glides.
How do I remove a drawer with soft-close slides?
Open the drawer fully, lift the front upward slightly, then pull forward. Soft-close mechanisms often disengage with this motion. If it resists, check for a release tab near the back.
Can I remove a drawer without breaking the slides?
Yes, if you identify the correct release method first. Forcing the drawer damages glides. Always look for levers, buttons, or tabs before pulling.
What if my drawer has no visible release mechanism?
Some older drawers use friction fit or gravity locks. Try lifting the front while pulling. If that fails, the drawer may be a fixed unit that requires disassembling the cabinet frame.
How do I put the drawer back after removal?
Align the glide arms with the tracks, push straight in until it clicks, and test the motion. For under-mount slides, ensure the front lip hooks into place before pushing fully.
Key Takeaways for Removing Cabinet Drawers
Removing a cabinet drawer doesn’t have to be frustrating. By identifying the glide type, using the correct release method, and avoiding common errors, you can complete the task in under five minutes. Always work gently, inspect mechanisms closely, and take notes during removal for easier reassembly.
Start by examining your drawer slides to determine which release method applies. Then follow the steps for your specific mechanism. With this knowledge, you’re ready to tackle any drawer, from basic utility cabinets to high-end kitchen systems.


