

Tired of looking at dated laminate cabinets but dreading the cost and mess of a full remodel? You are not alone. Many homeowners assume that updating laminate kitchen cabinets requires professional help or a massive budget. The truth is that with the right techniques and a bit of patience, you can transform your kitchen dramatically.
This guide walks you through every option available, from painting and hardware swaps to veneer overlays and open shelving. You will learn exactly what supplies you need, how to prep surfaces properly, and which mistakes to avoid. By the end, you will have a clear action plan to give your kitchen a fresh, modern look without replacing your cabinets.
Evaluate Your Cabinet Condition First
Before you buy any supplies, take a close look at what you are working with. A successful update starts with understanding the current state of your cabinets.
Check for Structural Damage
Inspect your cabinets for water damage, especially near the sink and dishwasher. Look for swelling, soft spots, or peeling laminate. If the substrate underneath feels spongy, that area needs repair before any cosmetic work. Minor damage can be filled and sanded. Severe damage may mean replacing individual doors or drawer fronts.
Test Laminate Adhesion
Press firmly on the laminate surface in several spots. If it feels bubbly or moves under pressure, the adhesive underneath has failed. Paint and veneer will not stick well to loose laminate. You can re-adhere small sections with contact cement, but larger problem areas may require door replacement.
Decide Between Repair and Replacement
Count how many doors show significant wear. If most of your cabinets are in good shape but a few are damaged, replacing just those doors is smart. New MDF or plywood doors can match your existing style and give you a fresh surface to work with.
Choose Your Update Method
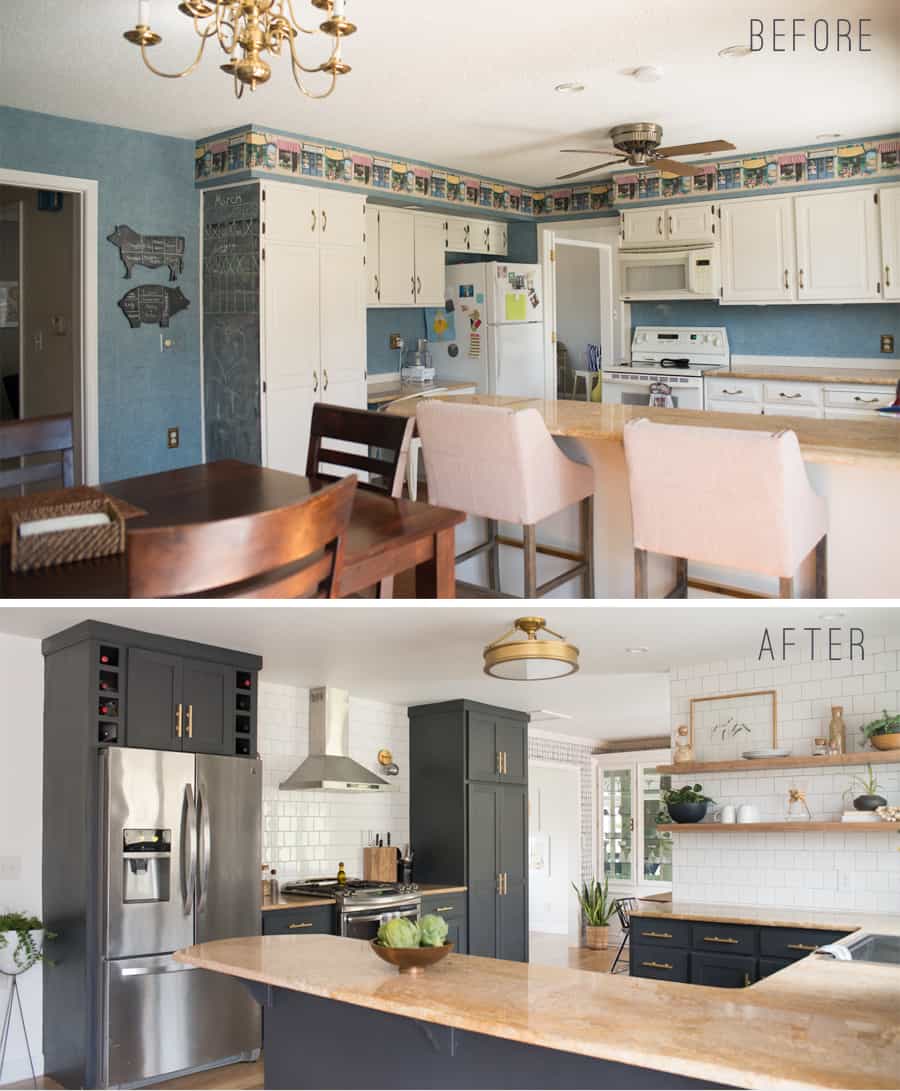
Your budget, skill level, and desired look will determine which approach works best. Here are the main options to consider.
Paint for Maximum Transformation
Painting is the most affordable way to completely change your kitchen’s appearance. A fresh coat of paint in a modern color like navy, sage, or charcoal can make old laminate cabinets look intentional and stylish. This option requires the most prep work but delivers dramatic results.
Replace Hardware for Quick Impact
Sometimes all your cabinets need is new hardware. Swapping outdated knobs for modern cup pulls or matte black handles costs between $5 and $15 per drawer. This simple change takes an afternoon and instantly modernizes the space.
Apply Wood Veneer for a Premium Look
Veneer sheets made from walnut, oak, or maple can be glued directly over laminate. This gives you the warmth and texture of real wood without the expense of new cabinets. Veneer is more durable than paint and creates a high-end appearance.
Install New Doors or Convert to Open Shelving
Replacing cabinet doors with shaker-style MDF or reclaimed wood options gives your kitchen a completely new personality. Alternatively, remove upper doors and install floating shelves for an open, contemporary feel.
Gather the Supplies You Need
Having everything ready before you start saves time and prevents frustration mid-project.
Painting Supplies Checklist
- Degreaser for removing grease and grime
- Sandpaper in 120 and 220 grit
- Tack cloths or damp microfiber towels
- High-adhesion primer such as Zinsser Bulls Eye 1-2-3
- Cabinet-grade paint in your chosen color
- Foam rollers and angled brushes
- Clear polyurethane sealant for protection
Supplies for Alternative Updates
- Contact adhesive and a J-roller for veneer application
- Drill and driver for installing new hardware
- Level for shelf installation
- LED strip lights for under-cabinet lighting
- New hinges if your existing ones are worn
Prep Your Surfaces Thoroughly
Skipping prep work is the number one reason paint fails on laminate. Follow these steps carefully for lasting results.
Remove Doors and Hardware
Take down every door and drawer front. Remove all hinges, knobs, and pulls. Label each piece with painter’s tape and a matching number on the cabinet box. This makes reassembly simple and prevents mix-ups.
Deep Clean Every Surface
Laminate traps grease and cooking residue, especially near the stove. Use a degreaser and scrub every surface thoroughly. Rinse with clean water and allow everything to dry completely. Any remaining grease will prevent paint from adhering properly.
Sand to Create Texture
Use 120-grit sandpaper to lightly scuff the glossy laminate surface. You are not trying to remove the laminate, just creating enough texture for primer to grip. Wipe away all dust with a tack cloth or damp cloth before priming.
Apply Primer for Adhesion
Zinsser Bulls Eye 1-2-3 is specifically formulated for difficult surfaces like laminate. Apply it with a brush for edges and a roller for flat areas. Allow the primer to dry completely, which typically takes two to four hours. A second coat ensures full coverage.
Apply Paint Like a Professional
The application technique matters as much as the prep work. Thin, even coats always beat thick, rushed ones.
Select the Right Paint
Cabinet-grade paint is formulated to withstand daily wear and tear. Water-based alkyd or acrylic enamel options provide excellent durability. High-gloss finishes give a modern, sleek appearance and are easier to clean than flat finishes.
Choose Your Application Method
A brush and roller setup works well for DIYers. Use a high-quality angled brush for edges and corners, and a small foam roller for flat panels. A paint sprayer produces the smoothest finish but requires masking off surrounding areas and more practice to master.
Apply Multiple Thin Coats
Let the first coat dry for four to six hours. Lightly sand with 220-grit paper to smooth any imperfections, then apply the second coat. Resist the urge to apply thick paint, which sags and takes much longer to cure properly.
Seal for Long-Lasting Protection
Once the paint is fully dry, apply a clear polyurethane sealant. This protects against scratches, moisture, and everyday wear. Allow the sealant to cure for 48 to 72 hours before reinstalling hardware and using your cabinets.
Upgrade Your Hardware
New hardware acts like jewelry for your kitchen. It is a small change with outsized visual impact.
Pick a Style That Fits Your Design
- Matte black for a modern, bold statement
- Brushed nickel for a classic, versatile look
- Brass for warmth and traditional elegance
- Minimalist cup pulls for a streamlined appearance
Mix Metals Like a Designer
Combining finishes can create a curated, high-end feel. For example, pair brass pendant lights with matte black cabinet pulls. Just keep one metal dominant to avoid a chaotic look.
Measure Carefully Before Drilling
Use a template or jig to ensure new holes are perfectly aligned. Most standard pulls have 3-inch or 7-inch center-to-center spacing. Measure twice and drill once to avoid mistakes.
Try a Veneer Overlay Instead of Paint

If you want the look of real wood without replacing your cabinets, veneer is an excellent option.
Select Your Veneer Type
Walnut offers a rich, modern appearance. Oak provides a classic, timeless look. Maple is light and airy, perfect for brightening a small kitchen. Veneer sheets come in various sizes, including 4×8 foot panels.
Apply Contact Adhesive
Brush contact cement onto both the cabinet surface and the back of the veneer. Let it dry until it is tacky, usually 15 to 20 minutes. Carefully position the sheet, starting from one edge and working across.
Roll Out Air Bubbles
Use a J-roller from the center outward to eliminate any air pockets. Trim the edges with a utility knife and straight edge for a clean finish. This method transforms the appearance while maintaining your existing cabinet structure.
Convert to Open Shelving

Removing upper cabinet doors and installing floating shelves creates an open, airy kitchen feel.
Choose Shelf Materials
Reclaimed wood adds character and warmth. Plywood with edge banding offers a clean, modern look. Pre-finished boards save time and effort. Brackets can be industrial metal or hidden supports for a minimalist appearance.
Install Shelves Securely
Anchor shelves into wall studs, not just drywall. Use a level to ensure everything is straight. Drill pilot holes before driving screws. Adding LED strip lights underneath provides both ambiance and task lighting.
Add Complementary Kitchen Upgrades
Your cabinet update will look even better when paired with other budget-friendly improvements.
Install a Quick Backsplash
Peel-and-stick tiles require no grout and no mess. Subway tiles offer classic appeal, while geometric patterns add modern interest. Choose colors that complement your new cabinet finish.
Upgrade Your Lighting
- Under-cabinet LED strips illuminate countertops for food prep
- Pendant lights over an island add style and function
- Dimmer switches let you control the mood and brightness
Refresh Countertops on a Budget
Paint laminate counters with countertop-specific paint. Apply contact paper for a temporary change. Install butcher block or tile for a more permanent upgrade that still costs less than stone.
Coordinate Wall Colors
Light gray or white walls enhance brightness and make cabinets stand out. Deep tones add drama and sophistication. Test paint samples in natural light before committing to a full room.
Avoid These Common Mistakes
Knowing what not to do is just as important as knowing the right steps.
Never Skip Degreasing
Grease repels paint and causes it to peel within weeks. Clean every surface thoroughly, even areas that look clean. The area near your stove deserves extra attention.
Use the Right Primer
Standard primers fail on non-porous laminate surfaces. Always use a high-bonding primer like Zinsser Bulls Eye 1-2-3. This step determines whether your paint job lasts or fails.
Avoid Thick Paint Coats
Thick paint sags, drips, and takes forever to dry. Thin, even layers cure better and produce a smoother finish. Patience during application pays off in the final result.
Respect Curing Times
Paint may feel dry to the touch within hours, but full curing takes days. Wait at least 72 hours before reinstalling hardware and using your cabinets. Rushing this step compromises durability.
Maintain Your Updated Cabinets
Proper care keeps your refreshed cabinets looking great for years.
Clean Gently
Use mild soap and water for routine cleaning. Avoid abrasive sponges and harsh chemicals that can damage the finish. Wipe up spills promptly to prevent staining.
Touch Up Chips Quickly
Keep leftover paint for touch-ups. Fix scratches and chips as soon as you notice them before they worsen. A small brush and a few minutes prevent bigger problems later.
Tighten Hardware Periodically
Doors and drawers loosen over time with daily use. Check screws every few months and tighten as needed. This simple habit extends the life of your hardware.
Control Humidity Levels
Excess moisture can warp laminate and cause veneer to lift. Use exhaust fans while cooking and running the dishwasher. A dehumidifier helps in humid climates.
Frequently Asked Questions About Updating Laminate Kitchen Cabinets
Can you paint laminate cabinets without sanding?
Sanding is strongly recommended for proper paint adhesion. Laminate is non-porous and glossy, which makes it difficult for paint to grip. Lightly scuffing with 120-grit sandpaper creates texture that helps primer and paint bond effectively. Skipping this step increases the risk of peeling.
What is the best primer for laminate cabinets?
Zinsser Bulls Eye 1-2-3 is specifically recommended for laminate surfaces. This high-adhesion primer bonds well to glossy, non-porous materials. It provides a reliable base for cabinet-grade paint and helps ensure your finish lasts.
How much does it cost to update laminate kitchen cabinets?
The cost varies by method. Hardware replacement runs $5 to $15 per drawer. Painting supplies typically cost less than $200 for an average kitchen. Veneer overlays cost more but still far less than new cabinets. Door replacement is the most expensive update option.
How long does painting laminate cabinets take?
Plan for at least three to five days. Prep work takes one day, primer needs several hours to dry, and each paint coat requires four to six hours of drying time. Add 48 to 72 hours for the sealant to cure before reassembly.
Is it better to paint or replace laminate cabinets?
Painting is the most cost-effective option and works well when your cabinets are structurally sound. Replacement becomes necessary when there is significant water damage or delamination. Assess your cabinet condition first to make the right choice.
Can you apply wood veneer over laminate cabinets?
Yes, veneer overlays work well on laminate surfaces. Use contact adhesive and a J-roller for smooth application. Choose walnut, oak, or maple for a real wood appearance. This method transforms the look while maintaining your existing cabinet structure.
Key Takeaways for Updating Laminate Kitchen Cabinets
Updating laminate kitchen cabinets is one of the most rewarding DIY projects you can tackle. The transformation potential is huge, and the cost is a fraction of a full remodel. Whether you choose to paint, replace hardware, apply veneer, or convert to open shelving, proper preparation determines your success.
Start by evaluating your cabinet condition and choosing the method that fits your budget and skill level. Gather all supplies before you begin, and never rush the prep or curing stages. Avoid the common mistakes of skipping degreaser, using the wrong primer, or applying paint too thickly.
Your next step is simple. Pick one update method and gather your supplies this week. With a weekend or two of focused work, you can achieve a designer-quality kitchen that feels brand new without the remodel price tag.


