That awkward gap between your kitchen cabinets and the ceiling often feels like a design mistake waiting to be judged. Dust collects there, shadows hide in the corners, and the empty space makes your beautiful kitchen feel unfinished and cold.
You can fix this eyesore without expensive construction or custom carpentry. This guide reveals proven above cabinet ideas to turn that blank stretch into a curated showcase using paint, clusters, and hidden lifts.
Prepare the Surface for Styling Success
Skipping the cleaning phase guarantees your new display will look dingy within days. Grease and dust accumulate silently above cabinets, creating a grimy base that undermines even the most stylish arrangement.
Remove All Existing Items Completely
Take down every single object currently sitting on top of your cabinets. Do not just dust around them because you need a true blank canvas to assess your space accurately. This step forces you to evaluate what you actually own versus what is just clutter.
Deep Clean Cabinet Tops Thoroughly
Wipe the surface with a microfiber cloth and an all-purpose cleaner or warm soapy water. Focus heavily on the back edge where the cabinet meets the wall since grease traps itself in this corner. Let the area dry completely before you consider placing any decor back up there.
Inspect Structural Stability and Gaps
Check that your cabinet tops are level and secure before adding any weight. Note the exact depth of the gap between your cabinet top and the ceiling to determine what items will fit visually. If doors are loose or wobbly, fix those structural issues first since styling cannot hide instability.
Source and Categorize Your Decor Collection
The best displays blend function, memory, and texture through smart categorization. You likely already own many usable items tucked away in storage that just need a new home.
Group Items by Functional Type
Sort your potential decor into five core categories to see what you have.
* Vessels and Containers like canisters, ceramic jars, and vintage tins
* Bottles and Jars including glass apothecary bottles for light play
* Functional Decor such as rolling pins, cutting boards, and trays
* Organic Elements like baskets, plants, or dried branches
* Personal Artifacts including travel souvenirs and handmade gifts
Shop Smart at Thrift Stores
Hit secondhand stores if your collection feels thin or lacks variety. Look for shape and texture over color since you can always paint an item later to match your palette. A wooden base picked up for ten dollars can become a perfect riser with a little work.
Transform Finds with DIY Painting Techniques
Found objects rarely match your kitchen aesthetic right out of the box. Simple DIY magic can unify clashing colors and create a high-end, aged look that feels intentional.
Apply Layered Painting for Depth
A single coat of paint often makes an item look flat and cheap. Use a three-layer method starting with a neutral base, adding a tonal second layer, and finishing with a hand-painted detail color like olive green. Imperfection is intentional here since a slightly uneven edge adds warmth and authenticity.
Distress Metal with Rub-and-Buff Method
Metal corners on wooden planters often look too shiny or mismatched for a vintage look. Tape off surrounding wood areas, apply two shades of brown acrylic paint, and let them dry completely. Rub and buff the dry surface with a soft cloth to create aged, vintage-inspired hardware.
Repaint Clashing Wooden Tools
A vintage rolling pin with teal handles might stand out for the wrong reasons in your neutral kitchen. Unify it by sanding the handle and repainting it in your key theme color. This same technique works wonders on cutting boards or trays to bring them into harmony with your display.
Build Height with Hidden Lifts
Items often get lost behind the cabinet lip, making your display feel flat and invisible from the floor. You need height to make the arrangement pop.
Use Green Insulation Foam Secrets
Cut green insulation foam to fit the cabinet ledge and place it discreetly under your decor. This material is lightweight so it will not strain your cabinets, and it remains invisible from below. This hidden lift creates the illusion that your vases or baskets are naturally tall.
Flip Bases into Functional Risers
That chunky wooden candle holder you thrifted can serve a new purpose as a riser. Remove any wires since they are usually drilled in rather than glued, then flip the base upside down. Now it adds necessary height and texture without looking like a prop.
Style with Clusters Instead of Lines
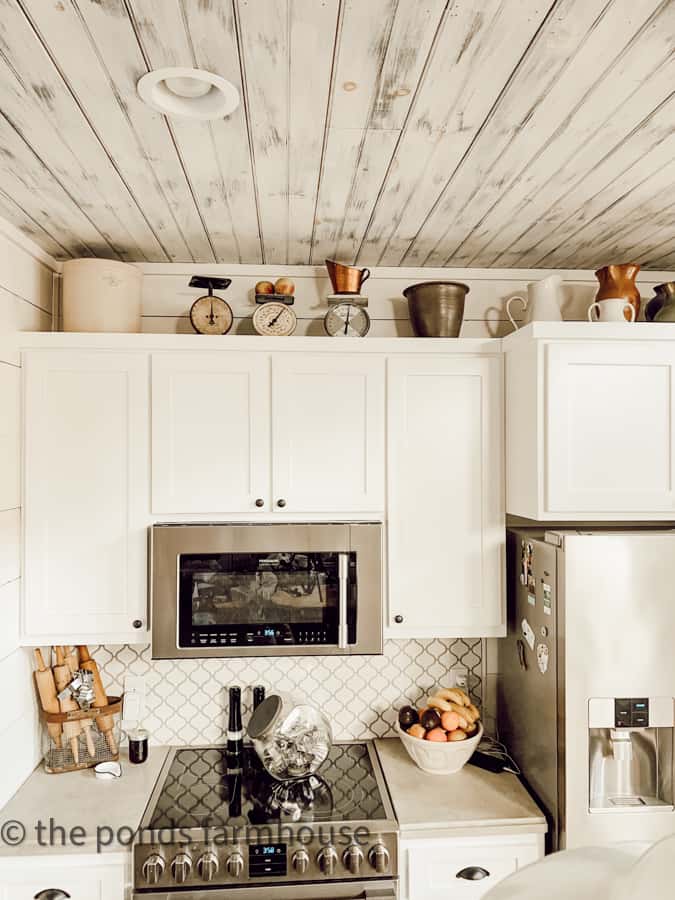
Spacing items evenly across the cabinet run is the most common mistake people make. That approach looks like lining up soldiers rather than creating a curated home.
Arrange Tight Groups of Three to Five
Create mini vignettes by arranging items in tight groupings rather than a straight line. Think of this like a horizontal gallery wall where empty space between clusters is just as important as the decor itself. Each cluster becomes a focal point that draws the eye naturally.
Utilize Odd Numbers for Balance
Use three, five, or seven items within each cluster for the best visual balance. Odd numbers feel more natural and dynamic to the human eye while even numbers can feel static. This simple rule makes your display look professional and thought-out.
Vary Heights Strategically Within Groups
Start with tall items in the back like a high bottle or plant to create depth. Place medium pieces in the middle and short items like small canisters in the front. This layering ensures nothing gets hidden and creates a sense of movement.
Balance Aesthetics with Practical Reality
Styling is creative but it must survive in the real world of cooking and cleaning. You need to consider dust, weight, and stability before finalizing your look.
Avoid Common Dust Traps
Open baskets and intricate carvings collect dust faster than smooth surfaces. If you hate cleaning, opt for sealed wood, smooth ceramics, or closed containers to minimize maintenance. Alternatively, commit to a quarterly deep clean schedule to keep everything fresh.
Mind the Weight Limits Carefully
Do not overload cabinets with heavy stone vases or thick books unless you know they are reinforced. Stick to light to medium-weight items to ensure safety and prevent damage to your cabinetry. The foam lift trick works because it adds height without adding dangerous weight.
Secure Loose Items Firmly
Ensure nothing will fall when you open cabinet doors below or walk past quickly. Keep tall items centered and away from hinges to prevent accidents. Test your work by gently shaking the cabinet to make sure nothing wobbles.
Embrace Evolution in Your Design
Your above cabinet display does not need to be perfect on day one and arguably should not be. Treat the space as evolving decor that grows with your taste.
Swap and Rotate Items Regularly
A yellow box that clashes today might be painted tomorrow to fit better. Even after you style and photograph your display, you will likely tweak it later and that is the point. Let the arrangement breathe and change as you find new pieces or seasons shift.
Let Pieces Tell Your Story
The most powerful above cabinet ideas are personal rather than just pretty. Style that rolling pin from your grandmother with a linen cloth or group job site bottles with a vintage tray. Every piece should mean something or support the mood of warmth and nostalgia.
Choose Between Maximalist and Minimal Styles
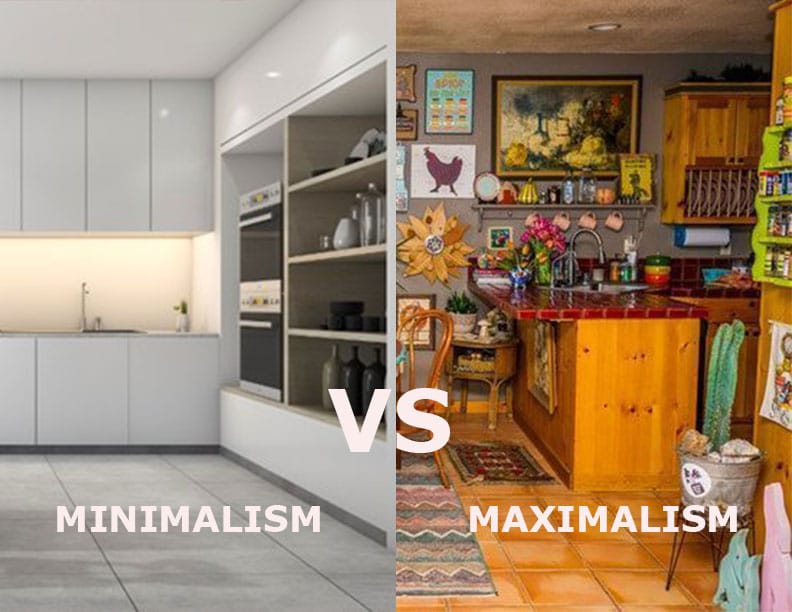
Not everyone wants a filled shelf, so your style should match your personality and goals. You can choose between two distinct aesthetic paths.
Curated Maximalist Look
This approach is ideal for those who love color, texture, and visual interest. Use multiple clusters, mix metals with wood and ceramic, and embrace intentional clutter with purpose. This look suggests your home has history and items were collected over time.
Clean Minimal Approach
Renters or those planning future renovations often prefer leaving the space mostly empty. Use one or two large sculptural items and stick to monochrome tones for symmetry. This look says you care about design but are waiting for the perfect permanent solution.
Plan for Future Kitchen Changes
Styling above cabinets can be part of a long-term design strategy rather than just a temporary fix. Use this space to test ideas before committing to a full renovation.
Bridge to Bold Kitchen Colors
If you plan to paint your kitchen a dark moody plum or burgundy later, use olive green on decor now. This color bridges your current neutrals with your future drama so your current styling is not wasted. It acts as a color transition tool that evolves with your home.
Test Textures Before Building
Use this zone to experiment with layouts and palettes before installing open shelving. If you love how baskets and ceramics look up there, it might confirm that open shelving is right for your future remodel. This low-risk testing ground saves money and regret later.
Final Thoughts on Above Cabinet Ideas
Transforming the gap above your cabinets turns a visual sore spot into a highlight of your kitchen. By cleaning thoroughly, sourcing wisely, and styling in clusters, you create a space that feels collected and personal. Remember that imperfection adds character and evolution is part of the process.
Start by clearing off your cabinets today and gathering three items you already own. Apply these above cabinet ideas to build your first cluster and watch how quickly that empty space becomes your favorite design feature.
Frequently Asked Questions About Above Cabinet Ideas
How do you keep decor from falling off above cabinets?
Secure loose items by keeping them centered and away from cabinet hinges. Test stability by gently shaking the cabinet and ensure tall items are not top-heavy. Using lightweight materials like foam risers also reduces the risk of accidents.
What is the best way to clean above cabinet decor?
Schedule a deep clean every three to six months by removing all items first. Wipe down each piece individually and dust the cabinet surface before returning everything. Choosing smooth ceramics over textured items helps reduce dust accumulation between cleanings.
Can you style above cabinets in a rental home?
Yes, styling is perfect for renters because it requires no demolition or permanent changes. Use lightweight, thrifted items and removable adhesives if needed to avoid damage. This approach adds personality without violating lease agreements or requiring construction.
How high should decor be placed above cabinets?
Items should be tall enough to be visible over the cabinet lip from eye level. Use hidden foam lifts or flipped bases to add height if your objects are too short. The goal is to ensure nothing gets lost in the gap between the cabinet and ceiling.
What colors work best for above cabinet styling?
Choose colors that complement your current kitchen while bridging toward future plans. Olive green is excellent for connecting neutral tones with future dark or bold kitchen colors. Stick to a cohesive palette of three colors maximum to maintain a curated look.
Is it better to fill the whole space or leave gaps?
It is better to use clusters with intentional empty space rather than filling the entire run. Group items in threes or fives and leave breathing room between groups for visual balance. This prevents the area from looking cluttered and overwhelming.