

Attaching a face frame to a cabinet can make or break the entire project. A poorly secured frame leads to gaps, misalignment, and a finished piece that looks anything but professional. The method you choose affects everything from durability to how the final product appears under a stained or painted finish.
This guide walks you through proven attachment techniques, from simple glue and clamps to pocket screws and splines. You will learn which method suits your specific project, how to prevent common mistakes, and how to achieve a flawless, flush fit every time.
Choose the Right Attachment Method
Match Method to Your Project Type
The ideal way to attach a face frame depends on whether the cabinet will be painted or stained, how visible the joints will be, and whether you are working in a custom shop or production environment.
For stain-grade cabinets, where wood grain is showcased, avoid visible fasteners entirely. Use glue with clamps or biscuits instead. For paint-grade builds, minor imperfections can be filled and sanded smooth, so finish nails or pocket screws are acceptable. In production settings, speed matters. Many shops use brads, crown staples, or hot melt glue. For fine furniture, prioritize clean lines and maximum glue surface over assembly speed.
Glue Is the Real Strength
Regardless of which fasteners you choose, wood glue on flat, true surfaces creates the strongest bond. As multiple experts confirm, a well-glued joint with proper clamping produces a connection that is essentially bomb-proof. Mechanical fasteners like biscuits or screws do not add significant strength. They help align parts and hold them in place while the glue dries.
If the face frame and cabinet front edges are flat and square, glue alone can permanently lock the joint. One woodworker reported that removing a glued face frame left chunks of wood behind on the plywood edge, clear evidence of the bond’s strength.
Glue and Clamp Only
Best for Stain-Grade and Fine Furniture
This minimalist method uses only wood glue and clamps. No screws, nails, or biscuits required. Traditional woodworkers favor it for high-end, visible cabinetry where fastener holes would ruin the look.
Steps:
1. Ensure the back of the face frame and front edge of the cabinet carcass are flat and square.
2. Apply wood glue evenly along all contact surfaces.
3. Position the face frame, slightly oversized at 1/16″ to 1/8″ wider than the carcass.
4. Clamp securely using bar clamps or bow clamps.
5. Allow at least 30 minutes of drying time before removing clamps.
Pro Tips:
– Use sawhorses to elevate the cabinet for clamp clearance.
– Bow clamps work better than standard clamps for even pressure distribution.
– For multiple units, stagger glue-ups. Clamp one cabinet while prepping the next.
Why It Works:
Long-grain to long-grain glue contact creates maximum strength. If your carcass is slightly out of square, clamping the face frame can pull it back into alignment. This method also leaves no holes to fill, which is essential for stain-grade work.
Use Pocket Screws for Speed
Ideal for Hidden Fasteners
Pocket screws eliminate the need for clamps and speed up assembly significantly. This makes them popular in kitchen cabinet production. The key is routing screws from the outside of the carcass, where they remain hidden after installation.
Steps:
1. Lay the cabinet on its back.
2. Clamp the face frame at two corners to position it.
3. Mark pocket screw locations, placing them at high spots if the frame is not perfectly flat.
4. Drill pocket holes into the carcass side, not the face frame.
5. Apply glue, then drive screws to pull the frame tight.
Advantages:
– No clamps needed during assembly.
– Screws are invisible once cabinets are installed.
– Allows quick assembly of multiple units.
Avoid These Mistakes:
– Never place pocket holes where they will be visible, even inside the cabinet.
– Do not rely on screws alone. Always use glue for strength.
Pro Tip:
For multi-cabinet runs, add a horizontal screw from one face frame into the next. This aligns units and pulls them tight during installation.
Align with Biscuits
Perfect for Multi-Part Face Frames
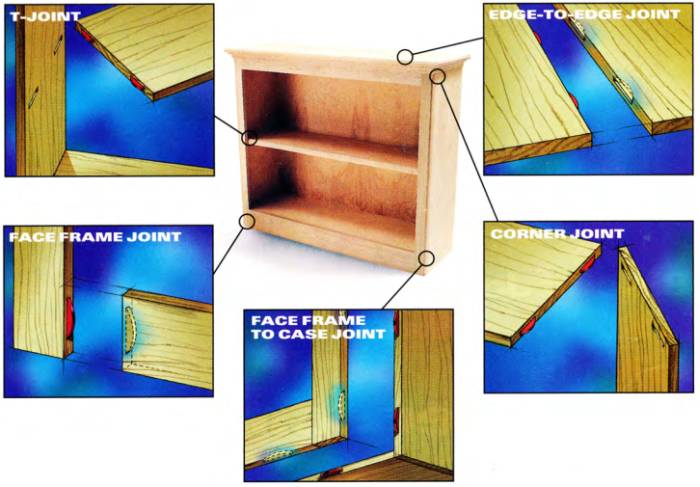
Biscuits are excellent alignment aids, especially when gluing multiple stiles and rails at once. They do not add strength but keep pieces from shifting during clamping. This makes them ideal for natural wood or stain-grade finishes.
Steps:
1. Cut biscuit slots in both the cabinet edges and back of the face frame.
2. Apply glue to all joints and insert biscuits.
3. Position the frame and clamp.
4. Remove clamps earlier than usual. Biscuits stabilize the joint, allowing you to move to the next cabinet while glue sets.
Best Use Cases:
– Paint-grade: Use biscuits for alignment, then glue and clamp.
– Production shops: Use a few biscuits to simplify glue-up without worrying about joint strength.
Expert Insight:
Biscuits make alignment trivial, especially when clamping a dozen face frame members at once. They are not load-bearing, but they save time and prevent frustrating misalignment issues.
Secure with Finish Nails
Fast for Paint-Grade Cabinets
Shooting brads or finish nails from the inside of the cabinet secures the face frame without visible holes. This method is common in production shops where speed is essential.
Steps:
1. Apply glue to the entire contact surface.
2. Position the face frame.
3. Use a brad nailer to shoot nails through the cabinet interior into the back of the frame.
4. Wipe excess glue and let dry.
When to Use It:
– Paint-grade only. Nail holes can be filled and sanded smooth.
– Soft maple face frames are often used for painted cabinets due to cost and workability.
Avoid This:
– Never use nails on fine hardwoods like oak unless holes fall in dark grain patterns.
– Filling nail holes in stained wood is difficult and often looks unprofessional.
Alternative:
Some shops use crown staples in a rabbet, hidden later by a decorative bead. This works well for rabbeted face frames.
Reinforce with Plywood Splines
Hidden Alignment with Extra Glue Surface
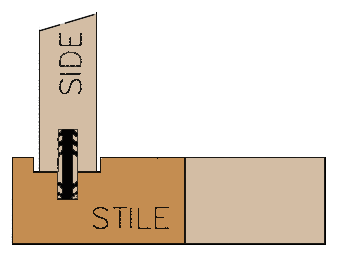
This method uses 1/2″-wide strips of 1/8″ plywood inserted into matching kerfs cut in both the cabinet and face frame. It adds alignment and slightly increases the glue area.
Steps:
1. Cut 1/4″-deep kerfs down the center of the cabinet’s front edges using a table saw.
2. With the same fence setting, cut matching kerfs on the back of the face frame stiles.
3. Apply glue to both surfaces.
4. Insert spline strips into the face frame grooves.
5. Clamp the frame to the cabinet.
Pro Tips:
– Use 6″ spline segments at top, middle, and bottom. Full-length splines are not necessary.
– Lightly sand splines if they fit too tightly due to a thin-kerf blade.
Why It Works:
Like biscuits, splines align parts during glue-up. The real bond comes from the long-grain glue surface. Door skin plywood is available at home centers for about $7 per sheet, making this an economical option.
Try Dado or Tongue and Groove
Mechanical Joints for Precision
For maximum alignment and a professional fit, consider cutting a dado or tongue-and-groove joint between the face frame and cabinet.
Dado Method:
1. Cut a shallow dado in the face frame to fit over the cabinet edge.
2. Apply white glue in the dado.
3. Slide the frame on.
4. Reinforce with hot melt glue inside, which acts as a clamp substitute.
Tongue and Groove:
– Uses router bits to create interlocking edges.
– Provides excellent alignment and more glue surface.
– Requires precise setup but delivers a seamless look.
Best For:
– Custom shops prioritizing speed and accuracy.
– High-end cabinetry where fit is critical.
Prevent Slippage During Glue-Up
Use Alignment Pins or High Spots
Face frames can shift during clamping, especially if not perfectly flat. Prevent movement with these tricks:
Modified Finish Nail Pins:
1. Cut 3 finish nails to 1/4″ long.
2. Drill 3/16″-deep holes in the carcass edge.
3. Insert nails point-up.
4. Press the face frame down. The nails grip and hold position while clamping.
Pocket Screw Trick:
– After corner clamping, drive pocket screws at high spots to pull the frame tight.
Warning:
– Place pins or screws away from future hinge or hardware locations.
Size Frame for Flush Fit
Oversize and Trim After Gluing
Most builders make the face frame 1/16″ to 1/8″ wider than the carcass. This ensures full contact even if the cabinet bows slightly or the wall is uneven.
Why It Works:
– Prevents the carcass from being proud of the face frame, which causes problems when sanding.
– Allows final shaping with a flush-trim router bit.
Flush-Trim Process:
1. Glue and clamp the oversized frame.
2. After drying, use a flush-trim bit with a bearing-guided router.
3. Run it along the face frame edge to trim flush with the carcass.
4. Fill any small gaps with wood filler, then sand with 220-grit paper.
Handle Multi-Cabinet Runs
Pre-Align and Screw Together
For cabinet runs, such as kitchen base units, alignment between face frames is crucial.
Best Practices:
– Build face frames as long assemblies when possible.
– Overhang one frame slightly where cabinets meet.
– Use horizontal screws from one face frame into the next to pull them tight.
– In the shop, clamp units together and install male and female connectors, such as a screw and threaded insert, for field assembly.
If Alignment Fails:
– Accent the seam instead of hiding it. Use a V-groove or core box bit to create a decorative line.
– Test routing on scrap wood first.
Select Method by Finish Type
Paint vs. Stain: What Works Best
| Finish Type | Recommended Method |
|---|---|
| Paint Grade | Glue plus finish nails from inside, soft maple frames, crown staples in rabbet |
| Stain Grade | Glue with clamps, biscuits for alignment, no visible fasteners |
| Natural Wood | Glue with biscuits for easy glue-up and clean appearance |
Key Rule:
– Never use brads or screws where they will be visible in stained wood.
– Pocket screws are acceptable only if hidden on the outside of the carcass.
Frequently Asked Questions About Attaching Face Frames
Can I attach a face frame with just glue and no fasteners?
Yes. Glue alone creates a bomb-proof joint when surfaces are flat and true. The long-grain glue contact provides maximum strength. Clamps hold the frame in place for about 30 minutes while the glue sets.
Are pocket screws strong enough for face frames?
Yes, when combined with glue. Pocket screws eliminate the need for clamps and provide mechanical holding power. Place them on the outside of the carcass where they remain hidden after installation.
Do biscuits add strength to face frame joints?
No. Biscuits are alignment aids, not strength enhancers. They keep pieces from shifting during clamping. The glue provides the actual bond strength.
What is the best method for paint-grade cabinets?
Glue with finish nails shot from the inside works well. Nail holes can be filled and sanded smooth. Soft maple face frames are commonly used for painted cabinets.
How much should the face frame overhang the cabinet?
Make the face frame 1/16″ to 1/8″ wider than the carcass. This allows for full contact even if the cabinet bows. After gluing, trim flush with a router and flush-trim bit.
Can I use finish nails on stain-grade hardwood?
Avoid it. Nail holes in stained wood are difficult to hide and often look unprofessional. Use glue and clamps or biscuits for stain-grade work instead.
Key Takeaways for Attaching Face Frames
The strongest face frame joint starts with flat, true surfaces and quality wood glue. Mechanical fasteners serve as helpers, not heroes. They align parts and hold them in place while the glue dries.
Choose your method based on finish type and visibility. Paint-grade cabinets allow more flexibility with nails and pocket screws. Stain-grade work demands hidden fasteners or none at all. For production efficiency, pocket screws and hot melt glue save significant time. For fine furniture, glue and clamps deliver unmatched quality.
Oversize your face frame slightly and trim flush after gluing. This simple practice accommodates imperfect carcasses and ensures a clean, professional result. Test your technique on scrap wood first, especially when using decorative routing. Then clamp true, trim flush, and build with confidence.


