

Corner cabinets often feel like awkward, hard-to-reach spaces that waste valuable storage potential in your home. Learning how to build corner cabinets transforms these neglected nooks into functional assets using smart geometry and standard materials.
You will discover how to cut precise 45-degree bevels, assemble a segmented back for uneven walls, and install pullout organizers for maximum access. This guide covers every step from material selection to final installation so you can build a custom unit that fits perfectly.
Calculate Exact Dimensions for Your Space
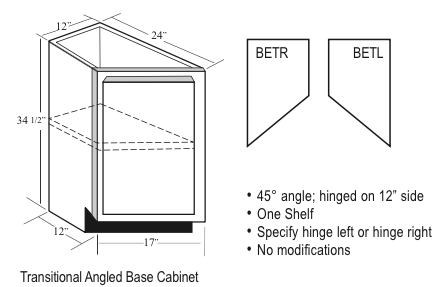
Determining the correct size is the most critical step before cutting any wood. You must decide on the depth based on whether you are building an upper or base cabinet unit.
Determine Side Depth by Cabinet Type
The side depth dictates how far the cabinet extends into the room along the wall.
* Upper cabinets: Standard depth is 12 inches, though 15 inches works well for bridging gaps.
* Base cabinets: Choose between 15 inches or 24 inches to match adjacent cabinetry.
A 17-inch diagonal front opening typically provides about 14 inches of usable interior space. This width is ideal for installing pullout bins or turntables without compromising structural integrity.
Adjust Cuts for Face Frame Loss
If you plan to add a face frame, you must subtract material from your side panel cuts. A 1×3 face frame reduces the effective depth by approximately 1 1/16 inches due to the 45-degree bevel.
* For a 12-inch finished depth, cut plywood sides to 10 15/16 inches.
* For a 15-inch finished depth, cut sides to 13 15/16 inches.
* Frameless designs require no subtraction; simply cut sides to the exact final depth.
Optimize Width for Doorway Transport
Cabinets wider than 27 inches may not fit through standard doorways during installation. You can solve this by beveling the back corners at 45 degrees to trim the overall footprint. Cut the top and bottom back panels 6 inches shorter than the full width and fill the rear gap with a small diagonal piece. This modification allows the unit to pass through doors while conforming to uneven walls.
Select Durable Materials for Longevity
Choosing the right materials ensures your cabinet withstands daily use and moisture. Plywood offers the best balance of strength and stability for the main box structure.
Use Plywood for the Cabinet Box
Construct sides, top, bottom, and shelves using ¾” plywood. This thickness provides excellent rigidity and holds pocket screws securely. One full sheet often yields all parts for a single unit.
* Use ½” plywood for the back panel to reduce weight and cost if desired.
* Apply edge banding to exposed front edges of shelves and the bottom panel.
* Avoid particleboard as it swells when wet and fails to hold screws over time.
Choose Hardwood for the Face Frame
Select 1×3 hardwood like White Oak or Hard Maple for the face frame stiles. These species resist denting and wear better than softer options.
* Avoid Poplar because it dents easily around door edges and shows wear quickly.
* Never use 1×2 lumber for stiles since the 45-degree bevel leaves only about ¾” of width.
* Use 1×2 lumber only for non-structural trim applications.
Gather Essential Fasteners and Glue
Secure your build with the correct hardware for lasting bonds.
* Use 1¼” screws for face frames and trim work.
* Drive 2″ screws for assembling the main box structure.
* Apply wood glue on all joints for strength, especially on face frames.
* Use brad nails with glue to hold frames in place while curing.
* Apply superglue (CA glue) to temporarily hold small stretchers during assembly.
Utilize Precision Tools for Accurate Cuts
Accuracy is paramount when cutting angles for corner units. The right tools ensure clean lines and tight joints that look professional.
Cut Angles with Track or Table Saws
A track saw is ideal for making long, straight 45-degree bevels on side panels safely.
* Use a circular saw with a guide as an acceptable alternative if you mark lines clearly.
* Employ a miter saw to cut face frame stiles and trim at exact 45-degree angles.
* Run side panels through a table saw to rip them to width and bevel edges efficiently.
* Always test your cuts on scrap wood before cutting your final pieces.
Maintain Joinery Equipment Properly
Keep your drilling tools in top condition to ensure square and secure joints.
* Use a pocket screw jig with a platform style for improved alignment during box assembly.
* Clean guide holes with a hole cleaner bit to remove sawdust and glue buildup.
* Drill shelf pin holes on both side panels and the diagonal back piece before attaching the face frame.
Leverage 3D Printing for Custom Solutions
Modern builders use 3D printing to create custom jigs and storage solutions quickly.
* Print drawer front spacers that slip onto corners for perfect spacing during installation.
* Design custom bins in CAD software like Fusion 360 for specific pullout organizers.
* Create specialty holders for coffee pods or spices tailored to your corner depth.
* Use printed spacer jigs attached to the cabinet bottom to set the first drawer position accurately.
Assemble the Cabinet Box Structure
Follow a logical sequence to assemble the box while maintaining squareness and alignment throughout the process.
Cut and Bevel Side Panels Precisely
- Rip ¾” plywood strips to your calculated width.
- Bevel one long edge of each side panel at 45 degrees using your saw.
- Sand all pieces thoroughly before beginning assembly.
These beveled edges will form the inner corner where the walls meet inside your kitchen or bathroom.
Attach Top Bottom and Sides
- Drill pocket holes on the ends of your top and bottom panels.
- Position the bottom panel 1.5 inches up from the base for toe kick clearance.
- Secure the top panel flush with the tops of the side panels.
- Apply wood glue and use clamps to ensure everything stays square.
Check your work with a framing square before the glue sets permanently.
Install the Segmented Back Panel
Use a diagonal back design with a gap to adapt to crooked walls effectively.
1. Cut two rectangular back panels that are 6 inches shorter than the total width.
2. Cut a small diamond-shaped filler piece to fit the rear gap.
3. Bevel the front and back corners of the upper and lower sections to match the profile.
4. Attach panels with pocket screws and reinforce with wood screws into the top and bottom.
5. Drive screws at an angle through the side panels into the diagonal filler piece.
Add a Corner Stretcher for Rigidity
Install a cross-brace across the back interior corner to prevent racking. Cut a strip of ¾” plywood or hardwood to fit diagonally. Temporarily glue it in place with superglue, then drive screws through both sides for permanent rigidity.
Construct and Mount the Face Frame
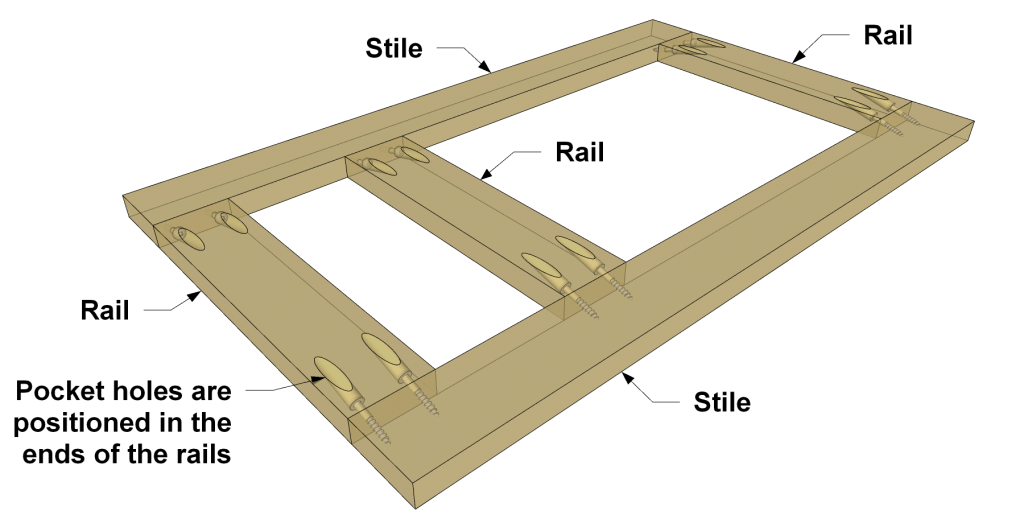
Building the frame separately allows for easier finishing and cleaner installation on the main box.
Build the Frame Separately
Construct the face frame off the cabinet box to ensure clean lines and easy access.
1. Cut 1×3 hardwood stiles with 45-degree bevels to match the cabinet angle.
2. Cut top and bottom rails square to connect the stiles.
3. Join pieces using pocket screws, dowels, or glue and brad nails.
Finish Before Installation
Paint or stain the face frame before attaching it to the cabinet box. This approach avoids brush marks in tight corners and ensures full coverage on all surfaces. Let the finish dry completely before proceeding.
Mount Flush and Secure
- Use clamps or a dog hole grid with stops to hold the frame perfectly flush.
- Apply wood glue to the cabinet edges where the frame will sit.
- Nail with brad nails and let cure for 24 hours for maximum strength.
The frame must fully cover raw plywood edges to provide a clean, professional appearance.
Fit Out the Interior for Maximum Utility
Transform dead space into prime storage by choosing the right interior configuration for your needs.
Install Adjustable Shelves
Cut shelves to match the top and bottom shape but make them 1/4″ smaller in width and depth.
1. Bevel front and back corners to follow the diagonal line of the cabinet.
2. Apply edge banding to the front edge for a finished look.
3. Ensure you drilled full columns of shelf pin holes during box assembly.
Test the fit of each shelf before applying any final finishes to the interior.
Upgrade with Pullout Organizers
Fixed shelves often waste deep corner space, so consider pullout organizers as a superior upgrade.
1. Install a ¾” spacer to clear the depth of the face frame.
2. Set the pullout tray into the bottom of the cabinet.
3. Attach the door directly to the organizer so it moves as one unit.
This setup eliminates the “junk drawer” effect and brings items forward for easy access.
Add 3D Printed Bins
Custom-printed bins can maximize utility in unique ways. Slide them onto spacers for adjustable depth or connect them via pins to drawer sides. Design two-tier layouts for pots, lids, coffee pods, or spices using durable PLA or PETG filament.
Install the Cabinet Securely

Proper installation ensures your new cabinet functions smoothly and remains level over time.
Decide on Base Strategy
Your approach depends on how many cabinets you are installing in the run.
* Single cabinet: Build the toe kick into the box with no separate base needed.
* Two cabinets: Clamp and fasten them together, then level as a pair.
* Three or more: Build a separate base platform, level it once, and let all cabinets sit on it.
Execute Mounting Steps
- Fill screw holes and gaps with wood filler, then sand smooth after drying.
- Apply primer and paint or stain, letting it cure fully before installation.
- Lift into place with help, using shims to level front-to-back and side-to-side.
- Secure to wall studs through the back panel for stability.
- Clamp to adjacent cabinets before final screwing to ensure tight seams.
- Attach hinges and hang the door, using specialty hinges for frameless angled cabinets if needed.
Finish with Molding
Add crown molding to the top or base molding to the bottom for a polished look. This bridges gaps between the cabinet and wall or floor while hiding minor installation imperfections.
Pro Tips for Long-Term Success
Avoid common pitfalls to ensure your project stands the test of time and usage.
Avoid Common Mistakes
- Using Poplar for face frames: Stick to Oak or Maple to prevent denting.
- Skipping edge banding: Exposed plywood absorbs moisture and looks unfinished.
- Drilling shelf holes late: Drill holes during box assembly before the frame blocks access.
- Ignoring wall irregularities: Use the segmented back design for a forgiving fit.
Maximize Usability
- Choose pullouts over fixed shelves: They turn difficult corners into prime storage.
- Bevel back corners: This is essential for cabinets over 27 inches wide for transport.
- Match wood species: Ensure your face frame matches existing kitchen cabinets.
Maintain and Upgrade
- Clean spills quickly: Wipe the bottom panel regularly to prevent damage.
- Reconfigure shelves: Extra shelf pin holes allow you to adapt storage over time.
- Print new bins: Update your storage solutions as your needs change.
Frequently Asked Questions About Building Corner Cabinets
What is the standard depth for a DIY corner cabinet?
Upper cabinets are typically 12 inches deep, while base cabinets range from 15 to 24 inches. You must adjust side panel cuts by 1 1/16 inches if adding a face frame to achieve these finished depths.
Why should I avoid using Poplar for the face frame?
Poplar is a soft wood that dents easily, especially around door edges and high-traffic areas. White Oak or Hard Maple provides superior durability and resists wear over time.
How do I get a large corner cabinet through a standard doorway?
Bevel the back corners at 45 degrees to reduce the overall footprint without losing interior space. Cabinets wider than 27 inches often require this modification for successful transport.
Can I use 3D printing to help with cabinet organization?
Yes, you can print custom spacer brackets, drawer front aligners, and tailored storage bins. These tools help with precise alignment during installation and maximize storage utility inside the unit.
Should I build a separate base for multiple cabinets?
If installing three or more cabinets, build a separate base platform to ensure a perfectly level run. For single units or pairs, you can integrate the toe kick or level them together directly.
Key Takeaways for How to Build Corner Cabinets
Building a corner cabinet transforms awkward space into functional storage using simple geometry and quality materials. Focus on precise 45-degree cuts, use hardwood for durability, and consider pullout organizers to maximize accessibility.
Start your project by calculating exact dimensions and gathering plywood, hardwood, and necessary tools. With careful planning and execution, you can create a custom unit that fits perfectly and lasts for years.


