

Painting metal cabinets is a cost-effective way to refresh outdated furniture, revitalize thrift store finds, or match your space with current decor. Whether you’re working with a metal file cabinet, storage locker, or kitchen-style metal cabinetry, a proper paint job can transform its look and extend its life. The key to success lies in surface preparation—cleaning, rust removal, and priming—which ensures long-lasting adhesion and a professional finish. Without these steps, even the best paint will chip, peel, or bubble over time.
In this guide, you’ll learn exactly how to paint metal cabinets with durable, smooth results. You’ll discover the right materials, proven techniques to avoid brush strokes, and smart styling upgrades that go beyond paint. By the end, you’ll be equipped to tackle your project confidently, no matter the condition of the metal.
Clean Thoroughly Before Painting
Why Cleaning Is Critical
Even if your metal cabinet looks clean, it likely has invisible grime, oils, and dust that block paint adhesion. Skipping cleaning is the top reason paint fails on metal. Fingerprints, kitchen grease, or factory residue create weak spots where paint lifts over time. A deep clean ensures a fresh, uniform surface that accepts primer and paint evenly.
Deep Cleaning Process
- Remove shelves and hardware – Take out drawers, shelves, knobs, and handles.
- Spray with Simple Green – Apply generously to all metal surfaces.
- Wipe with microfiber cloth – Use firm pressure to lift grime.
- Rinse with clean water – Remove all cleaner residue.
- Dry completely – Wait until no moisture remains before moving on.
For stubborn areas like sticker residue or built-up grime, use a razor scraper gently to avoid scratching. Never skip rinsing, since leftover cleaner can interfere with priming. Allow the cabinet to air dry for at least 1 to 2 hours in a well-ventilated area.
Remove Rust and Surface Flaws
Identify Rust Early
Rust weakens metal and spreads under paint if not treated. Inspect corners, seams, and bottom edges, which are common rust zones. Surface rust appears as reddish-brown spots or powdery patches. Deep rust with pitting needs more aggressive treatment but can still be painted over if stabilized.
Treat Rust with Rust Dissolver
Use Rust-Oleum Rust Dissolver for safe, effective rust removal:
- Apply with a brush or cloth to affected areas.
- Do not let it dry, as this is critical. Wipe or rinse it off within 10 to 15 minutes.
- Rinse with fresh water and dry thoroughly.
Warning: If rust remover dries, it can strip the original finish and leave spotty patches. However, if you’re painting the entire cabinet, this won’t affect the final result. Just proceed with priming.
Smooth Surface Imperfections
After rust removal, lightly sand rough areas with medium-grit sandpaper (120 to 180 grit). This evens out the surface and helps primer adhere. Wipe away sanding dust with a clean, dry microfiber cloth before priming.
Choose the Right Primer
When to Prime Metal
Priming is highly recommended for metal cabinets. It improves paint adhesion, blocks moisture, and extends the life of your finish. While alternatives exist, primer remains the most reliable option, especially for cabinets in high-touch or humid environments.
Select Primer by Rust Condition
| Metal Condition | Recommended Primer |
|---|---|
| No rust | Rust-Oleum Stop Rust Clean Metal Primer |
| Rust present | Rust-Oleum Stop Rust Rusty Metal Primer |
Both are oil-based, durable, and formulated specifically for metal. They prevent future corrosion and create a strong base for topcoats.
Apply Primer Correctly
- Use a synthetic brush or small roller for even coverage.
- Apply one thin, even coat and avoid drips.
- Let dry completely (typically 2 to 4 hours, check the label).
- Lightly sand with fine-grit sandpaper (220 grit) to smooth.
- Wipe away dust with a microfiber cloth.
Pro Tip: Tape off wheels, drawer slides, or other parts you don’t want painted using painter’s tape.
Skip Primer? Use a Deglosser
Deglosser as an Alternative
If you prefer to skip primer, use a surface prep deglosser like Heirloom Traditions Paint deglosser. It chemically etches the surface, removing gloss and creating a “tooth” for paint to grip.
How to Apply Deglosser
- Apply with a clean cloth or sponge in circular motions.
- Work in sections until the surface feels slightly rough.
- Wipe off residue and let dry (15 to 30 minutes).
- Proceed directly to painting.
Note: Skipping primer may require three paint coats instead of two for full coverage. This can increase cost and drying time, especially with premium paints.
Paint Your Cabinet Like a Pro
Choose the Best Paint Type
Not all paints bond well to metal. Recommended options include:
- Chalk paint – Matte finish, minimal prep needed, popular for furniture makeovers.
- Spray paint – Smooth, even coverage; ideal for intricate hardware or grills.
- Furniture paint (e.g., Irish Garden) – Durable, wipeable, and available in rich colors.
Avoid standard wall paint, since it lacks the binders needed for metal durability.
Pick a Complementary Color
Match your cabinet to the room’s palette. For example:
- Blue-gray pairs well with soft pinks and florals, great for she sheds.
- Bright white on lids or trim adds vintage charm.
- Avoid clashing tones and test samples if unsure.
Apply Paint with No Brush Strokes
Brush marks are common on metal. Eliminate them with these techniques:
For brush painting:
- Use a high-quality synthetic brush.
- Apply thin, even coats.
- Immediately dab a sponge over wet paint to flatten ridges.
- Use a sponge roller for large, flat surfaces.
For spray paint:
- Work in a ventilated area.
- Hold the can 8 to 12 inches from the surface.
- Use light, even sweeps; 2 to 3 thin coats beat one thick one.
Final smoothing:
- Use a foam roller on the last coat for a glass-like finish.
Apply Multiple Coats for Coverage
How Many Coats You Need
- With primer: 2 coats of paint usually suffice.
- Without primer: Expect to apply 3 coats.
- Drying time: Allow 2 to 4 hours between coats (check the paint label).
Apply the first coat lightly, since it’s a base layer. The second fills in and evens color. A third coat covers any thin spots, especially on textured or pitted metal.
Paint Interior and Exterior
Most projects involve painting both inside and outside for a cohesive look. However, you can:
- Use different colors for contrast (e.g., white interior, colored exterior).
- Apply primer only to the exterior and use deglosser on the interior to save time.
Ensure all surfaces are clean and dry before painting.
Seal for Long-Lasting Protection
Why Sealing Is Essential
Metal cabinets get touched, bumped, and wiped. Without a sealer, paint can scratch or wear down quickly, especially on drawer fronts and handles.
Choose the Right Topcoat
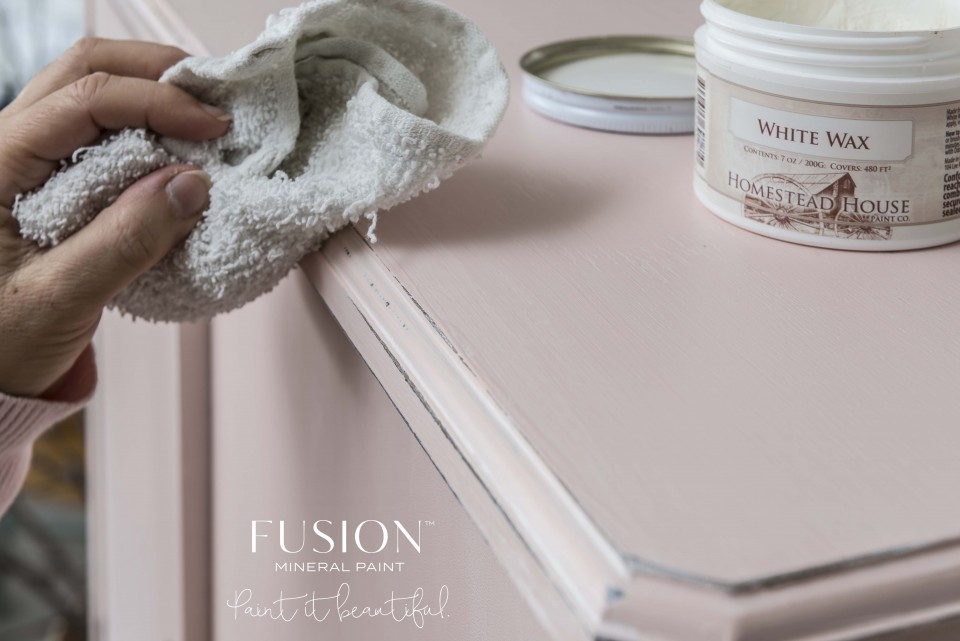
- Clear wax: Best for chalk paint. Adds soft sheen and protection.
- Apply with a lint-free cloth.
- Buff after 10 to 15 minutes for a smooth finish.
- Polyurethane: More durable for high-traffic cabinets.
- Use water-based for clarity and low odor.
- Apply with a brush or foam applicator.
Allow the sealer to cure fully (24 to 48 hours) before reassembly.
Reassemble and Style Your Cabinet
Reattach Hardware and Shelves
Once fully dry:
- Reinstall shelves, drawers, and slides.
- Reattach original knobs, or upgrade to new ones.
Design Tip: Replace old handles with modern pulls or colorful knobs for instant style.
Add Decorative Touches
- Insert a small lamp or decorative storage boxes inside.
- Use coordinating folders if used for filing.
- Style the top with plants, books, or office supplies.
Upgrade with Magnetic Storage

Attach DIY Magnetic Boxes
Maximize vertical space by adding magnetic storage:
- Create small wooden or pegboard boxes.
- Cover with wallpaper or paint to match your theme.
- Attach strong rare-earth magnets to the back.
- Stick directly to the metal cabinet sides.
Use them for:
- Tape, notepads, pens
- Sticky notes or scissors
- Craft supplies or office tools
Add Hooks for Extra Storage
Install small metal hooks on the sides:
- Hang headphones, keys, or tote bags.
- Great for home offices or kids’ rooms.
Bonus: Use the bottom shelf as an “inbox” for papers or mail.
File Cabinet-Specific Tips
Organize with Style
Fill your painted file cabinet with:
- Decorative folders in matching colors.
- Labelled tabs for systems like GTD (Getting Things Done).
- Snack storage if repurposed for kitchen or pantry use.
Replace Lost Locks
Many thrifted file cabinets lack keys. Fix this by:
- Reading the code on the lock face (e.g., “S07”).
- Searching online (Amazon, eBay) for matching replacement keys.
- Testing the key before final reassembly.
This simple fix restores security and function.
Work Safely and Efficiently
Ventilate Your Workspace
Always paint in a well-ventilated area. Open windows, use fans, or work outdoors. This reduces fumes from primers, paints, and solvents, especially spray products.
Protect Floors and Fixtures
- Lay down a drop cloth or cardboard.
- Use painter’s tape to mask off non-target areas.
- Cover nearby furniture or walls if spray painting.
Respect Drying Times
Rushing between steps causes smudges, dust pickup, and poor adhesion. Follow manufacturer times:
- Primer: 2 to 4 hours
- Paint: 2 to 6 hours
- Sealer: 24+ hours for full cure
Pro Tips for Best Results
Never Skip Cleaning
Even brand-new metal has oils from manufacturing. Always clean before any other step.
Rinse After Cleaning
Leftover cleaner residue can prevent adhesion. Always rinse with water and dry completely.
Use Quality Tools
Cheap brushes leave bristles and streaks. Invest in:
- Synthetic bristle brush
- Foam roller
- Lint-free cloths
Fix Mistakes Early
If paint bubbles or peels, sand down and re-prime. It’s easier to fix before sealing.
Save Money with Primer
High-end furniture paint is expensive. Using primer reduces the number of paint coats needed, saving $20 to $30 per project.
Frequently Asked Questions About Painting Metal Cabinets
Can you paint metal cabinets without sanding?
Yes, you can skip sanding if you use a deglosser or a high-quality primer. Clean the surface thoroughly, then apply a deglosser like Heirloom Traditions Paint to create a rough texture for paint to grip. Alternatively, use a metal-specific primer that bonds without sanding.
What kind of paint do you use on metal cabinets?
Chalk paint, spray paint, and furniture paint (like Irish Garden) work best on metal cabinets. These paints have binders that adhere well to metal surfaces. Avoid standard wall paint, which lacks the durability needed for metal.
Do I need to prime metal before painting?
Priming is highly recommended for metal cabinets. It improves adhesion, blocks moisture, and prevents rust from bleeding through. Use Rust-Oleum Stop Rust Clean Metal Primer for rust-free metal, or Rusty Metal Primer if rust is present.
How many coats of paint does a metal cabinet need?
With primer, two coats of paint usually provide full coverage. Without primer, you may need three coats. Always allow each coat to dry completely before applying the next, typically 2 to 4 hours.
How do you get smooth results when painting metal cabinets?
Use a high-quality synthetic brush, apply thin even coats, and dab a sponge over wet paint to flatten brush strokes. A foam roller on the final coat creates a glass-like finish. For spray paint, use light sweeping motions from 8 to 12 inches away.
Can you paint over rust on metal cabinets?
Yes, but you must treat the rust first. Apply Rust-Oleum Rust Dissolver to affected areas, rinse with fresh water, and dry thoroughly. Then use Rust-Oleum Stop Rust Rusty Metal Primer before painting.
Key Takeaways for Painting Metal Cabinets
Painting metal cabinets is a simple DIY project that delivers big visual impact. The secret is preparation: clean, repair, prime, and protect. Follow these steps, and you’ll achieve a smooth, durable finish that looks professionally done.
Start by cleaning thoroughly with Simple Green, rinsing, and drying completely. Remove rust with a dissolver, prime with the right product, and apply 2 to 3 coats of quality paint. Seal with clear wax or polyurethane for long-lasting protection.
Whether you’re refreshing an old office cabinet or upcycling a thrift store find, your newly painted metal cabinet will serve you beautifully for years to come. Gather your supplies, set up a ventilated workspace, and begin your transformation today.


