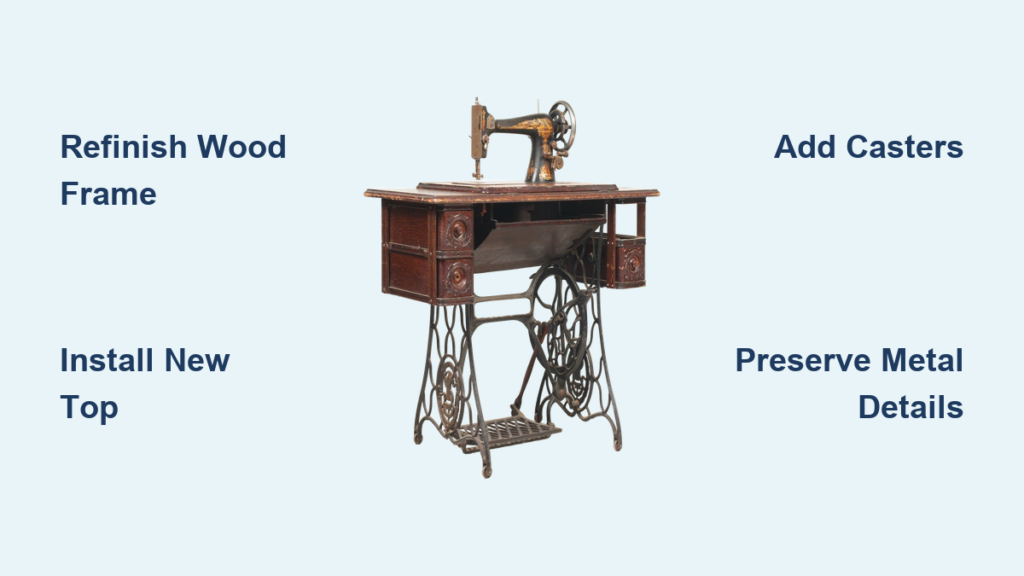
You found a vintage Singer cabinet with cast iron legs and solid wood, but you need fresh old sewing machine cabinet ideas to make it work in your modern home. These durable relics offer industrial charm and hidden storage that mass-produced furniture simply cannot match.
This guide reveals how to transform that heavy base into a stylish side table, functional desk, or unique kitchen island using proven techniques. You will learn specific restoration steps, ten distinct design styles, and smart ways to preserve historical mechanical details.
Transform the Base Into a Stylish Side Table

Converting your cabinet into a side table is the most popular choice because the compact footprint fits perfectly in living rooms or hallways. The original cast iron frame provides a sturdy foundation that requires minimal structural changes to become a Statement piece.
Select a Solid Cabinet Foundation
Inspect the cast iron legs and wooden frame for stability before starting any work. Look for models where the base sits level without major cracks or significant wood rot compromising the structure.
Refinish the Wood Frame Completely
Sand the existing wood thoroughly to remove old finishes and reveal the warm undertones beneath the surface. Apply a primer followed by paint colors like white for shabby chic or black for an industrial aesthetic.
Install a Custom Wood Top
Replace the original drop-leaf top if it feels too small or awkwardly shaped for your specific space needs. Cut a new slab from reclaimed barn wood or walnut to sit flush with the cabinet frame for a clean look.
Preserve the Industrial Metal Details
Leave the cast iron sides untouched to showcase their natural patina and golden tones that develop over decades. A light polish enhances these raw metal features while contrasting beautifully with your refined wood top.
Convert the Unit Into a Functional Desk
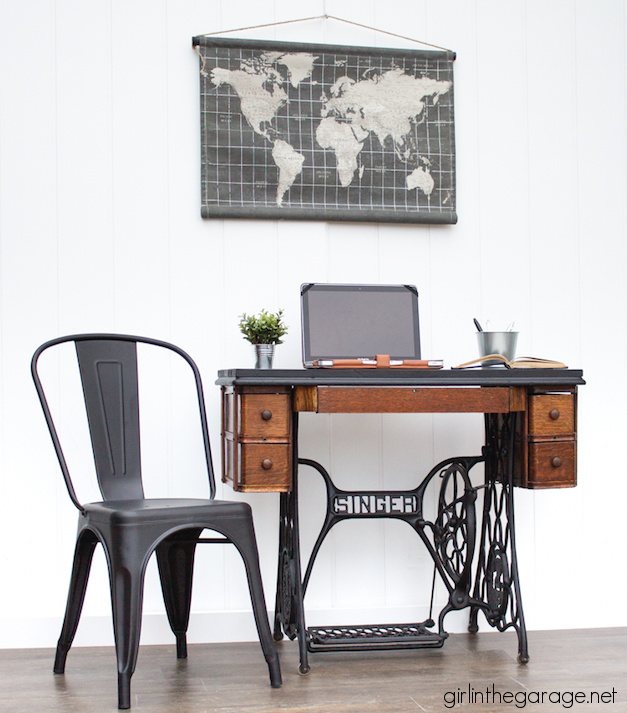
A vintage sewing machine cabinet makes an excellent compact writing desk or secretary station if you modify the drop-down leaf correctly. This conversion maximizes the built-in storage while providing a dedicated workspace for your home office.
Modify the Drop-Leaf Mechanism
Check that the leaf opens smoothly and supports weight without wobbling or collapsing under pressure. Reinforce old hinges if needed and sand the writing surface before adding leather or contact paper.
Optimize Legroom and Seating Height
Remove the treadle mechanism if it restricts leg space or keep it intact for a bold historical statement piece. Most cabinets sit at 28 to 30 inches tall which works well for standard seating arrangements.
Organize Drawers for Productivity
Use the deep drawers to store pens notebooks or sewing supplies securely out of sight. Line the interiors with patterned wallpaper or felt to protect your items and add a polished finish.
Style as a Black Secretary Desk
Paint the entire unit matte black for a sleek modern look that fits minimalist or Art Deco interiors. Pair this dark finish with brass hardware and a marble-look laminate top for extra luxury.
Create a Mobile Kitchen Prep Island
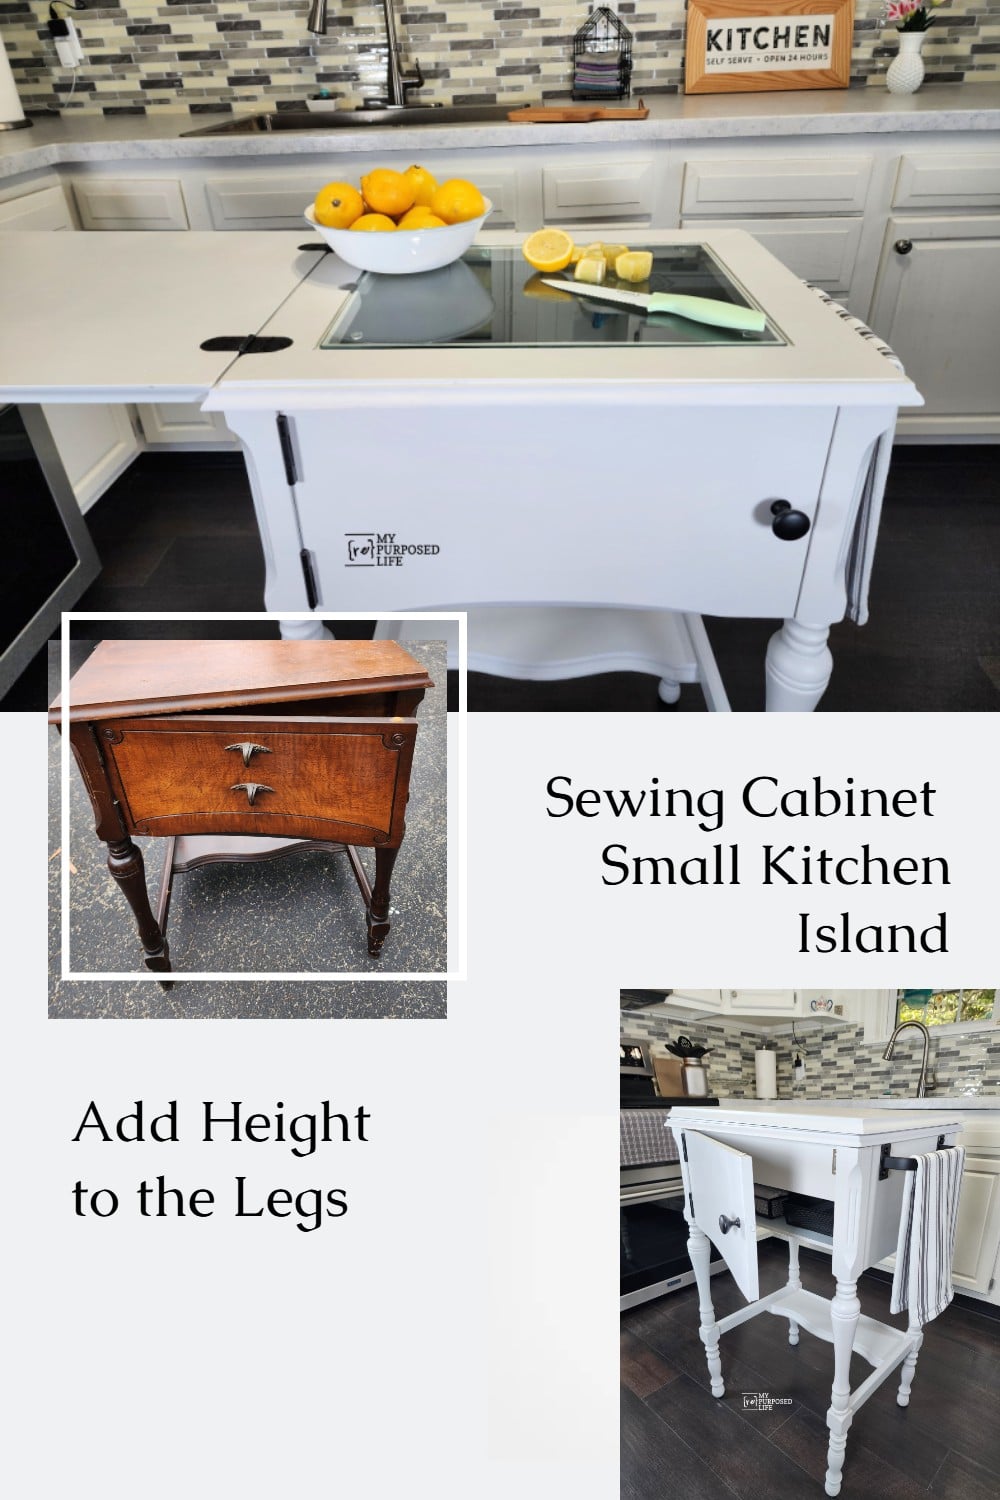
Leverage the inherent height and sturdiness of your cabinet by turning it into a mobile kitchen island or beverage station. This transformation adds valuable prep space while utilizing the deep storage capacity for kitchen essentials.
Reinforce the Structural Joints
Ensure all joints are tight and legs are stable before adding heavy countertops or appliances. Add corner braces using vintage-style iron brackets if the frame needs extra support.
Install a Durable Countertop Surface
Use butcher block marble tile or quartz to create a food-safe prep space that resists moisture and heat. Size the new top to overhang slightly so you can add towel hooks or bar seating.
Add Functional Kitchen Upgrades
- Install a sliding chopping board that covers the top when not in use
- Mount a small sink or wine rack underneath for extra utility
- Use internal drawers for spice storage or utensil organization
Match the Farmhouse Aesthetic
Whitewash the wood or paint it cream with light distressing to achieve a classic farmhouse look. Add a chalkboard panel on the front door for writing grocery lists or daily recipes.
Build a Rolling Bar Cart Conversion
Turn your cabinet into a conversation-starting bar cart with minimal modifications and some creative styling choices. This project works especially well if you want a mobile serving station for entertaining guests.
Remove the Treadle Mechanism
Take out the treadle mechanism to create more under-cabinet storage space for bottles and glassware. Alternatively keep it as a sculptural base and add a glass shelf above for display.
Add Casters for Easy Mobility
Attach locking swivel wheels to the bottom of the cabinet to make moving it effortless. Choose industrial-style metal casters that complement the existing cast iron components.
Style the Interior Storage
- Use one drawer specifically for cocktail tools and openers
- Store bottles on lower shelves for easy access during parties
- Add LED strip lighting inside the cabinet for ambient evening lighting
Choose a Bold Color Scheme
Paint the frame navy blue or deep green to create a nautical bar cart theme. Use rope detailing or anchor motifs on the sides to enhance the maritime vibe.
Repurpose Drawers as Wall Shelves

Do not limit your creativity to the full cabinet since individual drawers make stunning wall-mounted displays on their own. This approach preserves sewing history while creating functional wall art for any room.
Remove and Clean Drawers Carefully
Take drawers out carefully while preserving original hardware like knobs and runners. Sand and refinish the wood optionally distressing edges for a curated vintage look.
Mount Vertically on the Wall
Use heavy-duty brackets or French cleats to hang drawers horizontally or vertically in a gallery arrangement. Space them evenly to create a balanced visual display on your wall.
Display Themed Collections
- Arrange sewing notions like vintage thimbles spools and pincushions
- Showcase miniature machines or tiny decorative sewing machines
- Organize craft supplies like ribbons buttons and fabric swatches
Add Backing for Visual Depth
Line the back with patterned wallpaper fabric or mirrored contact paper to enhance visual appeal. This backing protects your walls and makes the displayed items pop against the background.
Honor History With a Mechanical Tribute Table
Preserve the full sewing mechanism including the treadle and flywheel to turn the unit into a functional art piece. This approach honors the engineering marvel of the past while providing a unique table surface.
Keep the Treadle Intact
Do not remove the foot pedal or drive belt since these moving parts tell the story of operation. Leaving them visible allows guests to appreciate the mechanical complexity of the machine.
Build a Glass or Wood Top
Create a flat surface large enough for lamps books or drinks without hiding the mechanism below. A glass top lets you view the mechanics while a solid wood top offers more utility.
Highlight the Flywheel Feature
Position the cabinet so the flywheel is visible from multiple angles in your living space. Use a small spotlight or LED puck light to draw attention to its intricate craftsmanship.
Use in Living or Entry Spaces
This style works well as a statement entry table or a conversation-starting living room centerpiece. It serves as a reminder of domestic history while functioning as modern furniture.
Explore Ten Unique Design Styles
Give your cabinet a distinct personality by choosing one of these proven aesthetic themes for your renovation project. Each style uses specific colors and hardware to achieve a cohesive look.
Vintage Revival With Pastels
Paint the cabinet mint green butter yellow or dusty rose for a soft nostalgic feel. Add antique brass knobs and stenciled floral patterns on the doors for extra charm.
Shabby Chic Two-Tone Finish
Apply a base coat in white then lightly sand edges to reveal a gray or sage undercoat. Line drawer interiors with lace-patterned contact paper and use a wax finish.
Farmhouse Charm With Chalkboard Front
Whitewash the wood to let grain show through and install a removable chalkboard panel on the front. Pair with iron cup pulls for authenticity and rustic appeal.
Bohemian Dream With Hand-Painted Art
Use terracotta teal or mustard paint as a base and add hand-painted mandalas. Attach macramé side panels or hang tassels from drawer pulls for texture.
Mid-Century Modern Minimalism
Choose avocado green coral or mustard with geometric tape patterns for a retro vibe. Use sleek black metal pulls and keep lines clean without ornate details.
Rustic Industrial With Exposed Metal
Paint the wood dark gray or black and leave cast iron sides in their natural gold patina. Add leather straps across corners or pipe shelf brackets for edgy contrast.
Whimsical Fairy Tale Cabinet
Paint soft pastels and add fairy lights inside the cabinet for a magical glow. Hand-paint castles or forests and use mirrored glass inserts for depth.
Nautical Theme With Rope Details
Use navy white and sand colors while wrapping rope around the legs or frame. Paint anchors or compasses on the sides and use a ship’s wheel as a pull.
Art Deco Glamour Style
Paint high-gloss black and add gold sunburst motifs or geometric patterns. Use chrome hardware and mirrored drawer fronts for a luxe entryway look.
Personalized Keepsake Cabinet
Paint a family name quote or monogram in cursive using custom stencils for precision. Add photo corners to the door or a tiny mirror in a small drawer.
Master the Restoration Process
Follow these proven techniques to transform your cabinet safely and beautifully without damaging vintage components. Proper preparation ensures your finished piece lasts for decades.
Disassemble With Care
Use a precision screwdriver instead of a drill to remove old straight screws that strip easily. Work slowly and apply penetrating oil if the fasteners feel stuck.
Sand and Reveal Wood Grain
Strip old paint and varnish with coarse then fine-grit sandpaper to reveal reddish undertones. Clean with a tack cloth before priming to ensure proper adhesion.
Prime and Paint for Durability
Use oil-based primer on bare wood to prevent tannin bleed and ensure a smooth finish. Apply 2 to 3 coats of paint with a foam roller letting dry fully between coats.
Distress and Wax for Authenticity
Lightly sand edges and corners to mimic age then apply clear or dark wax with a lint-free cloth. Buff for a soft sheen that protects and enhances the patina.
Line Drawers for Style
Use peel-and-stick wallpaper or contact paper to line interiors and prevent paint peeling. This adds a pop of pattern when drawers open and protects against humidity.
Modify Cast Iron Components
The metal parts are not just structural supports but design assets that define the character of your piece. You can cut shape or preserve these elements to suit your specific vision.
Cut and Shape With a Grinder
Use a metal grinder to trim or reshape cast iron legs or braces for a custom fit. Wear safety gear and work slowly to avoid overheating the metal.
Use Asymmetry as a Feature
Slight imperfections or uneven edges can be hidden by angling the piece or using it as a decorative brace. One project spelled “Singer” using cut iron pieces creatively.
Preserve the Natural Patina
Avoid painting over gold-toned cast iron unless necessary for your specific design theme. A light coat of clear sealant protects without dulling the finish.
Source and Select the Best Cabinet
Not all vintage cabinets are created equal so choose wisely to ensure a successful project outcome. Inspect potential purchases thoroughly before bringing them home.
Inspect for Structural Integrity
Check for solid wobble-free legs and intact drawer runners before buying. Ensure there is no major wood rot or insect damage compromising the frame.
Look for Character Features
Scars dents and wear add charm so prioritize cabinets with original hardware and visible patina. These imperfections tell a story and add value to the final piece.
Collect Multiple for Projects
Some restorers gather three or more units to pick the best parts for a single project. Extra drawers or legs can be used in other DIY projects later.
Consider Resale Value
Fully restored cabinets especially in high-demand styles like blue desks sell well at antique malls. A well-executed transformation can turn a cheap find into a profitable sale.
Maintain Your Repurposed Piece
Ensure your cabinet stays beautiful for years by following simple maintenance routines and protection strategies. Proper care preserves both the wood and metal components.
Protect High-Use Surfaces
Use polyurethane on tabletops or kitchen islands since it is more durable than wax in wet areas. This top coat prevents scratches and water rings from damaging your work.
Care for Wood and Metal
- Dust regularly with a soft cloth to prevent buildup
- Reapply wax every 6 to 12 months to maintain the finish
- Check iron hardware for rust and touch up with clear sealant if needed
Avoid Direct Sunlight
Prolonged UV exposure can fade paint and dry out wood over time. Place your cabinet in shaded or indirect light areas to preserve the color.
Frequently Asked Questions About Old Sewing Machine Cabinets
Can I remove the treadle mechanism completely?
Yes you can remove the treadle to create more legroom or storage space underneath. Many people remove it for desk conversions but keep it for display tables to honor history.
What type of paint works best on vintage wood cabinets?
Oil-based primer followed by latex or chalk paint works best for durability on old wood. Always sand and clean the surface thoroughly before applying any paint layers.
How do I clean cast iron parts without damaging patina?
Use a soft cloth and mild soap water to clean cast iron avoiding harsh abrasives. Apply a light coat of clear sealant or wax to protect the natural gold tones.
Are old sewing machine cabinets valuable before restoration?
Value depends on condition brand and model with Singer treadle cabinets often commanding higher prices. Intact mechanical parts and original hardware increase the initial worth significantly.
Can I use the cabinet outdoors on a patio?
It is not recommended to use these cabinets outdoors as wood and iron will rust or rot quickly. Keep them indoors or in covered porches to maintain structural integrity.
Key Takeaways for Your Old Sewing Machine Cabinet Ideas Project
Transforming a vintage cabinet into functional furniture blends historical preservation with modern utility effectively. Whether you choose a kitchen island desk or side table the result adds unique character to your home.
Start by inspecting your cabinet for structural soundness and selecting a design style that matches your decor. With proper cleaning painting and creative modifications your old sewing machine cabinet ideas will become a reality.